


 Tiếng Việt
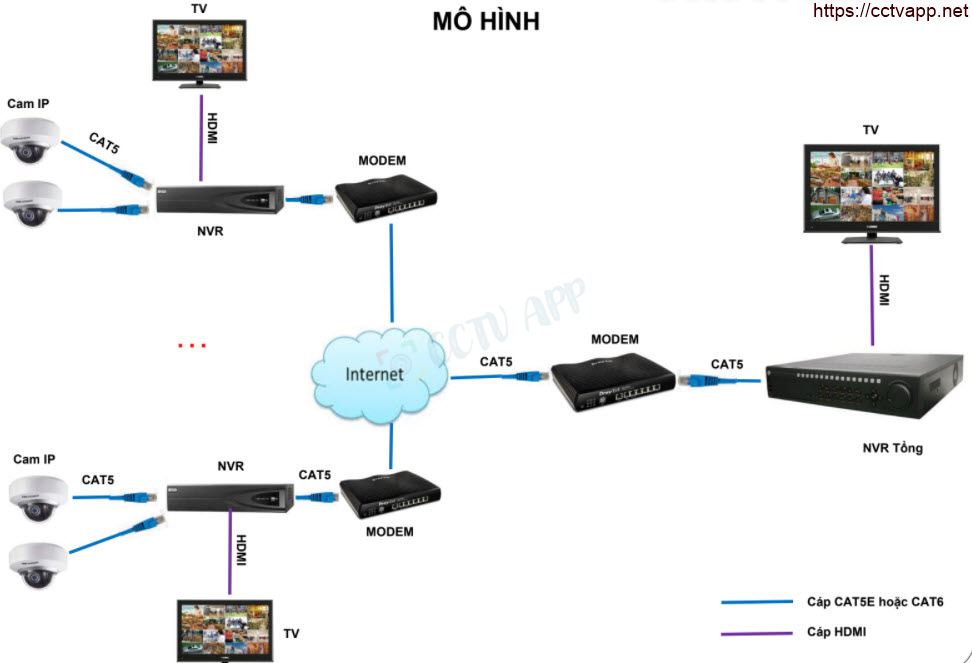
Instead of using NAS/Sever for storage to meet the needs of centralized management and data security, HIKVISION ; has given users a more cost-effective option, which is the method of “assigning the recorder to the recorder”.
In this article, I will guide users how to do this. to be able to assign the NVR to the NVR and operate in the most stable way.
Note: This method only supports No-IP, Dyn or CameraDDNS, IP WAN domains and currently does not support Hik-Connect Domain.
I. Configure NVR at branches
NVRs at branches are NVRs that will be assigned to NVRs at the center.
For these devices, if they already have a static WAN IP address, users only need to open the forwarding port (NAT port). ). If a static WAN IP address is not available, users need to set up a No-IP, Dyn or CameraDDNS domain name and open port forwarding.
II. Configure NVR at the management center
At the central NVR, we need to configure the following steps to be able to assign NVR at branches:
1. Create Custom Protocol
In the custom protocol management interface, users do the following:
Configuration > System > ; Camera Managerment > Custom Protocol
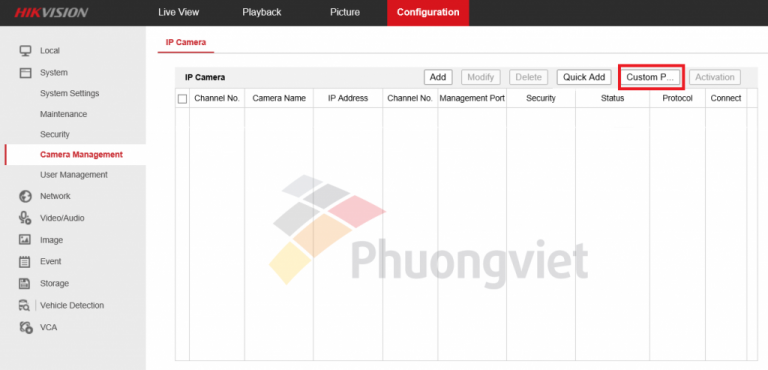
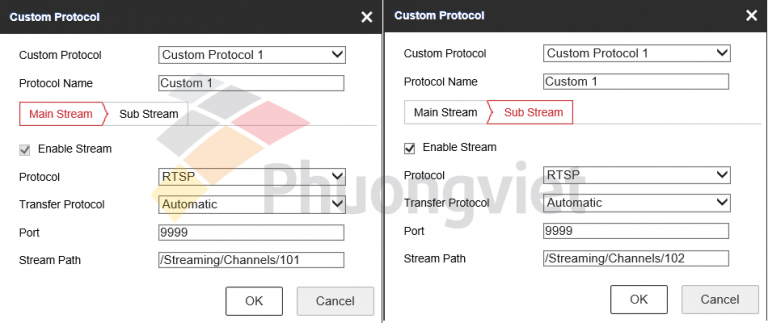
Accordingly, we configure in the table Custom Protocol as follows:
Custom Protocol : select custom protocol, HIKVISION recorder supports up to 16 custom protocols.
Protocol Name : Name custom protocol (set) optional)
Protocol : Select RTSP
Transfer Protocol: Automatic
Port : RTSP Gateway at branch
- The rule for entering the video stream resolution path is as follows:
| CHANNEL NUMBER | CHANNEL LINE TYPE | stream resolution path |
|---|---|---|
| Channel 1 | Main Stream | /Streaming/Channels/101 |
| Sub Stream | /Streaming/Channels/102 | |
| Channel 2 | Main Stream | /Streaming/Channels/ 201 |
| Sub Stream | /Streaming/Channels/202 | |
| Channel 3 | Main Stream | /Streaming/Channels/301 |
| Sub Stream | /Streaming/Channels/302 | |
| ……. | …….. | ……….. |
| Channel n | Main Stream | /Streaming/Channels/n01 |
| Sub Stream | /Streaming/Channels/n02 |
2. Assign NVR
After the configuration is complete Custom Protocol > Add
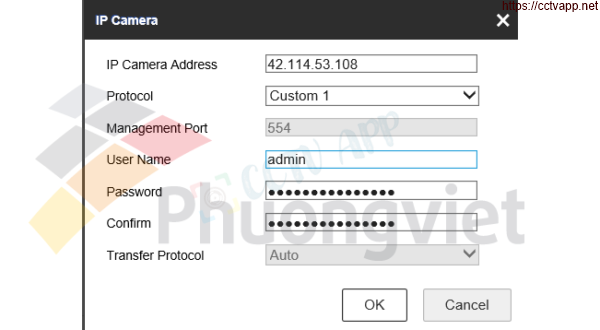
Ip Camera Address : Enter the address of the branch NVR (WAN IP, NO-IP domain, Dyn, CameraDDNS)
Protocol ; : Select a custom protocol create in step 1)
User Name : Admin
Password &nbs : Branch NVR Password
Confirm ; : Confirm password
Select OK to confirm and save.
Note: NVR Hikvision only supports up to 16 custom protocols, each of which corresponds to 1 camera channel of the camera. NVR to assign (NVR at branch). That is, users can only assign a maximum of 16 camera channels of each NVR at the branch to the center.
Therefore, users only need to change the IP address/domain name of this NVR to assign the second branch NVR after assigning the first branch NVR.
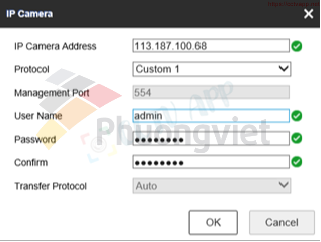
3. Check status
Check Status, if the status shows Online the user assigned successfully.
Note:
- For the remaining channels, users do the same as above.
- In some cases, after assigning, the Status item may not be displayed. Online marketing now => Users need to wait a few minutes for the system to update.
- When watching live (via iVMS4200/4500 or web browser), when the video stream starts to load, channels are assigned from the NVR to the NVR. delay may occur.
Good luck with your installation! Source: https://phuongviethcm.com/