


 Tiếng Việt
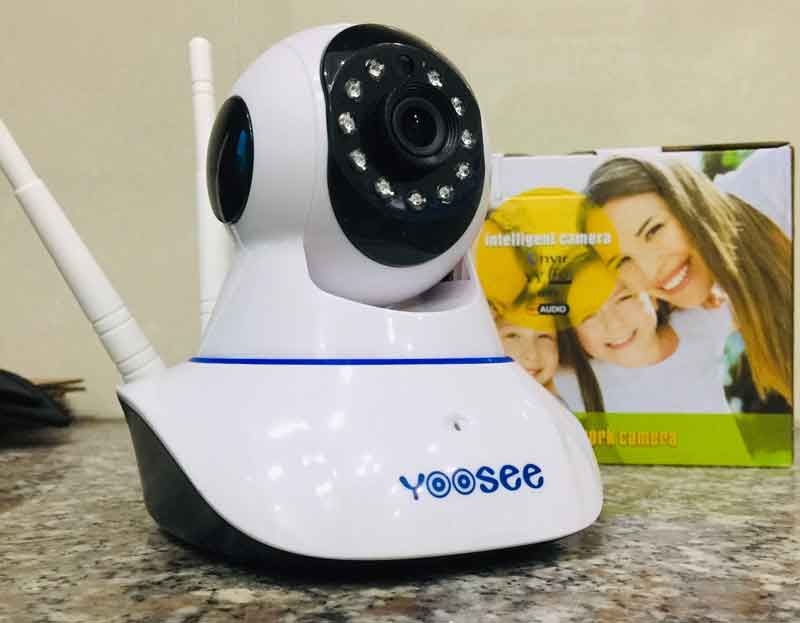
Hello everyone, in today’s article, I will guide you to install basic parameters on Yoosee Camera using software on your phone.
I. Setting parameters on Camera Yoosee
Getting used to the settings in Camera Yoosee.
In picture #1 you will see the installation locations :
- Quickly toggle the motion alert mode
- Share the camera to another phone
- Review the recorded video on the memory card or on the Cloud (This item data is only available when you have inserted a memory card )
- Setting changes inside the camera
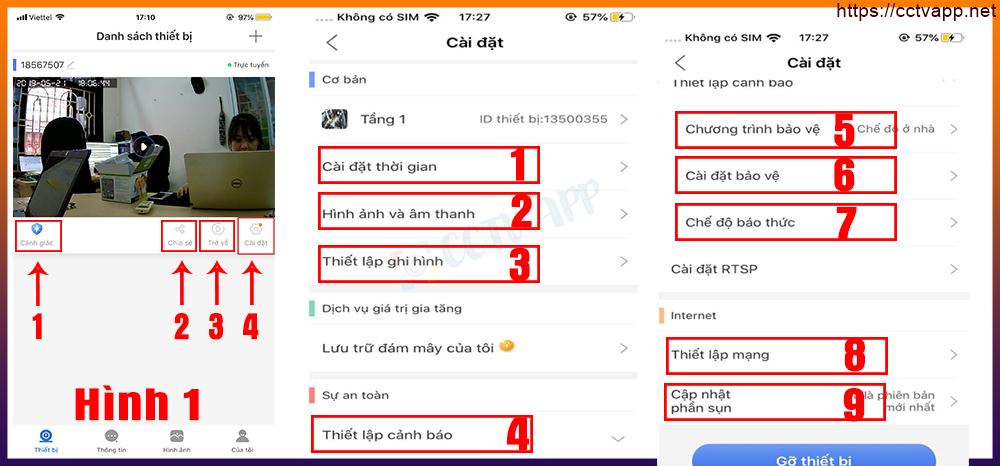
Inside settings Yoosee surveillance camera:
1. Time setting
- This is the section that helps you to adjust the time and time zone. Since the default is GMT+8 (China), it needs to be adjusted to GMT+7 (Vietnam).
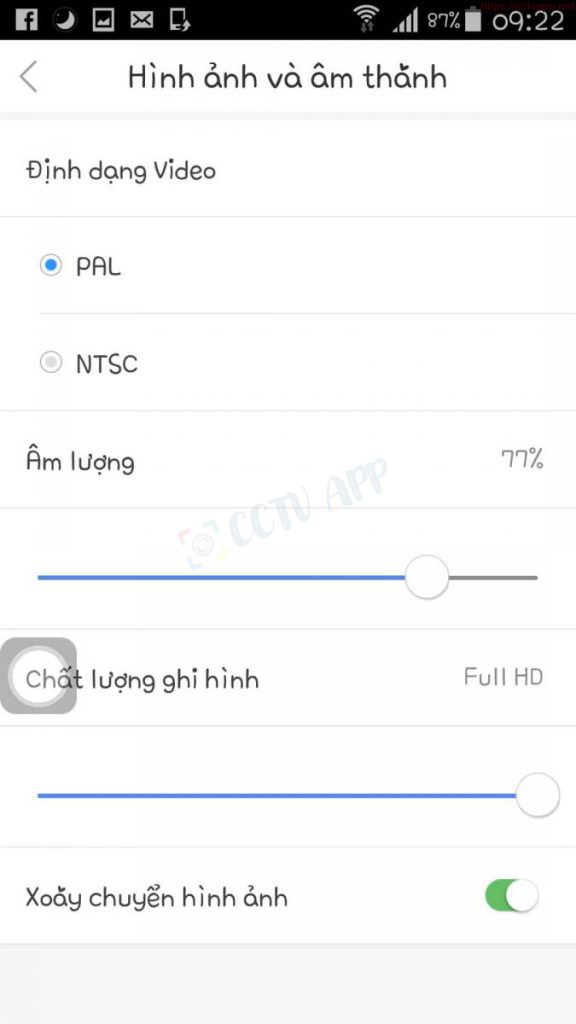
2. Pictures and sounds
In this section there will be sections including video format, video volume and resolution, and screen rotation for different needs. Some points to note when installing in this section:
- For video format, the default is PAL
- For volume, this is a loud or low speaker option.
- Recording resolution on camera depends on demand, when inserting 32GB card with HD720 recording mode can store about 7-8 days, Full HD1080 mode with 32GB card will store about 3-4 days.
3. Recording Settings
This section will include 3 parts :
- Manual recording: Continuous recording all day
- Recording warning: Recording only when the camera alarms
- Recording timer: Recording within a preset time.
4. Set up alarms on Yoosee camera
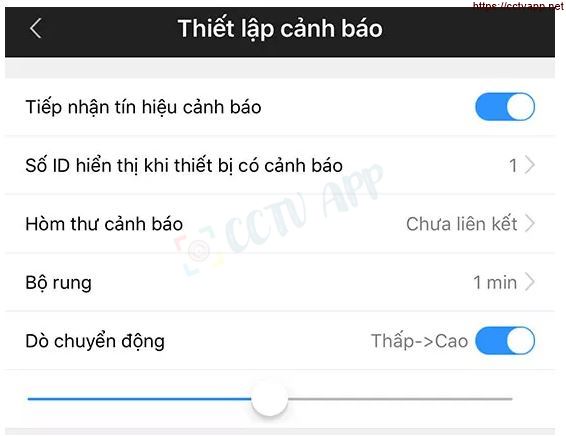
This is a pretty important function on the Camera, because in order to turn on the motion alert feature, it must be set up in this section .
- Receive Alerts: Allows the camera to send you notifications and images when it detects unusual motion to your phone, if you don’t want to receive alerts. alarms can be turned off .
- ID displayed when the device has an alarm: Leave no setting required by default .
- Box warning message: If you link email (including email , gmail… ) in, when there is a motion alert the software will automatically send you an email .
- Motion detection: Set the sensitivity of the sensor. Sensor. In this section, usually just leave it at the normal level, the camera will work most stably .
5 – 6. Yoosee Camera protection and settings
This section will have a number of protection programs, each of which comes pre-installed with some features such as:
- How to report motion in FullHD or HD720 recording mode.
- This part is not important, so when you install it you don’t need to care about it, it may be removed because most of the built-in features before is not suitable or not according to your needs.
7. Alarm settings
This is the setting mode for the motion warning features.
Select the item Recording Settings in Settings – In the Recording Settings section, we can check the free space on the memory card + If the memory card is inserted, the configuration says Settings The device has not inserted a memory card there will be 2 cases:
- Due to a memory card failure
- Due to a camera failure, the memory card cannot be recognized
If you encounter this error, please send it back to the seller for warranty.
If you want to play back the video on the camera, you need to insert a memory card and select to enable Manual recording mode + The video will be recorded and saved to the memory card. After 30 minutes, the file will be exported once.
II. Review Recorded Video
I show you how to manipulate to review videos saved on memory, with Yoosee camera when the software has been updated.
First to play back the recorded video, you need to set up recording in the settings. There are 3 modes:
- Manual Recording: The software will automatically record all day and every 30 minutes will output 1 file.
- Recording Warning : Only record when there is an alarm (to use this feature, you need to turn on the alarm mode). Video recording time 1-3 minutes for each alarm
- Recording timer: Recording only at the selected time slot.
Go to Settings => Select Recording Settings => Select Manual Recording so cam can store all day without any additional settings.
Note: On Android phones, the operation will be a little different: Due to the addition of cloud storage, in the “Back” section ” will have an entry Self-recorded content.
III. Alert Settings
Select Alert Settings
Turn on the features in the Alert Settings section one by one. In this step, the user will perform the following operations in turn:
- First turn on “Motion detection”
- Next turn on “Receive warning signals”
- If you turn on “Vibrator”: The camera will make a sound when motion is detected.
- If closed < strong>“Vibrator”: Camera won’t beep
- Enable “Subject Tracking”: Camera will follow moving subject ;(only for camera that can record).
- Go back to home screen and enable alerts
That’s all the steps to turn on the alarm feature on Yoosee Surveillance Camera.
IV. Share camera viewing permission for other mobile devices
To share a cam with another device, the shared device must have the Yoosee app and account first.
Then the sharing device just needs to click on the share on the screen, there will be 2 ways to do the sharing:
- Option 1 : Share via social networks There will be a link to the screen for the recipient to access, you Just copy the link and send it as a message to any device you want to share. The receiving device only needs to click on the link and follow the instructions to view it.
- Option 2: Share online: Select Share online + Scan the provided QR code, The receiving device will act as shown below: + Go to the main screen + Select Scan Then let the shared device scan the QR code The other code is already able to access the camera to see. The camera can be shared to many other devices at the same time.
Note:
- When connecting the Camera to WiFi, do not open/turn on 3G/4G mobile data to avoid affecting the connection process.
- Camera only connects to WiFi band. 2.4G frequency
Good luck with your installation!