


 Tiếng Việt
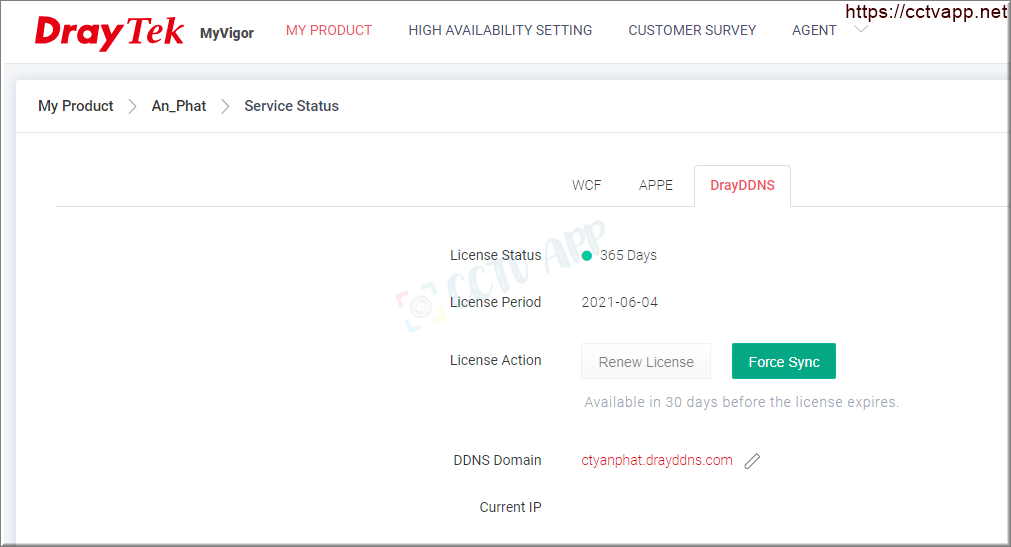
Currently, businesses often use VPN solutions to connect offices together. VPN not only reduces costs (Instead of renting a private channel) but also helps increase data security for businesses. Draytek always researches and markets integrated VPN products with high security protocols such as IPSEC (Internet Protocol Security), SSL (Secure Socket Layer).
In this article will guide you how to configure SSL VPN to spread with Draytek device and analyze its advantages and disadvantages so that you have the best choice for your business.
(Applies to DrayTek Vigor2912 / 2915 / 2133n / 2925 / 2926 / 2952 / 3220 / 3910 models using DrayOS)
I. Advantages of SSL VPN
1. Advantages of SSL VPN
- Easily bypass the firewall: Due to using only 1 TCP/443 port to create VPN Tunnle. TCP/443 is a common port that is always allowed to pass through by firewalls.
- Regardless of the NAT Device’s PassThrough VPN capability (The case is behind the NAT Device)
- Suitable when creating a LAN-to-LAN VPN between 3G and ADSL/FTTH (3G is the network behind an ISP’s NAT device, so if you use PPTP or IPsec it will be difficult)
- High security due to using SSL 3.0 standard
- High VPN bandwidth (Depending on model, ranging from 50 ~ 500Mbps)
- Supports both Host-to-LAN and LAN-to-LAN
2. Cons
- SSL VPN LAN-to-LAN only supports DrayTek -to-DrayTek
- Only support on Draytek products, cannot use other brand devices.< /li>

II. Installation Instructions
| Initial information | WAN IP | LAN Layer |
| Vigor2960 | 113.172.144.133 | 192.168.10.1/24 (255.255.255.0) |
| Vigor2925 | 113.172.175.127< /td> | 192.168.20.1/24 (255.255.255.0) |
1. Prepare
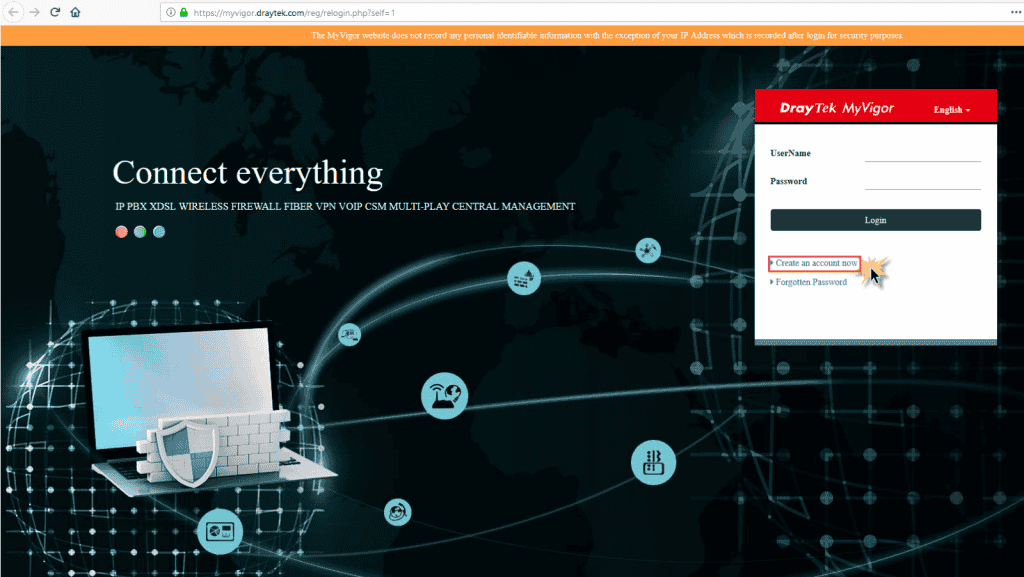
– Register and use DrayDDNS dynamic domain name service: Direction register and use domain name DrayDDNS – CCTV Application System (cctvapp.net)
2. Configuration Guide
- With VPN LAN-to-LAN, there will be one device as Dial-out and 1 device as Dial-in
- Device with Public IP (Static or Dynamic) is recommended do Dial-in. Device behind NAT device as Dial-out
- Instructions below are divided into 2 cases:
TH1: V2925 (out) — V2960 (in)
TH2: V2960 (out) — V2925 (in)
- If you use V2925 for both sites, configure V2925-1 as dial-out and V2925-2 as dial-in
A. Case 1: Vigor2925 (Dial-out) —- Vigor2960 (Dial-in)
******** Configuring Vigor2960 (Dial-in):
- Create User profile for VPN account:
- Go to User Management >>> User profile< /li>
- Username : Enter the user name
- Tick the checkbox Enable
- Password : Enter password for user
- SSL tunnel : Select Enable
- Select Apply

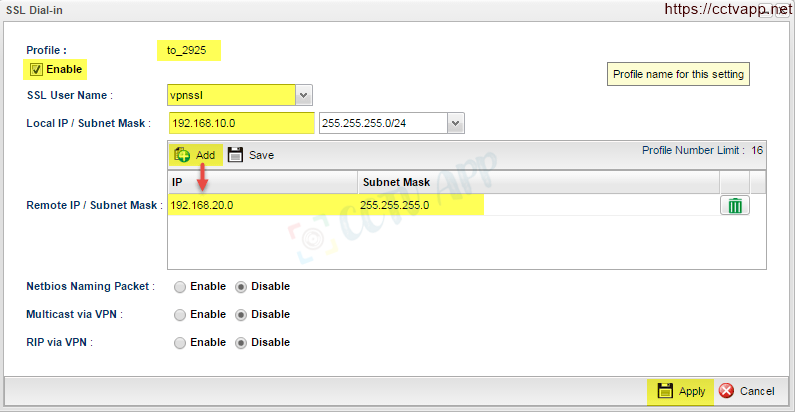
- Create Profile VPN:
- Go to VPN and Remote Access >>> VPN profile >>> tab SSL Dial_in >>> Click Add
- Profile : Name the vpn profile
- Tick Enable
- SSL User Name : Select User profile just created in the previous step
- Local IP/ Subnet Mask : Enter the IP and Subnet LAN of Vigor2960
- Remote IP/ Subnet Mask : Click button Add, enter IP and LAN Subnet of Vigor2925 >>> select Save
- Click Apply
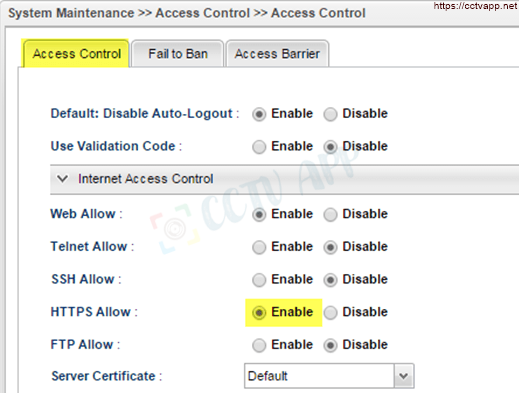
- Allow https for SSL VPN: Go to System Maintenance >>> Access Control >>> select Enable Https allow
******** Configuring Vigor2925 (Dial-out):
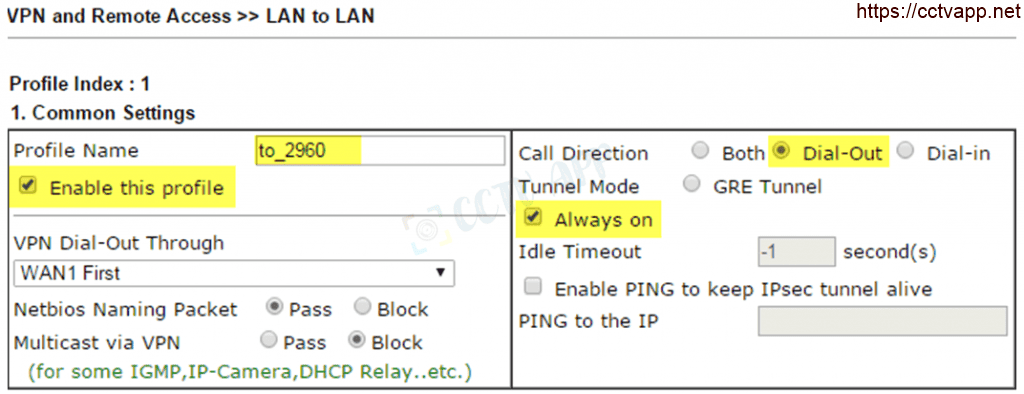
- Create VPN Profile:
- Go to VPN and Remote Access >>> Lan to lan
- Common Settings
- Profile name : Enter a name for the vpn profile
- Select Enable This Profile
- Call Direction : Select Dial out
- Select Always on
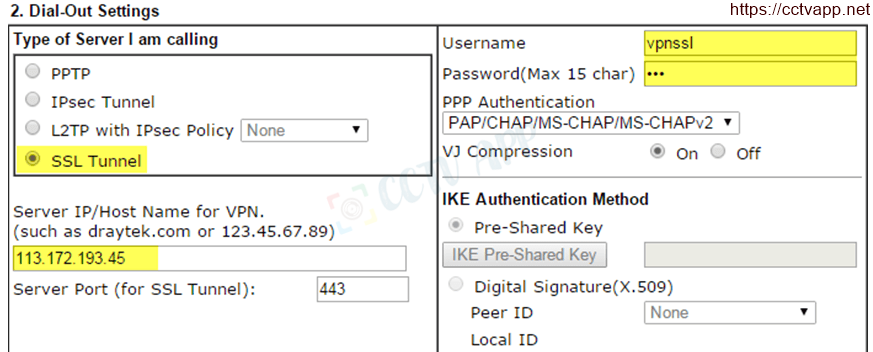
- Dial-out settings
- Select SSL Tunnel
- Server IP/Host Name for VPN ; : Enter IP Wan or Vigor2960 DDNS
- Username : Enter the Username created in Vigor2960
- Password : Enter the password created in Vigor2960
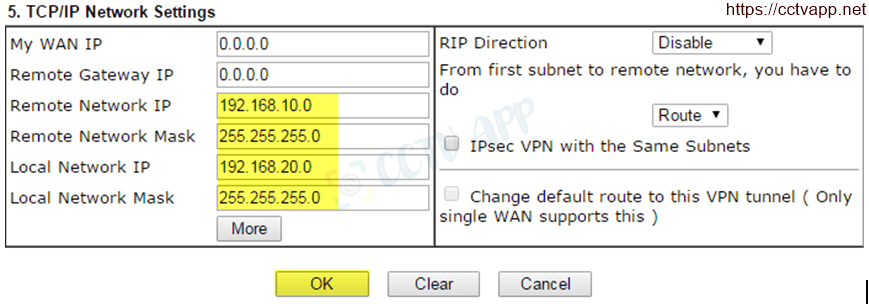
- TCP/IP Netword Settings
- Remote Network IP : Enter the IP of Vigor2960
- Remote Network Mask : Enter Vigor2960’s Subnet
- Local IP : Enter the IP of Vigor2925
- Local Network Mask : Enter Vigor2925’s Subnet
- Click Ok
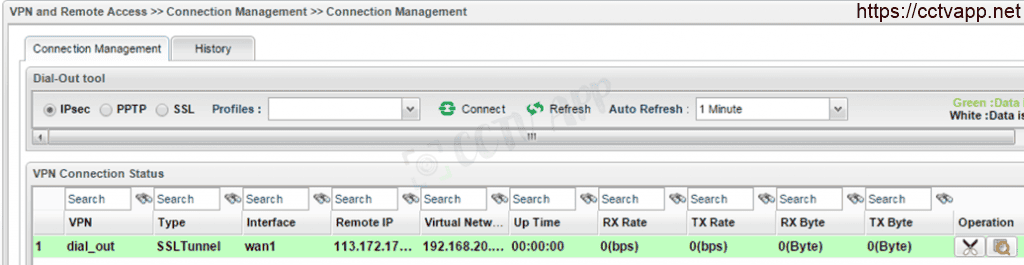
- Check Results
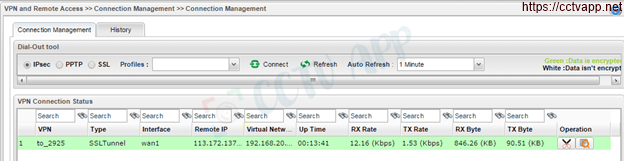
- On Vigor2925: Go to VPN and Remote Access >>> Connection Management
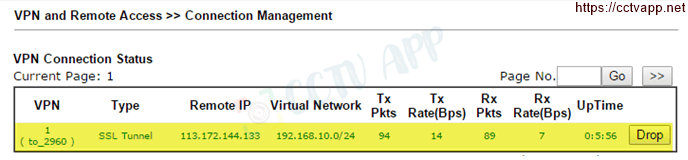
- On Vigor2960: Go to VPN and Remote Access >>> Connection Management
B. Case 2: Vigor2960 (Dial-out) —- Vigor2925 (Dial-in)
******** Configuring Vigor2925 (Dail-in):
- Configure VPN profile:
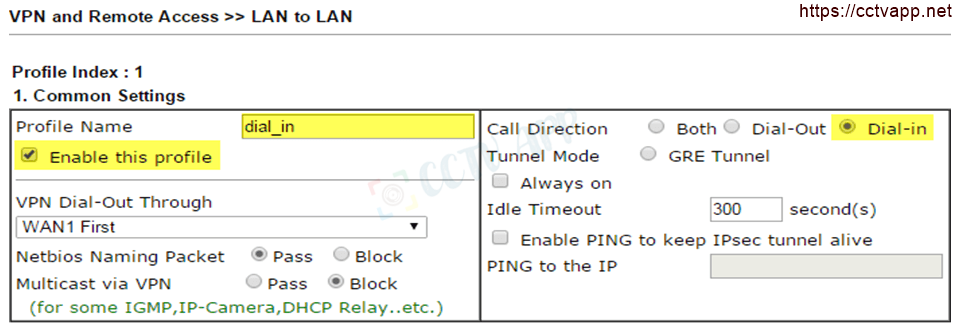
- Go to VPN and Remote Access >>> Lan To Lan
- Common Settings
- Profile name : Enter a name for the vpn profile
- Select Enable This Profile
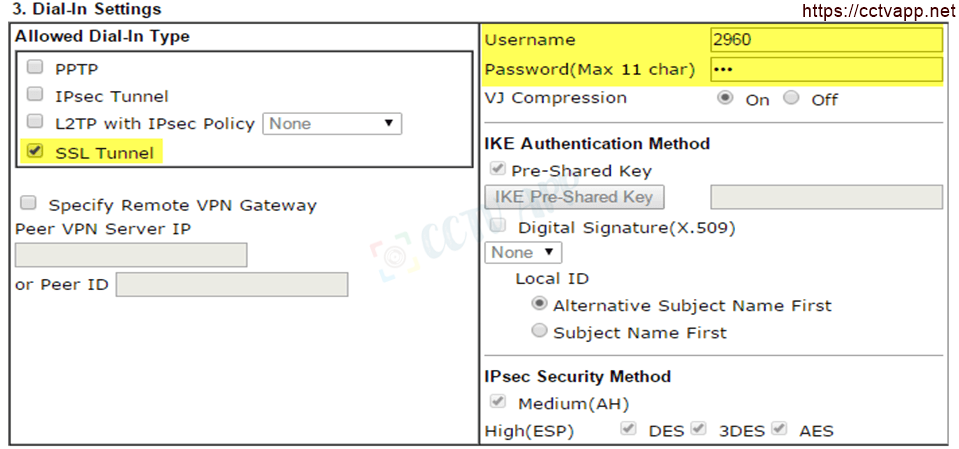
- Call Direction : Select Dial in
- Dial-in settings
- Select SSL tunnel
- Username : Create Username for Account SSL VPN
- Password : Enter Password for SSL VPN Account
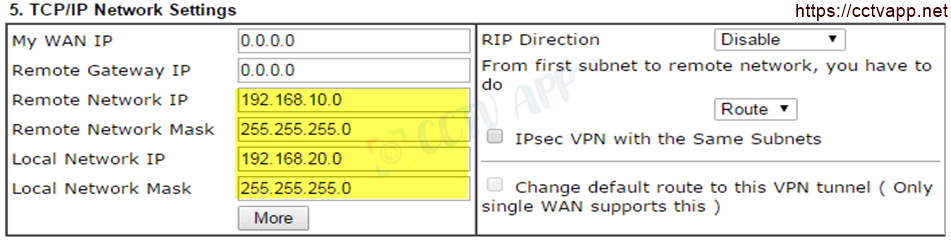
- CP/IP Netword Settings
- Remote Network IP : Enter the IP of Vigor2960
- Remote Network Mask : Enter Vigor2960’s Subnet
- Local IP : Enter the IP of Vigor2925
- Local Network Mask : Enter Vigor2925’s Subnet
- Press OK
******** Configuring Vigro2960 (Dial-out):
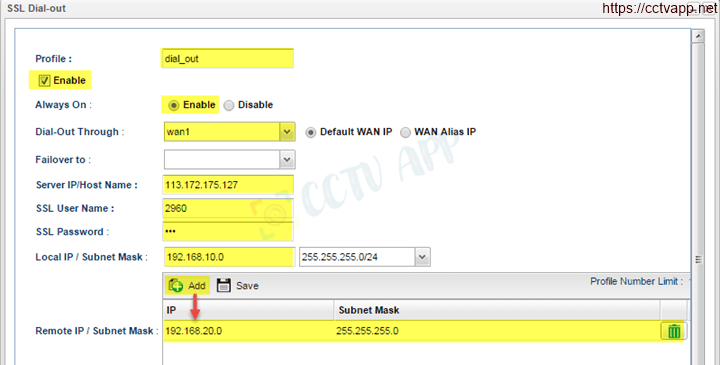
- Go to VPN and Remote Access >>> VPN profile >>> tab SSL Dial_in >>> Click button Add
- Profile : Name the vpn profile
- Select Enable
- Always on : Select Enable
- Dial_out through : Select Wan to connect to VPN (eg WAN 1)
- Server IP/Host name : Enter the IP and Subnet LAN of Vigor2925
- SSL User Name : Enter the Username SSL VPN created on Vigor2925
- SSL password : enter Username SSL VPN created on Vigor2925
- Local IP/ Subnet Mask : Enter the IP and Subnet LAN of Vigor2960
- Remote IP/ Subnet Mask : Click button Add, enter IP and LAN Subnet of Vigor2925 >>> select Save
- Click Apply
- Results
- On Vigor2925: Go to VPN and Remote Access >>> Connection Management
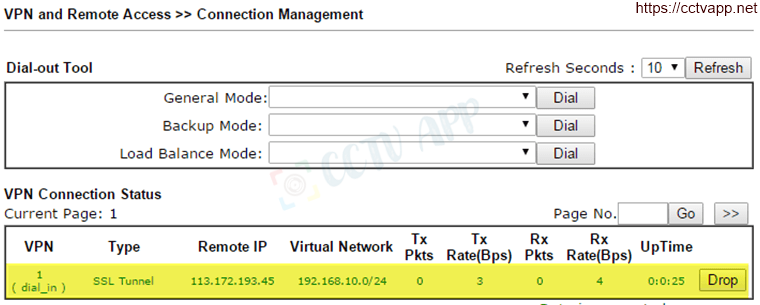
- On Vigor2960: Go to VPN and Remote Access>>> Connection Management
That’s it! Thank you for following the article!
References: https://anphat.vn/