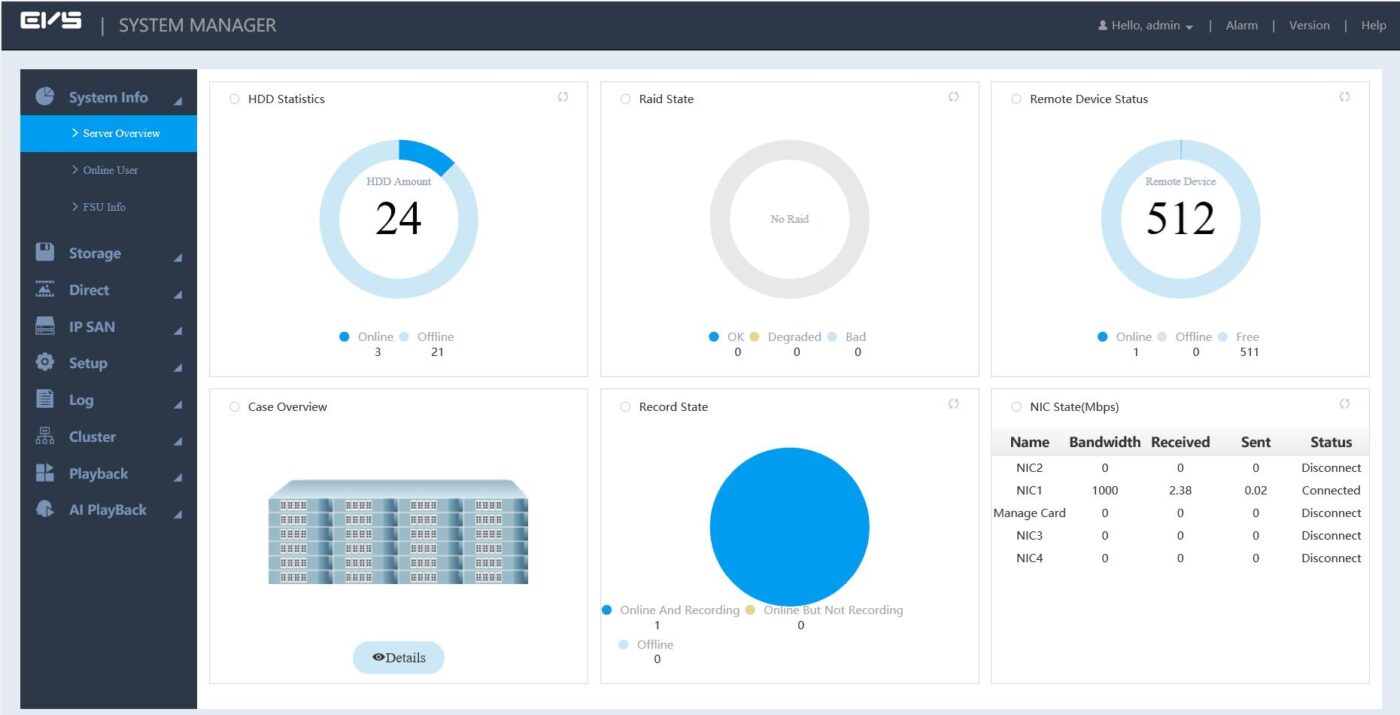
EVS (aka Storage server ) This is a specialized device used for large systems storing Video data. With the ability to connect up to 48 hard drives simultaneously and support diverse RAID technology, it will ensure your data is stored continuously and safely.
In today’s article, I will guide you on how to basically use the EVS storage device, instructions that apply to Dahua products:
- EVS5000, EVS5024S-R, EVS5036S-R, EVS7048S-R, EVS5136S
I. Initialization and basic installation
1. Initialize device
To initialize the device, first use the browser to access the default IP address of EVS, you will see the password initialization interface as below. Default IP address when plugged into LAN ports:
- LAN 1: http://192.168.1.108/
- LAN 2: http://192.168.2.108/
- LAN 3: http://192.168.3.108/
- LAN 4: http://192.168.4.108/
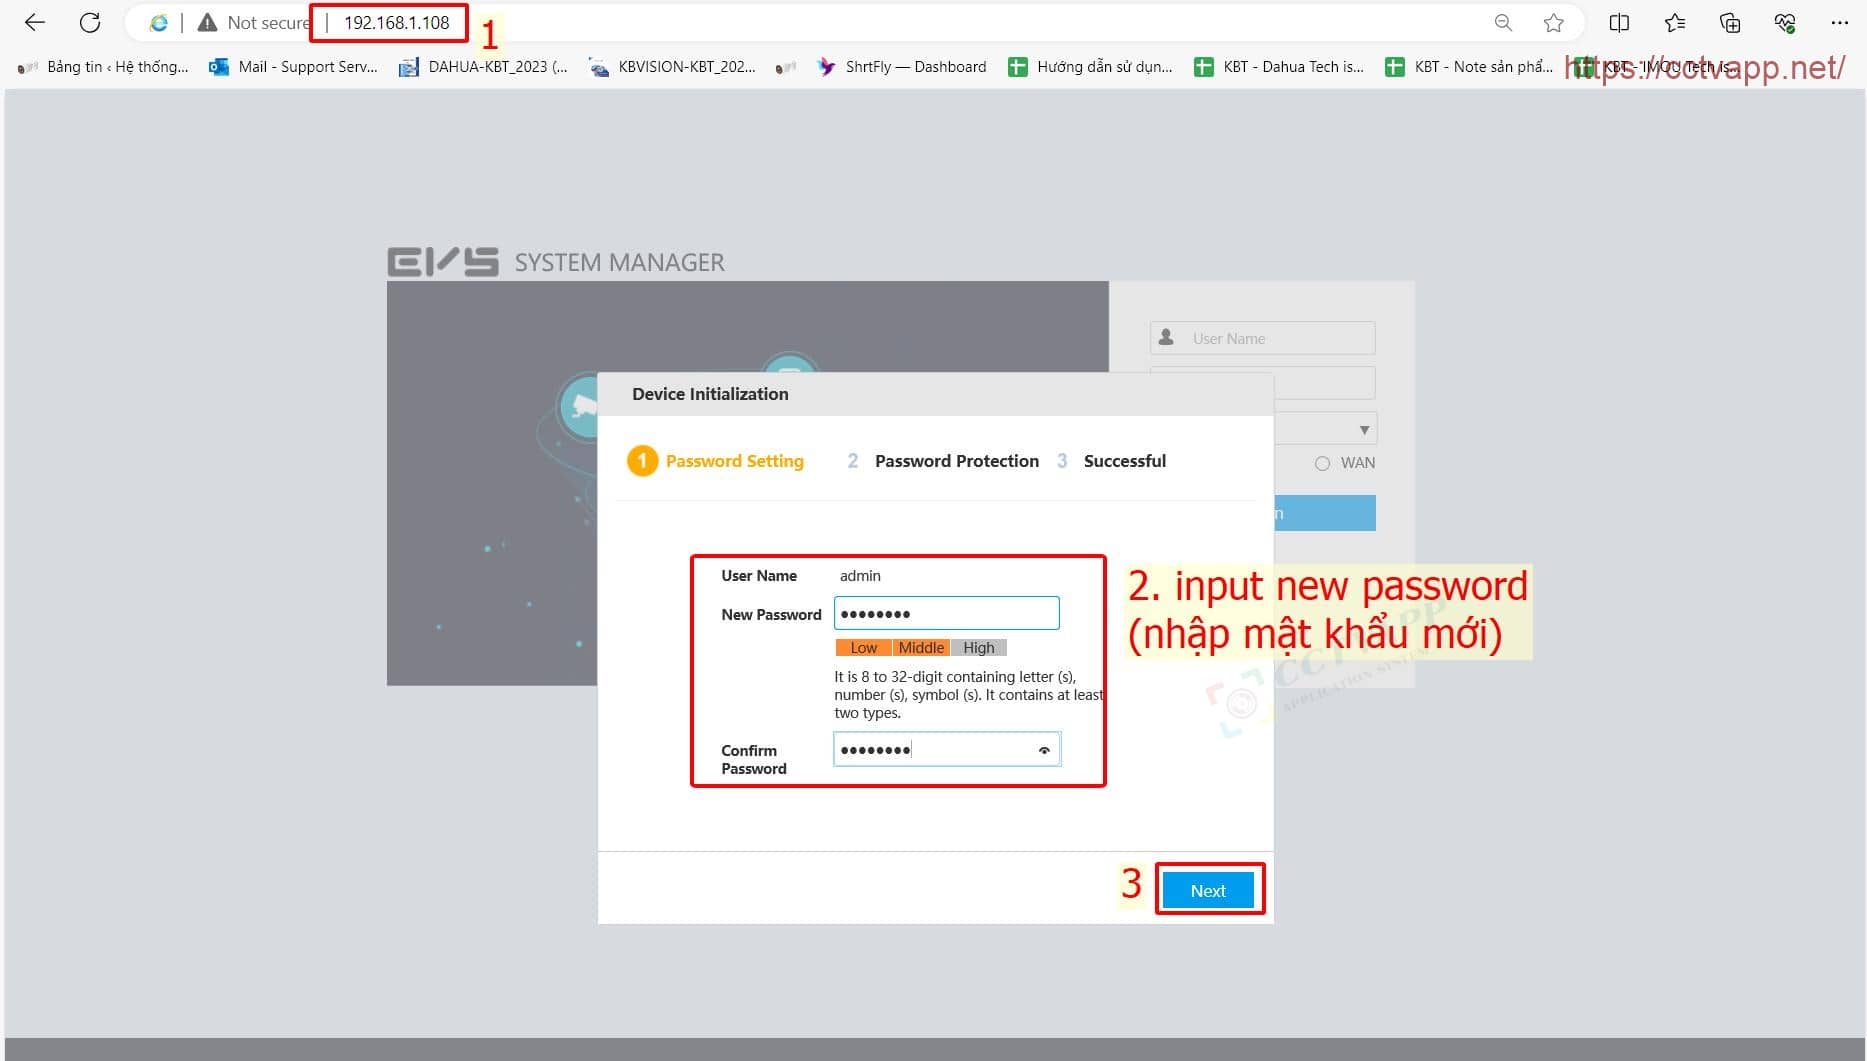
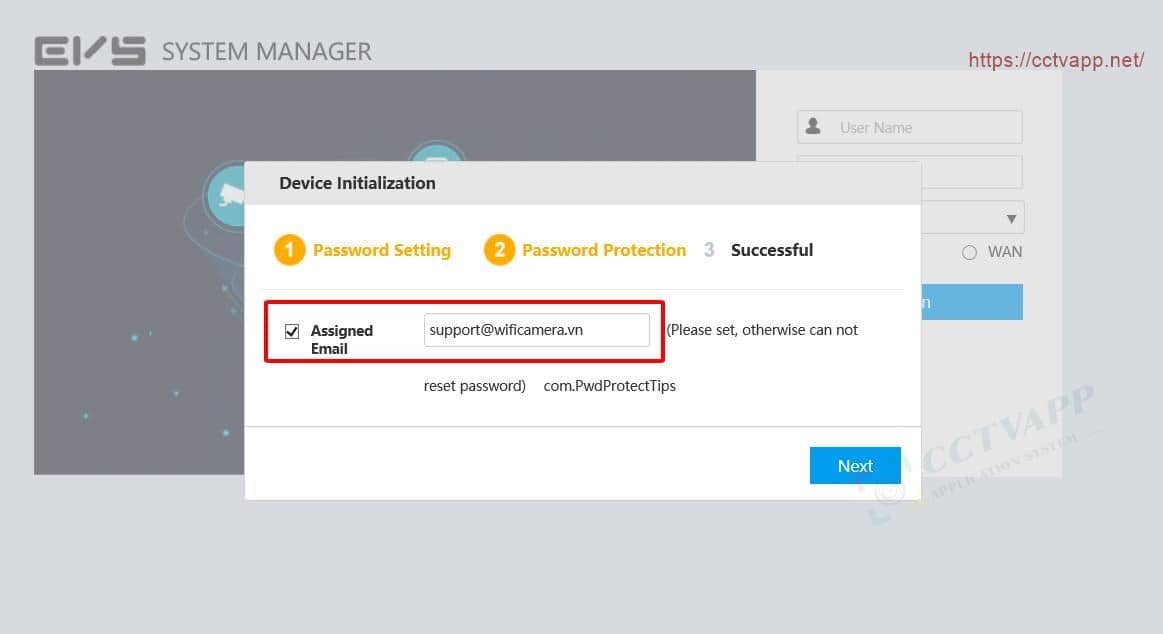
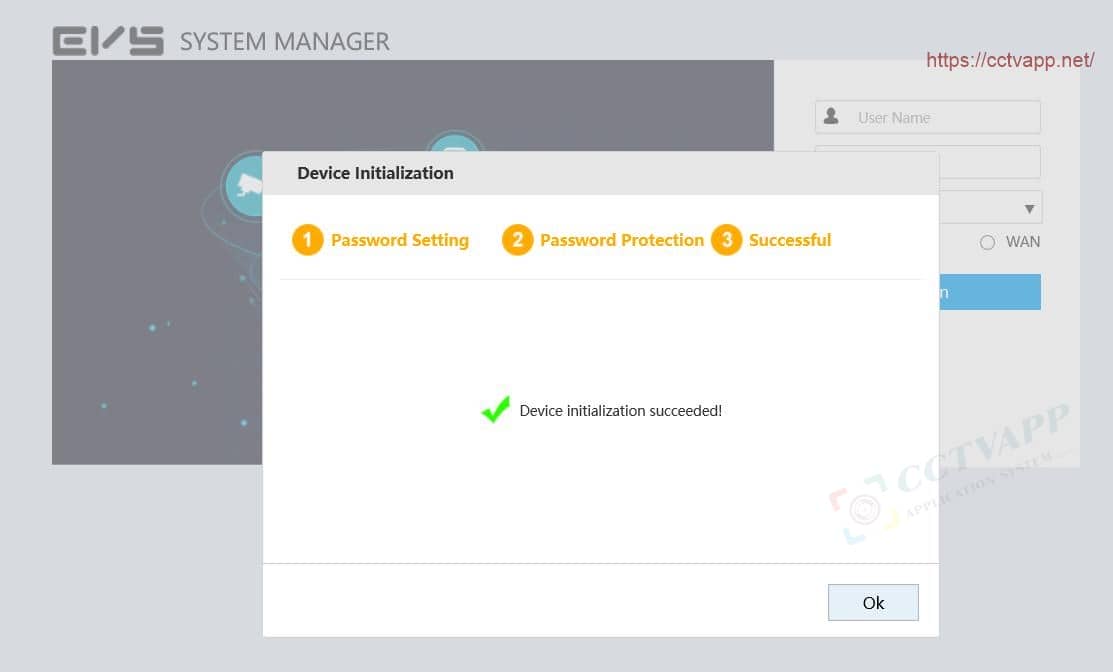
After setting up a password, enter your Email. This email is used to reset your password if you forget it. Please enter carefully and accurately, it is very important.
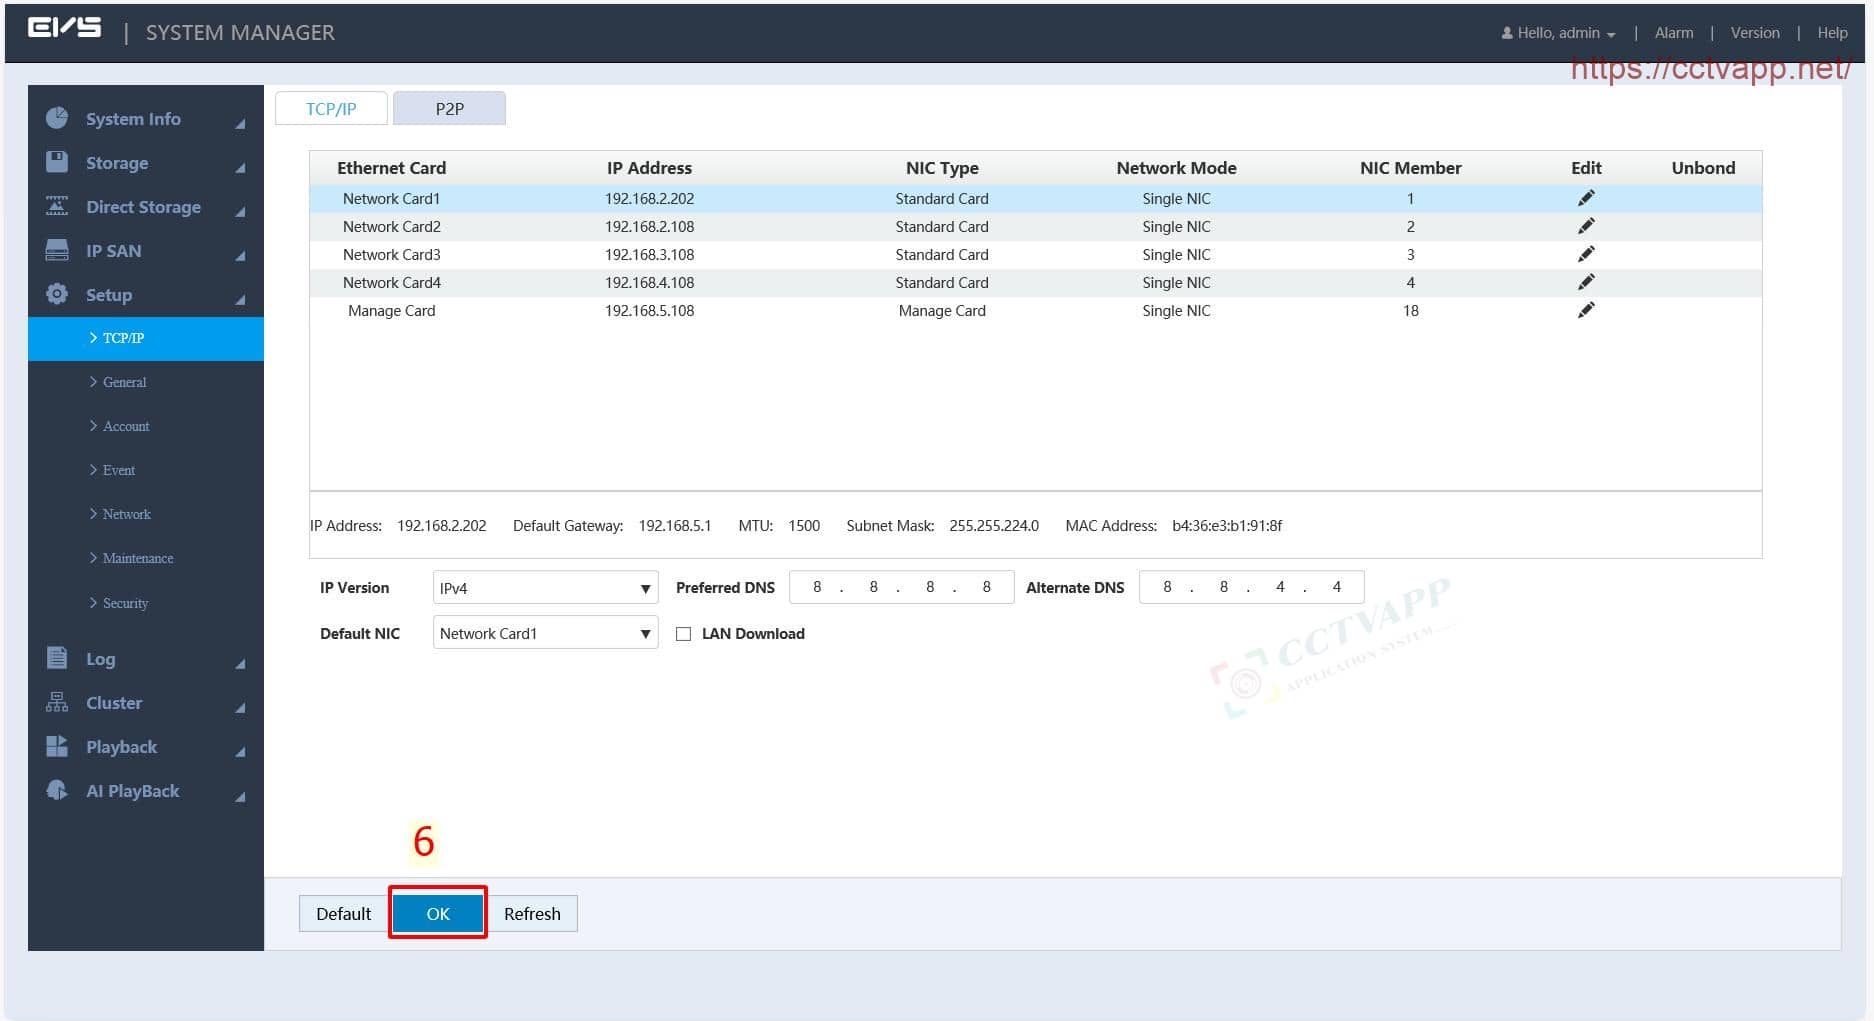
2. Change IP address for EVS
After initializing EVS, change the default IP address. This will help you avoid IP conflicts when installing new cameras and recorders into the system. Operation is as follows:
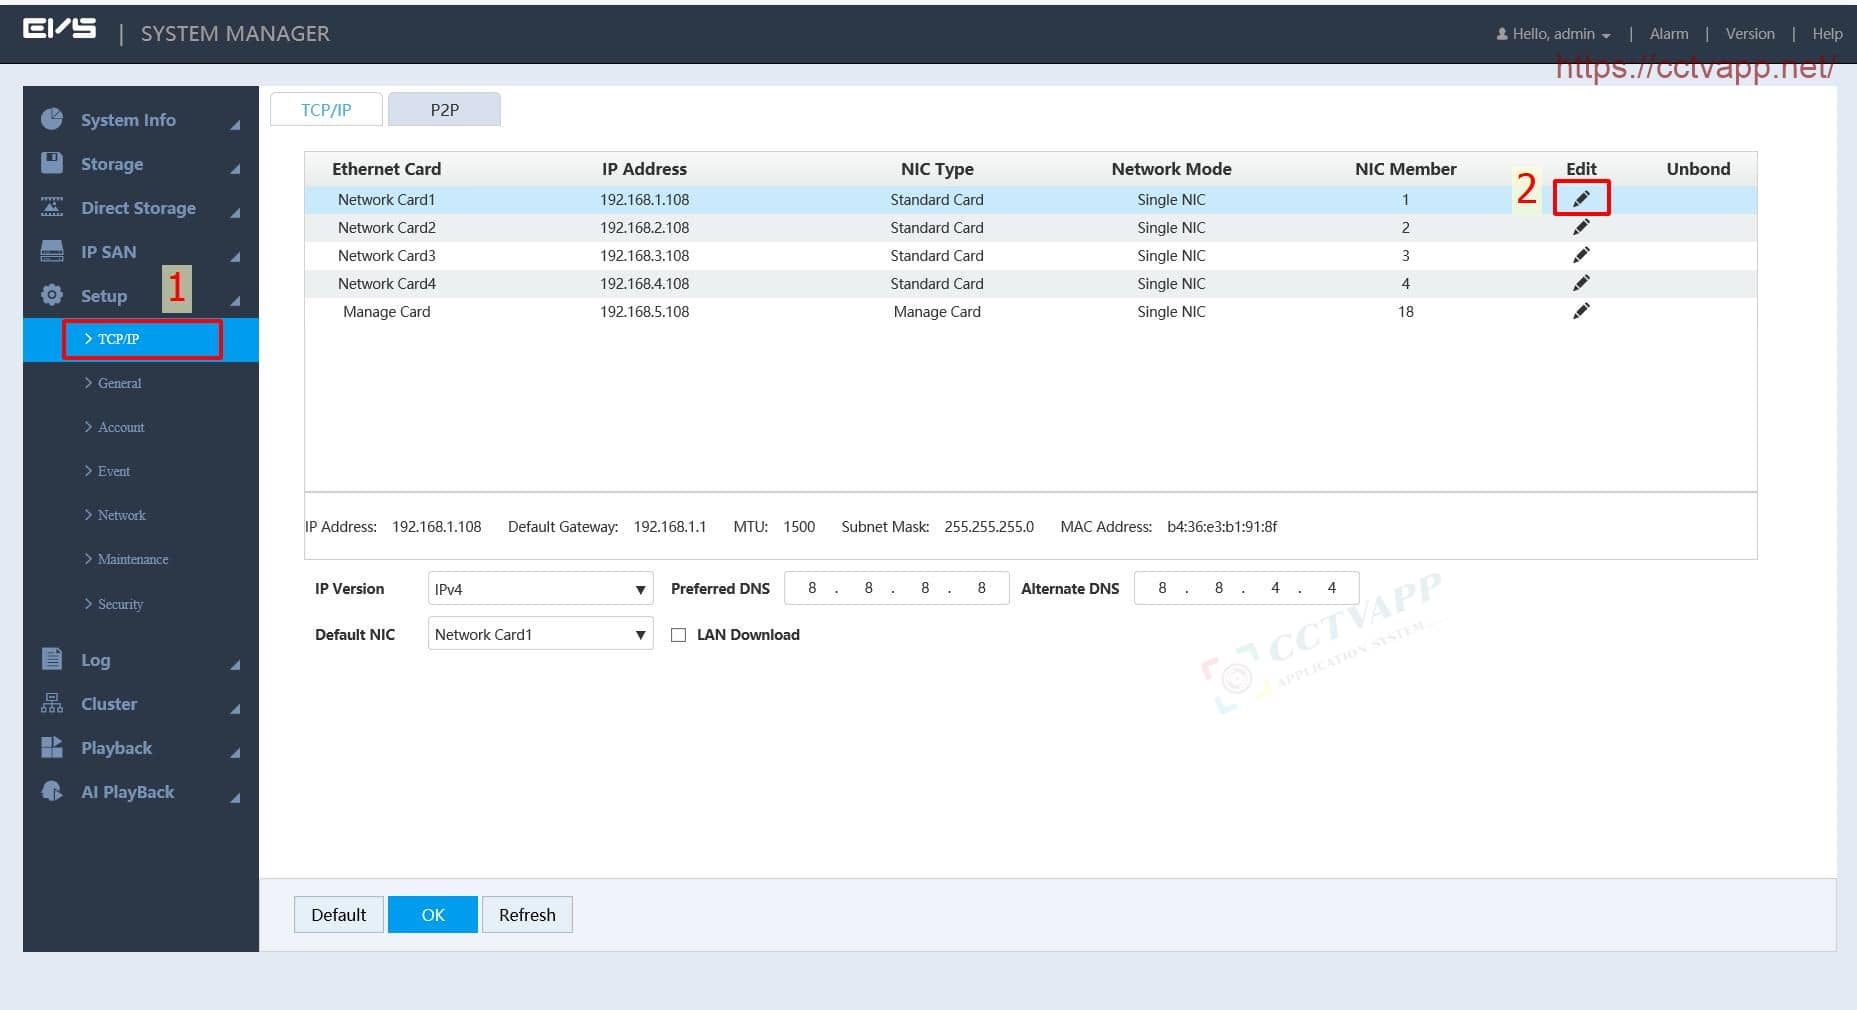
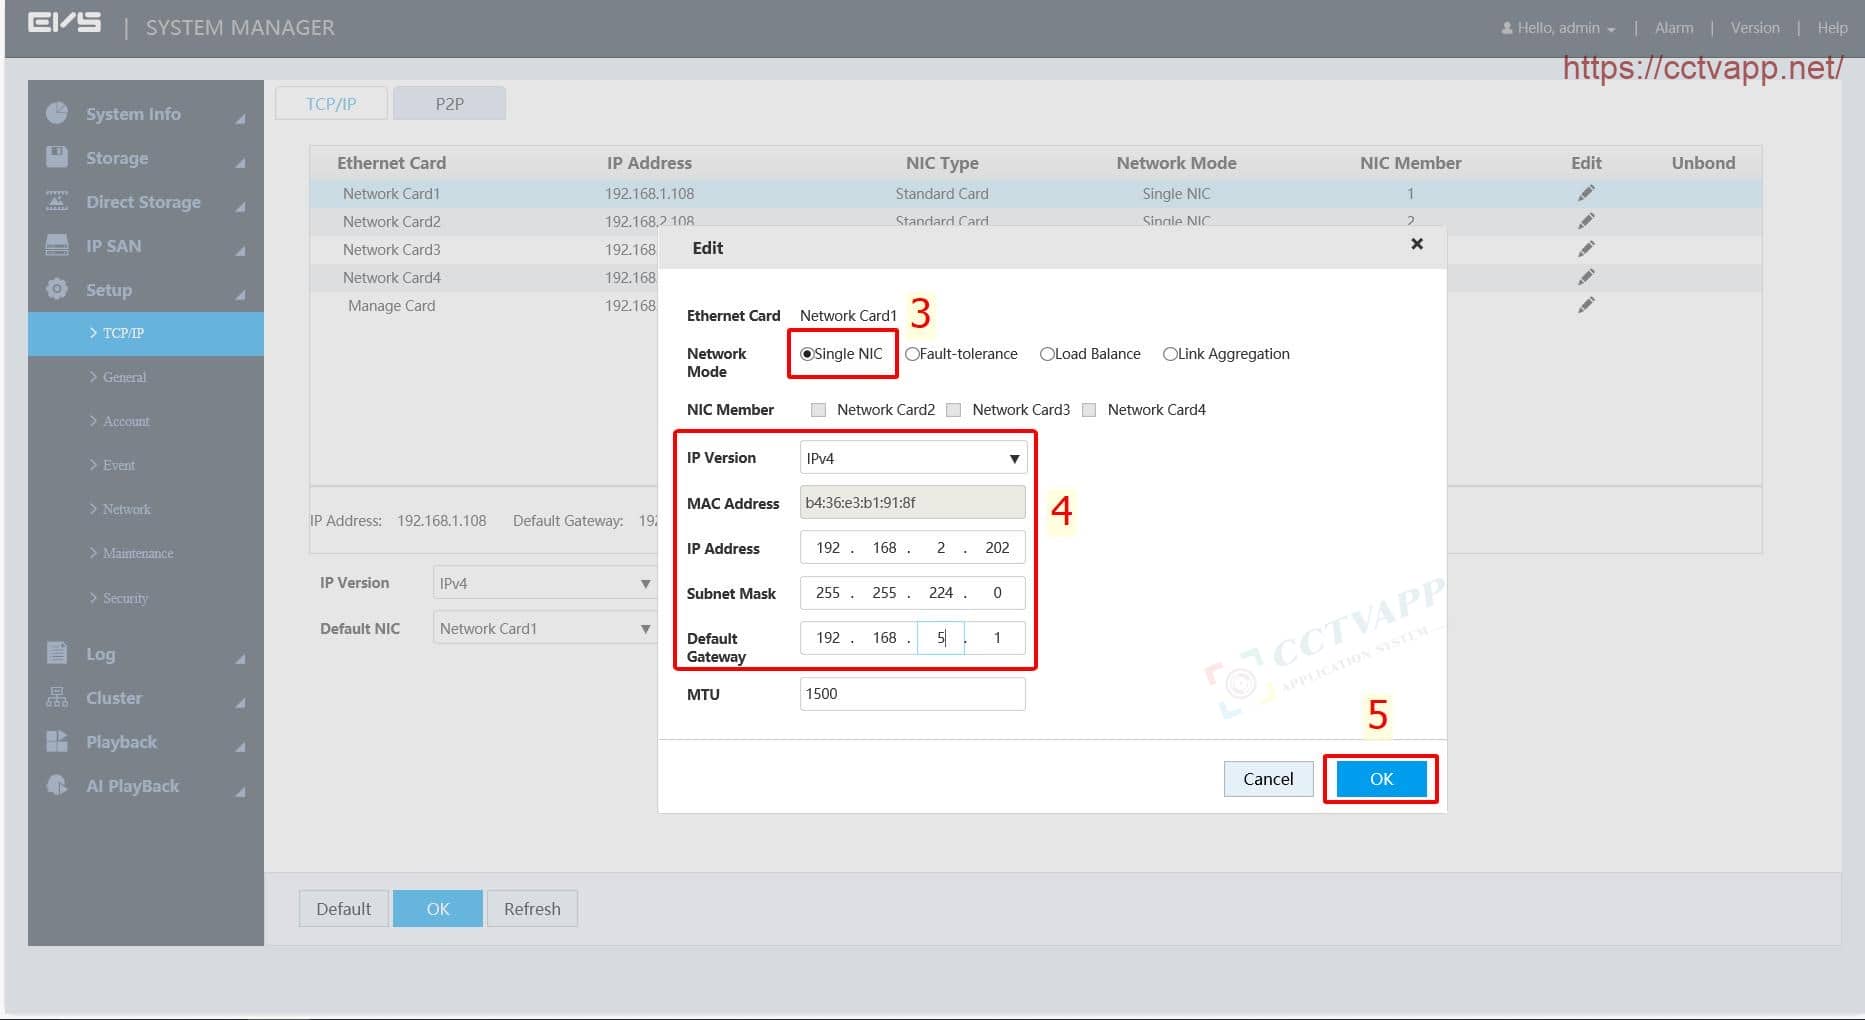
The EVS installation interface as shown in the picture currently does not support dynamic IP (DHCP), you can combine multiple network cards to use Load Balance
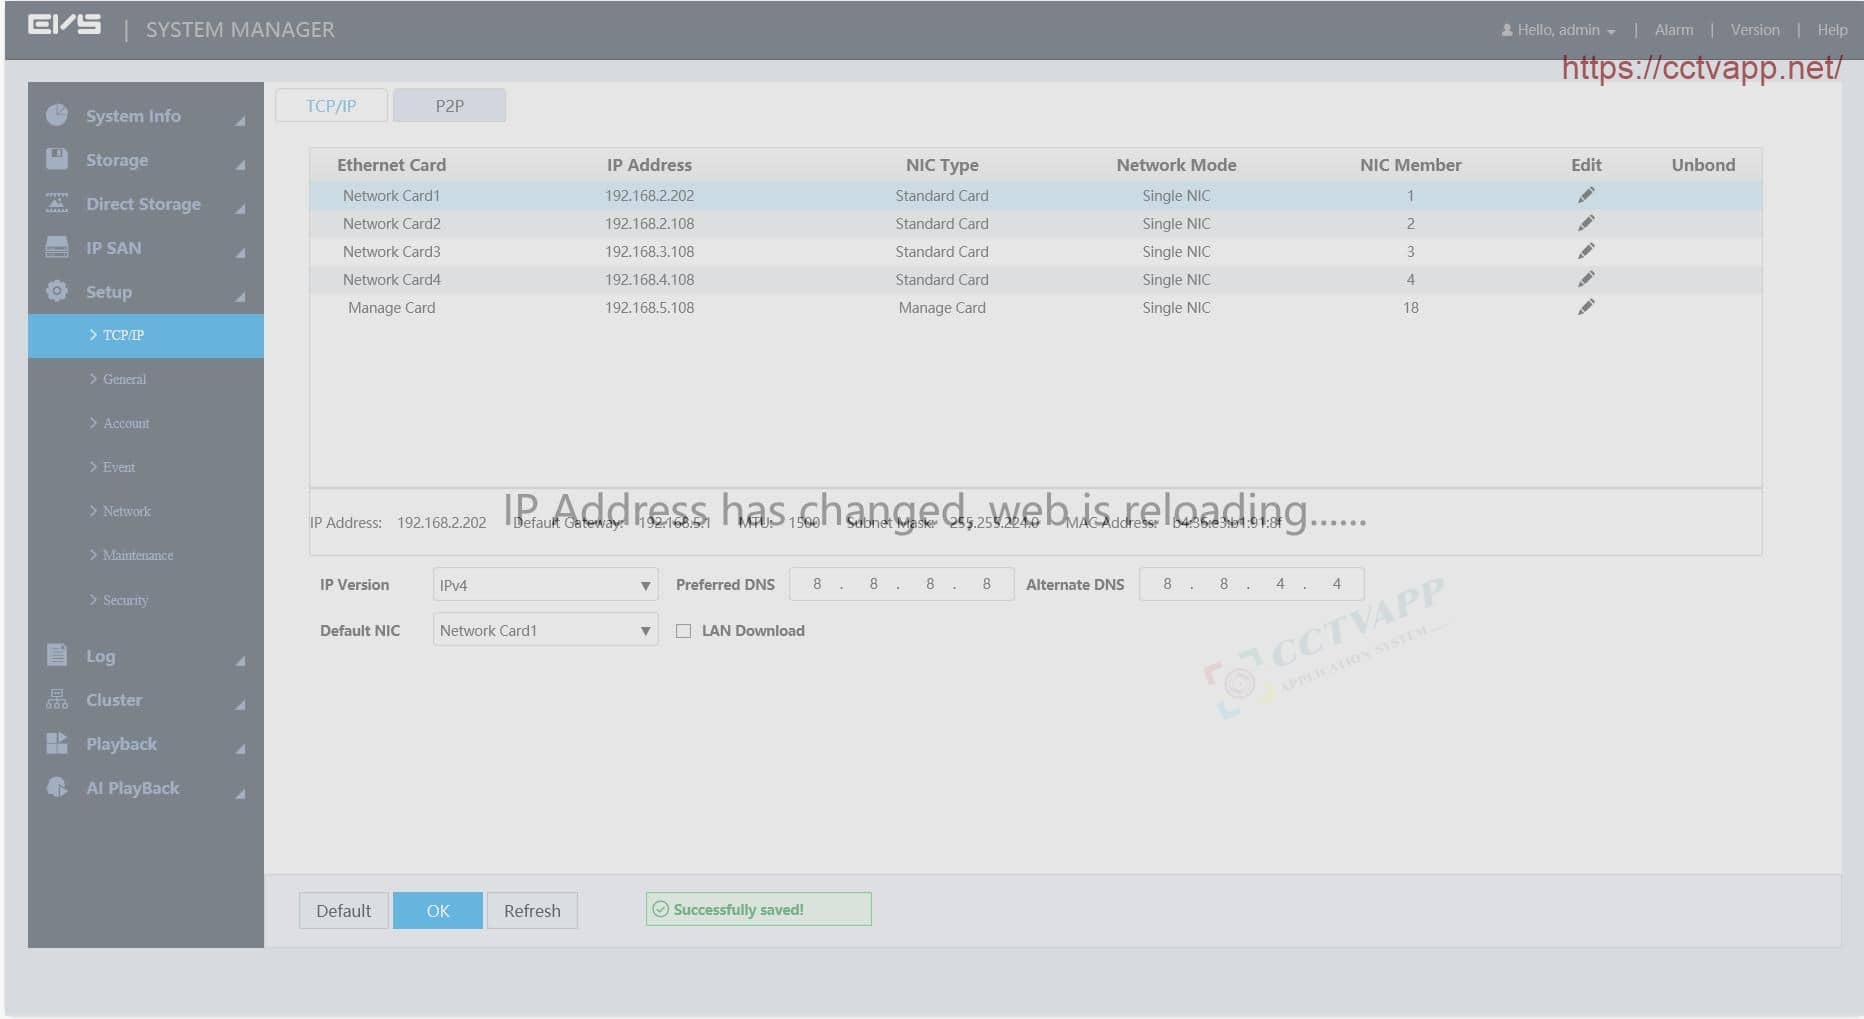
3. Reset password for EVS
In case you forget your EVS access password, you can reset it via the recovery email address (fill in at the time of creation – Section 1), access the EVS Web browser, proceed as follows :
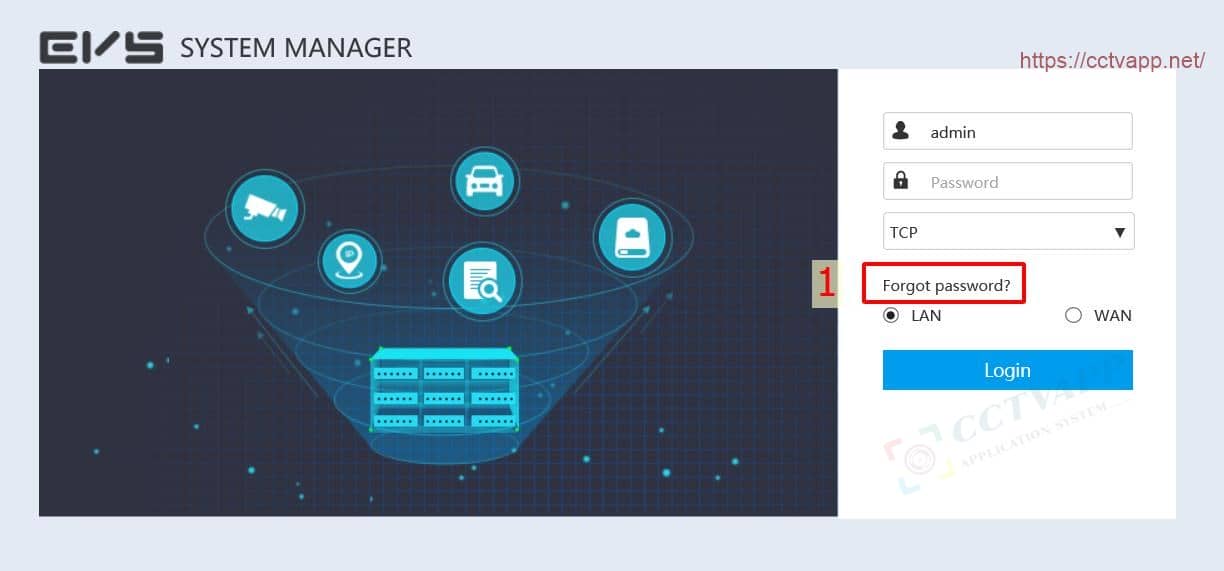
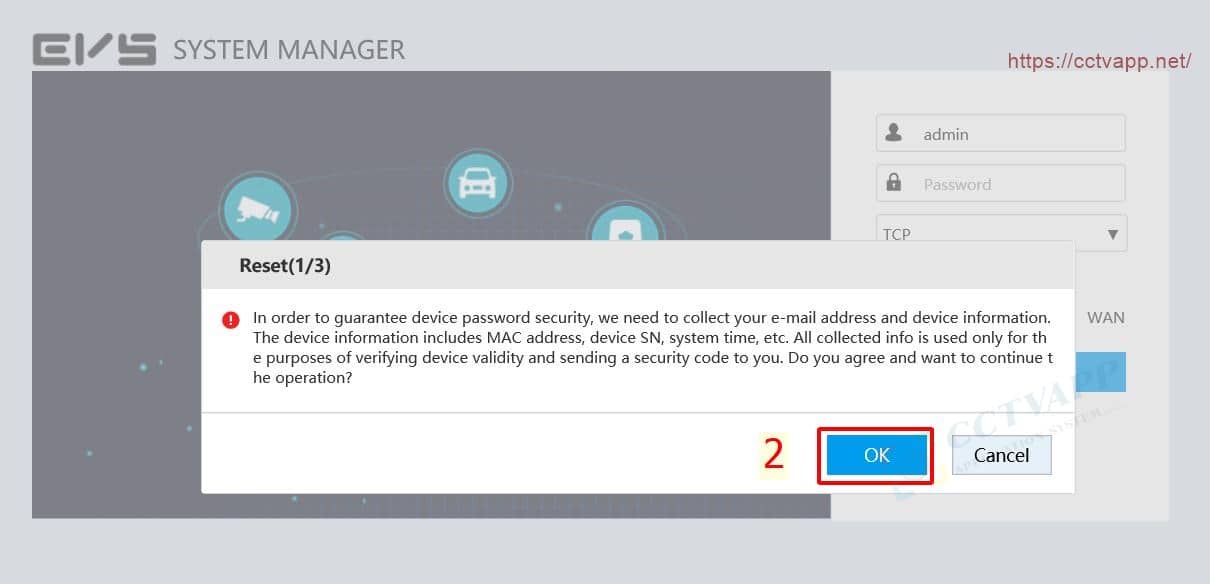
Next, open the app DMSS on mobile, select Settings -> Tool Manager -> Password reset tool, then scan the QR code in the browser.
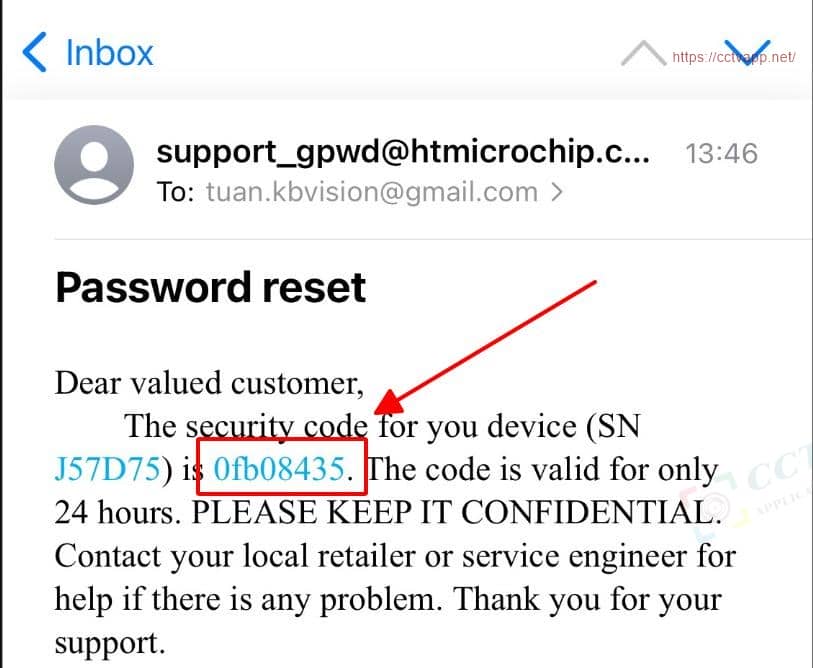
Check your email for the reset code (if you don’t find it, check your spam folder)
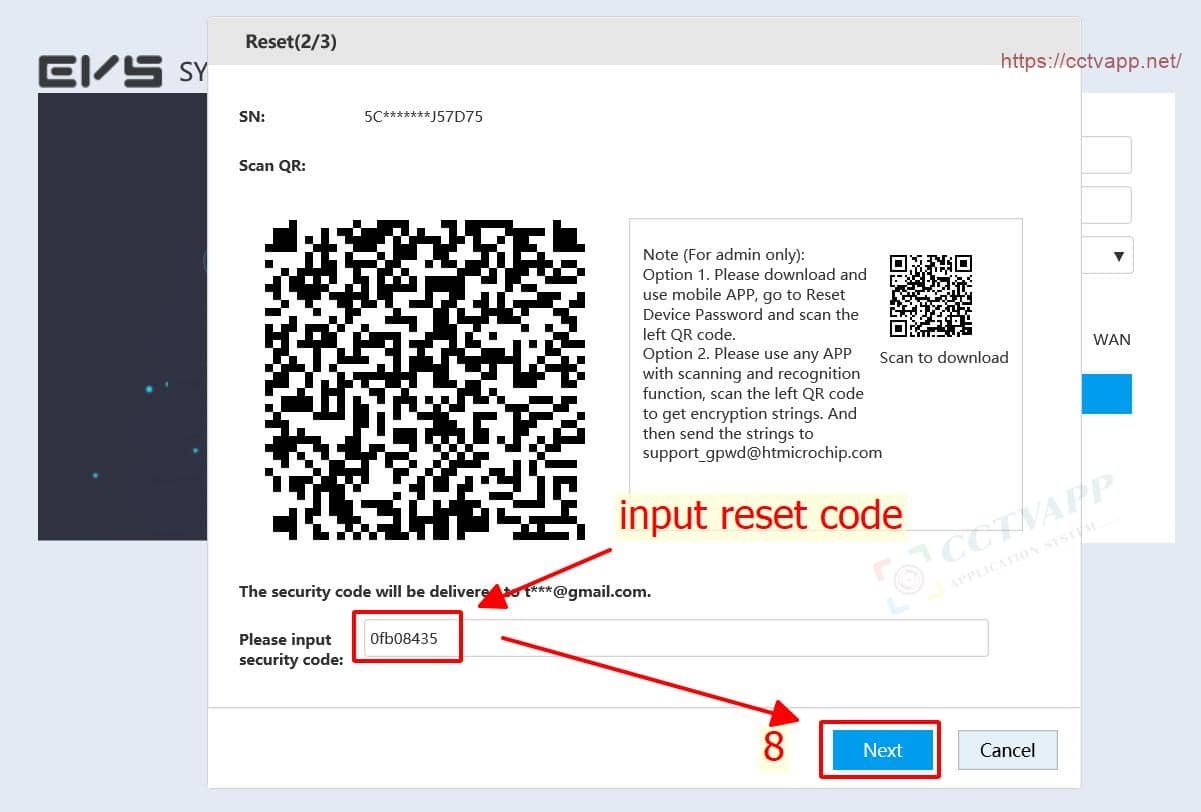
Once you have the recovery code, enter it into the browser interface and reset the new password.
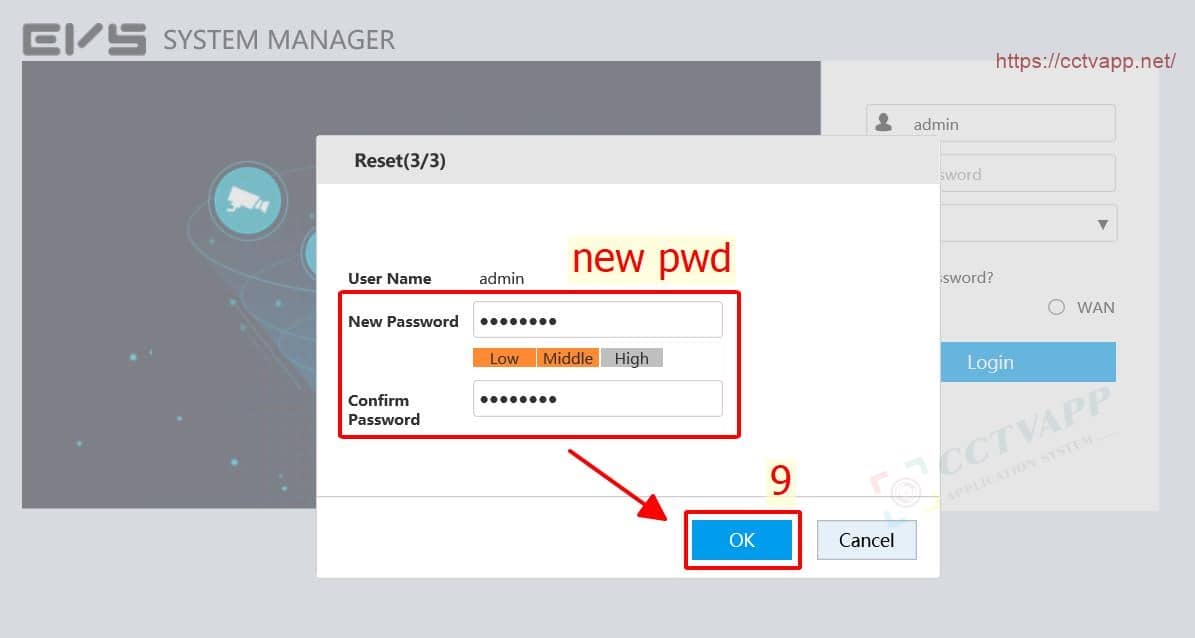
Instructions for resetting EVS password on TV screen and PC Client:
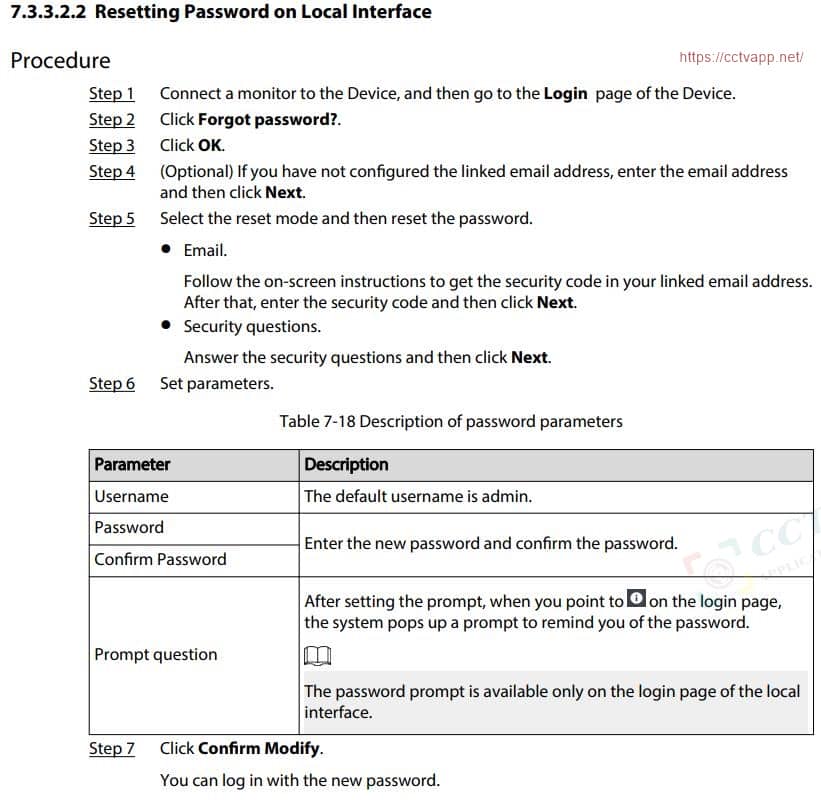
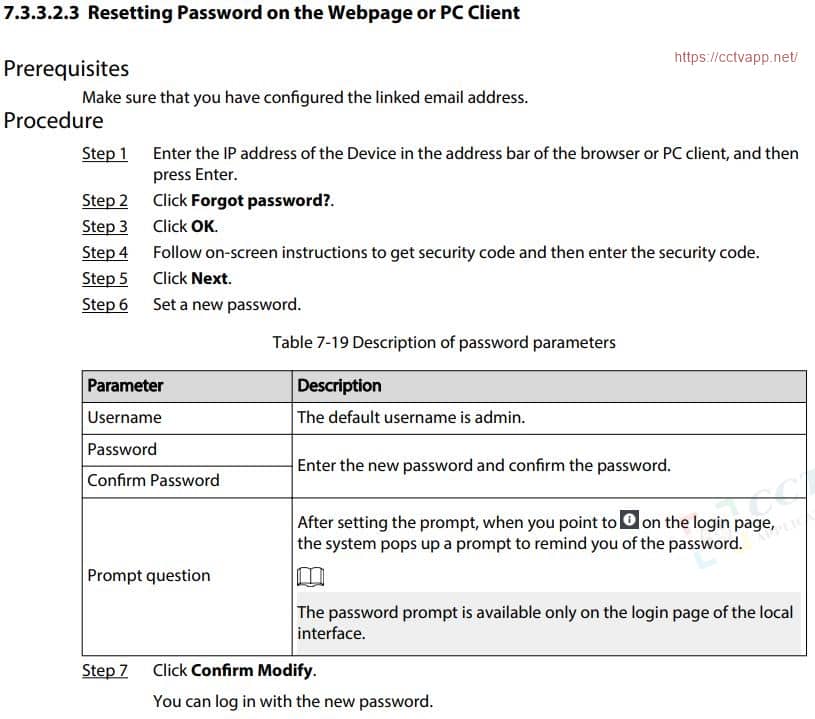
II. Add Camera and Video Recorder devices to EVS
1. Add IP Camera to EVS
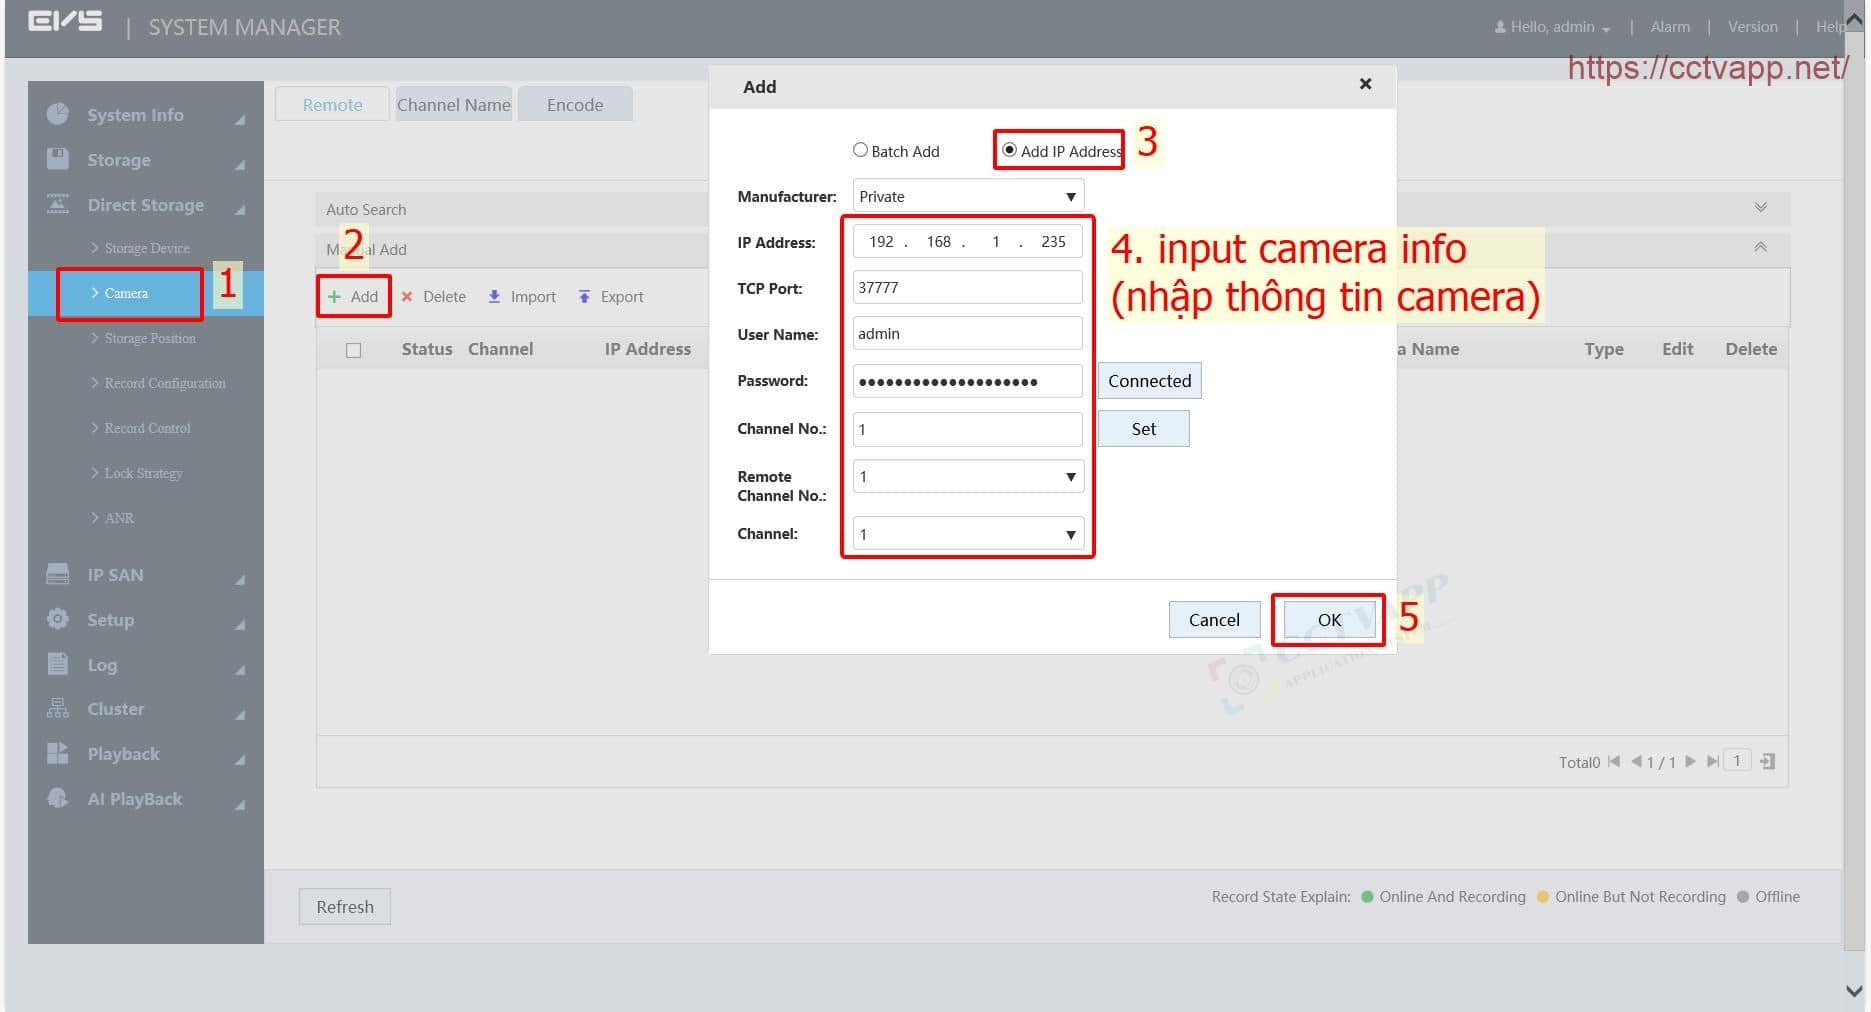
After adding the Camera, EVS starts connecting to the Camera:
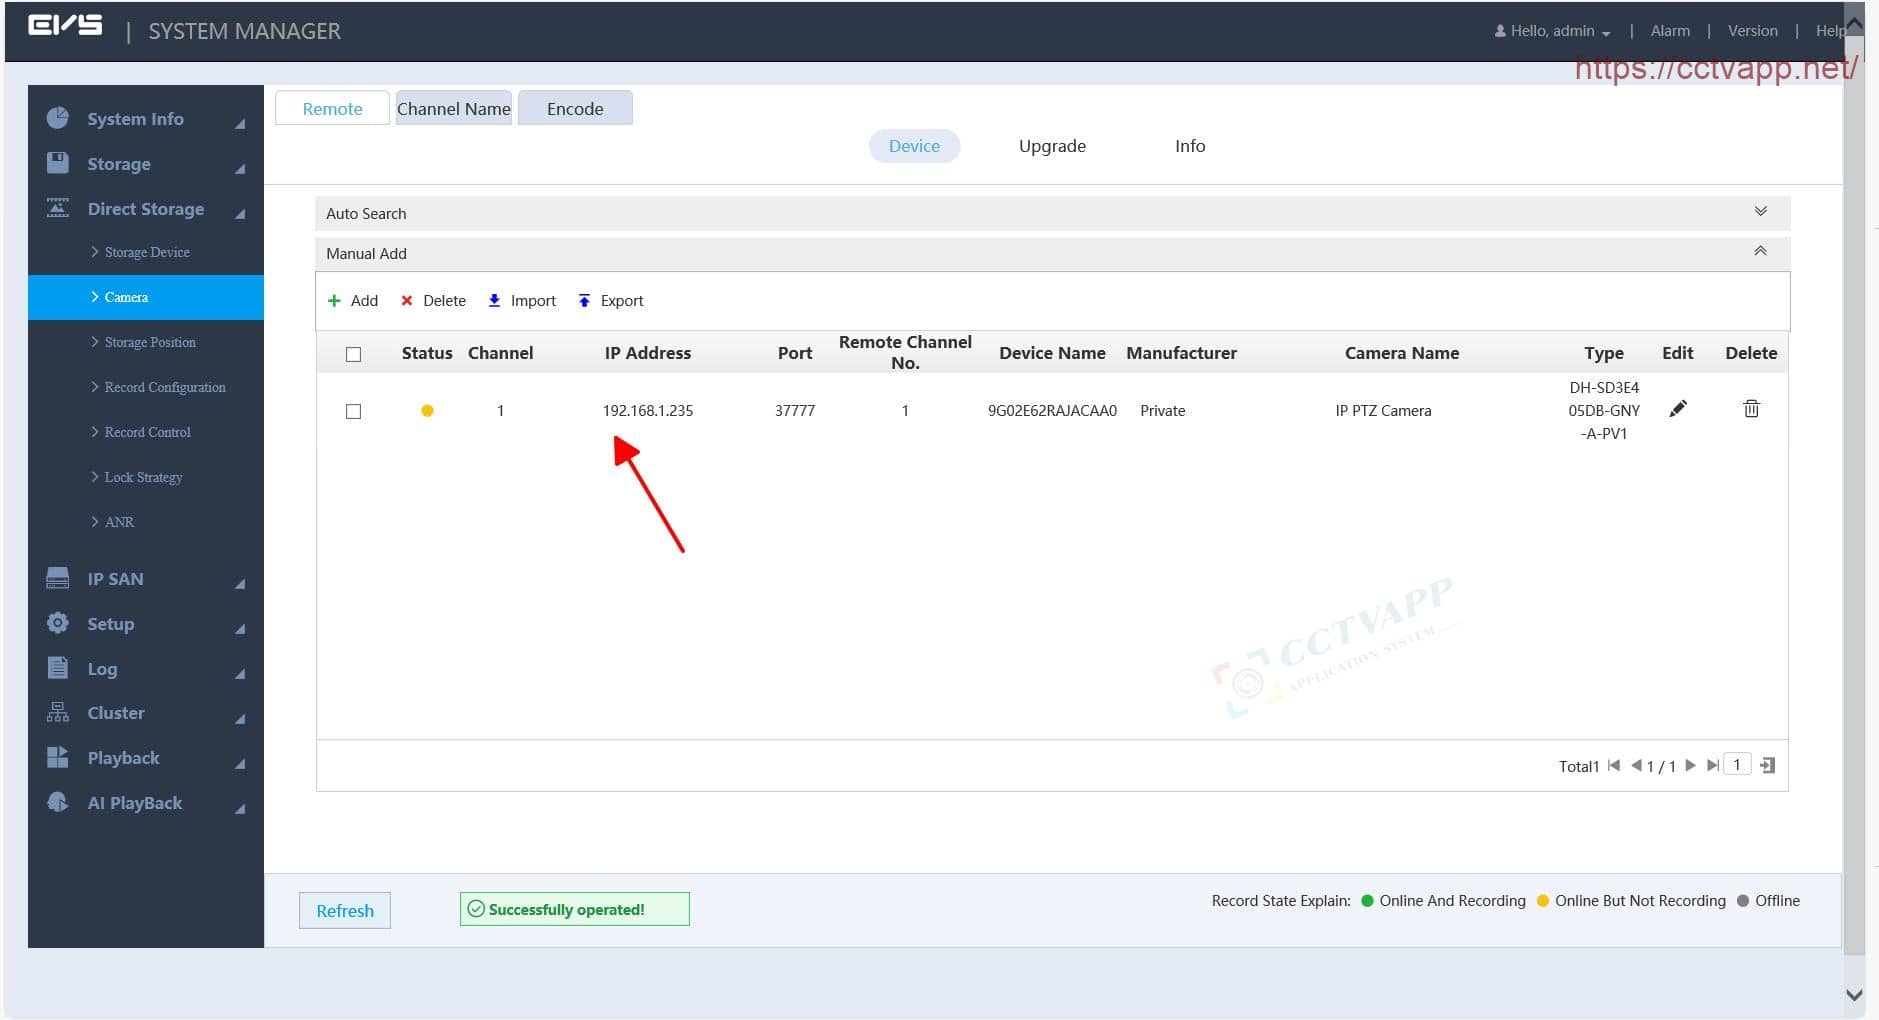
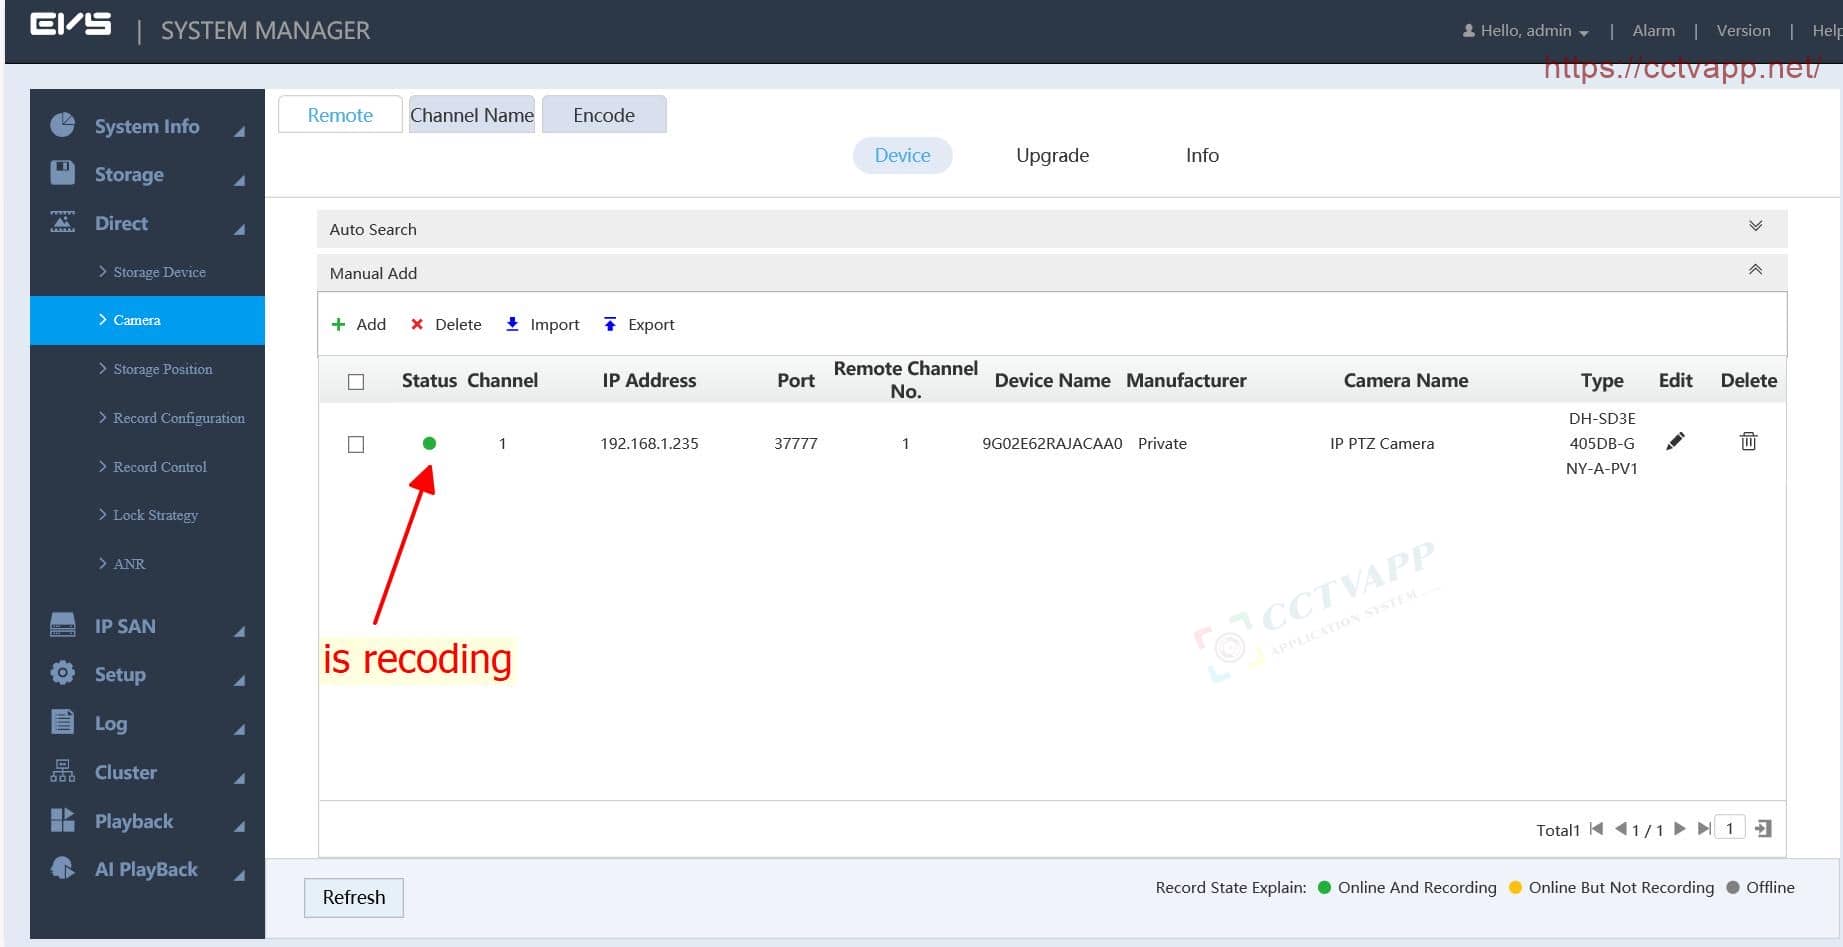
Wait about 10 seconds, press the button Refresh, you will see the Camera has connected successfully!
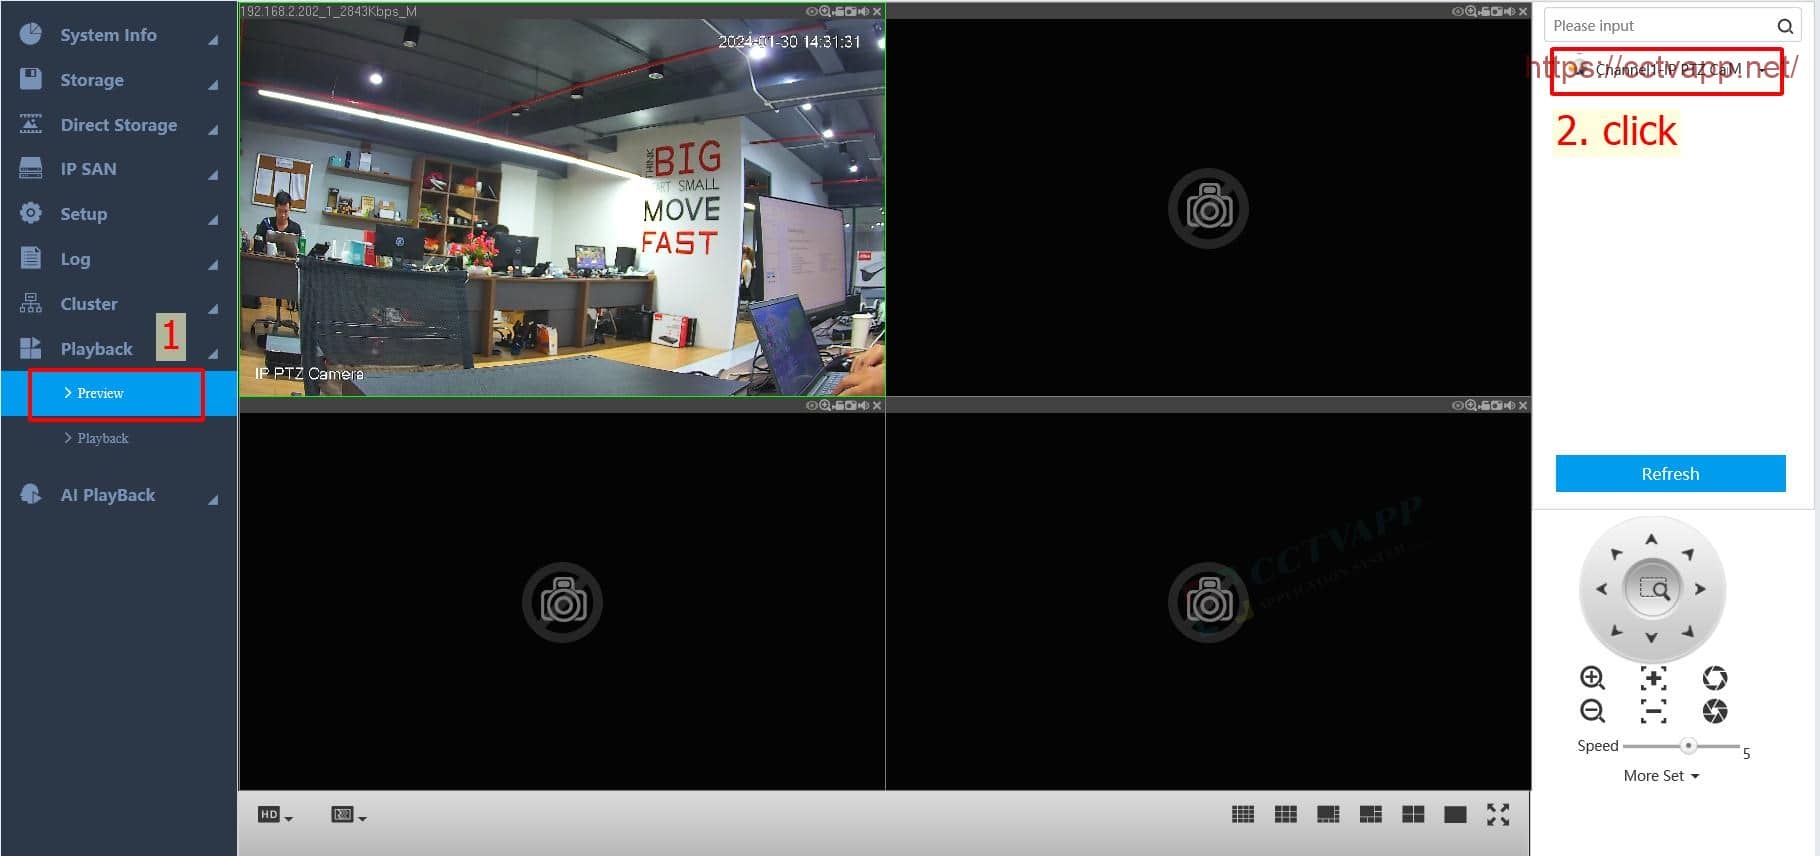
Return to the main interface, select Playback -> Preview -> Tap the Camera added on the right to start playing the video.
2. Add Video Recorder to EVS
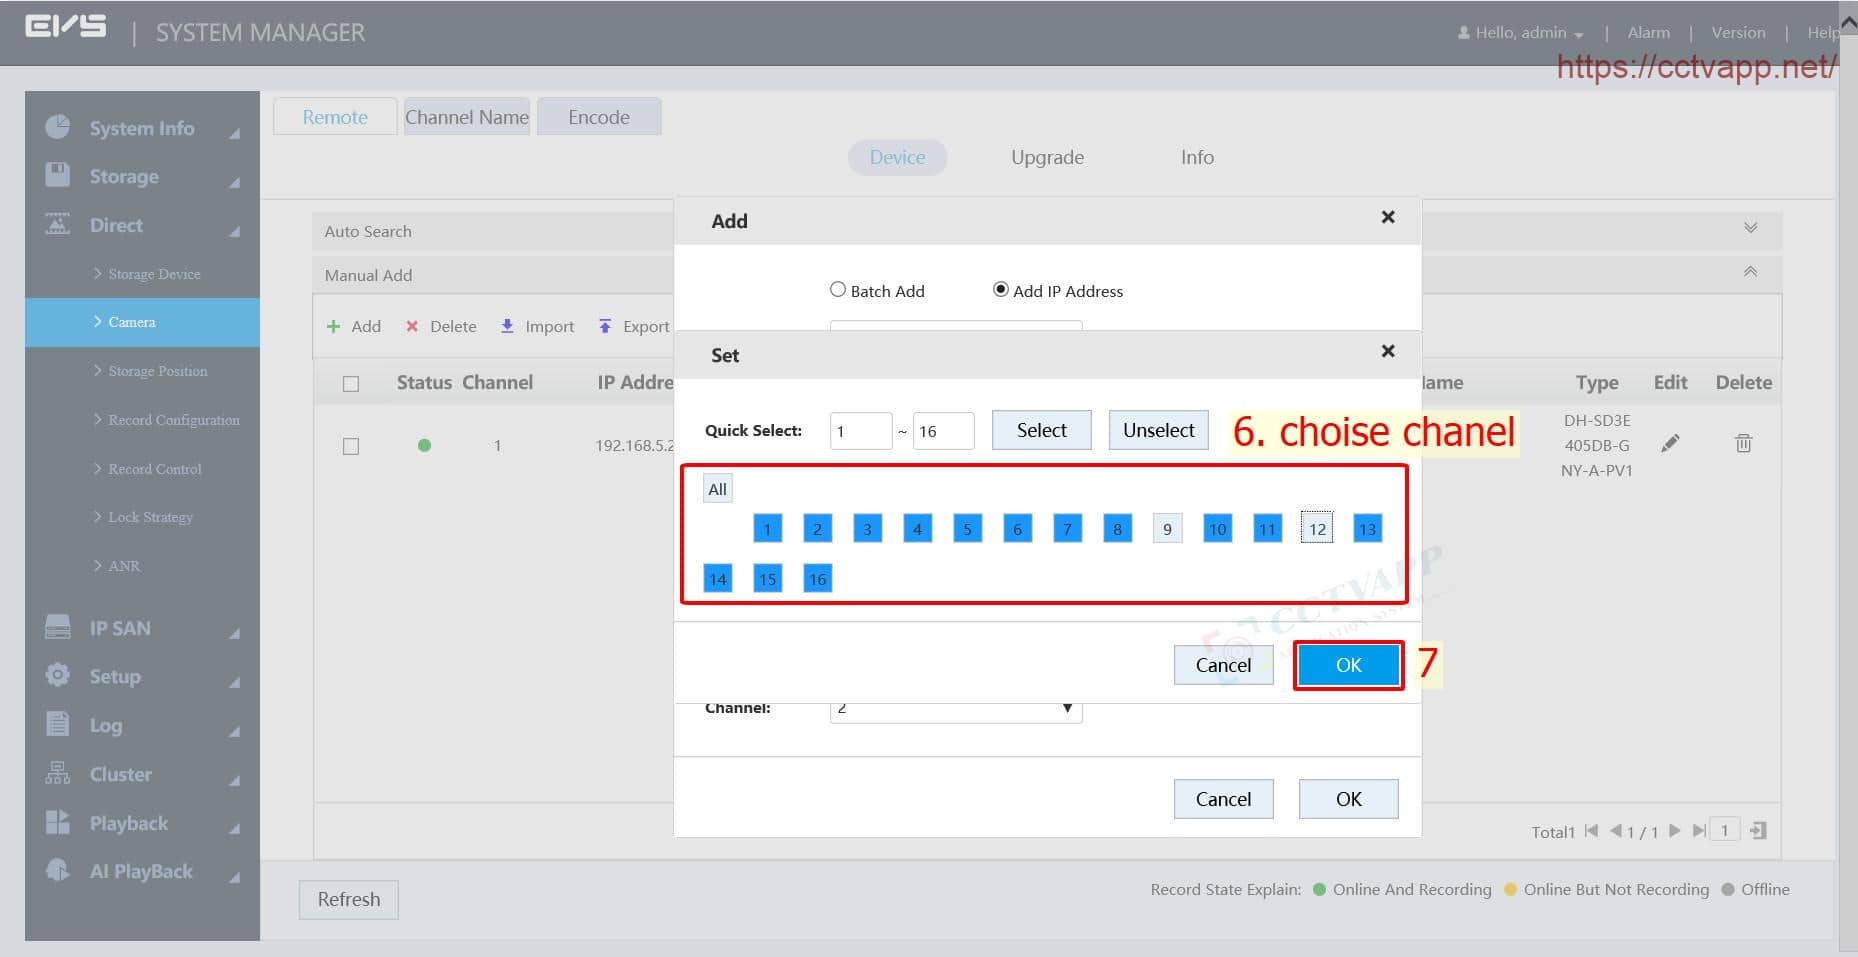
Similar to adding a Camera, you can add NVR, XVR, DVR, HCVR video recorders to EVS for storage. You can choose the channel you like:
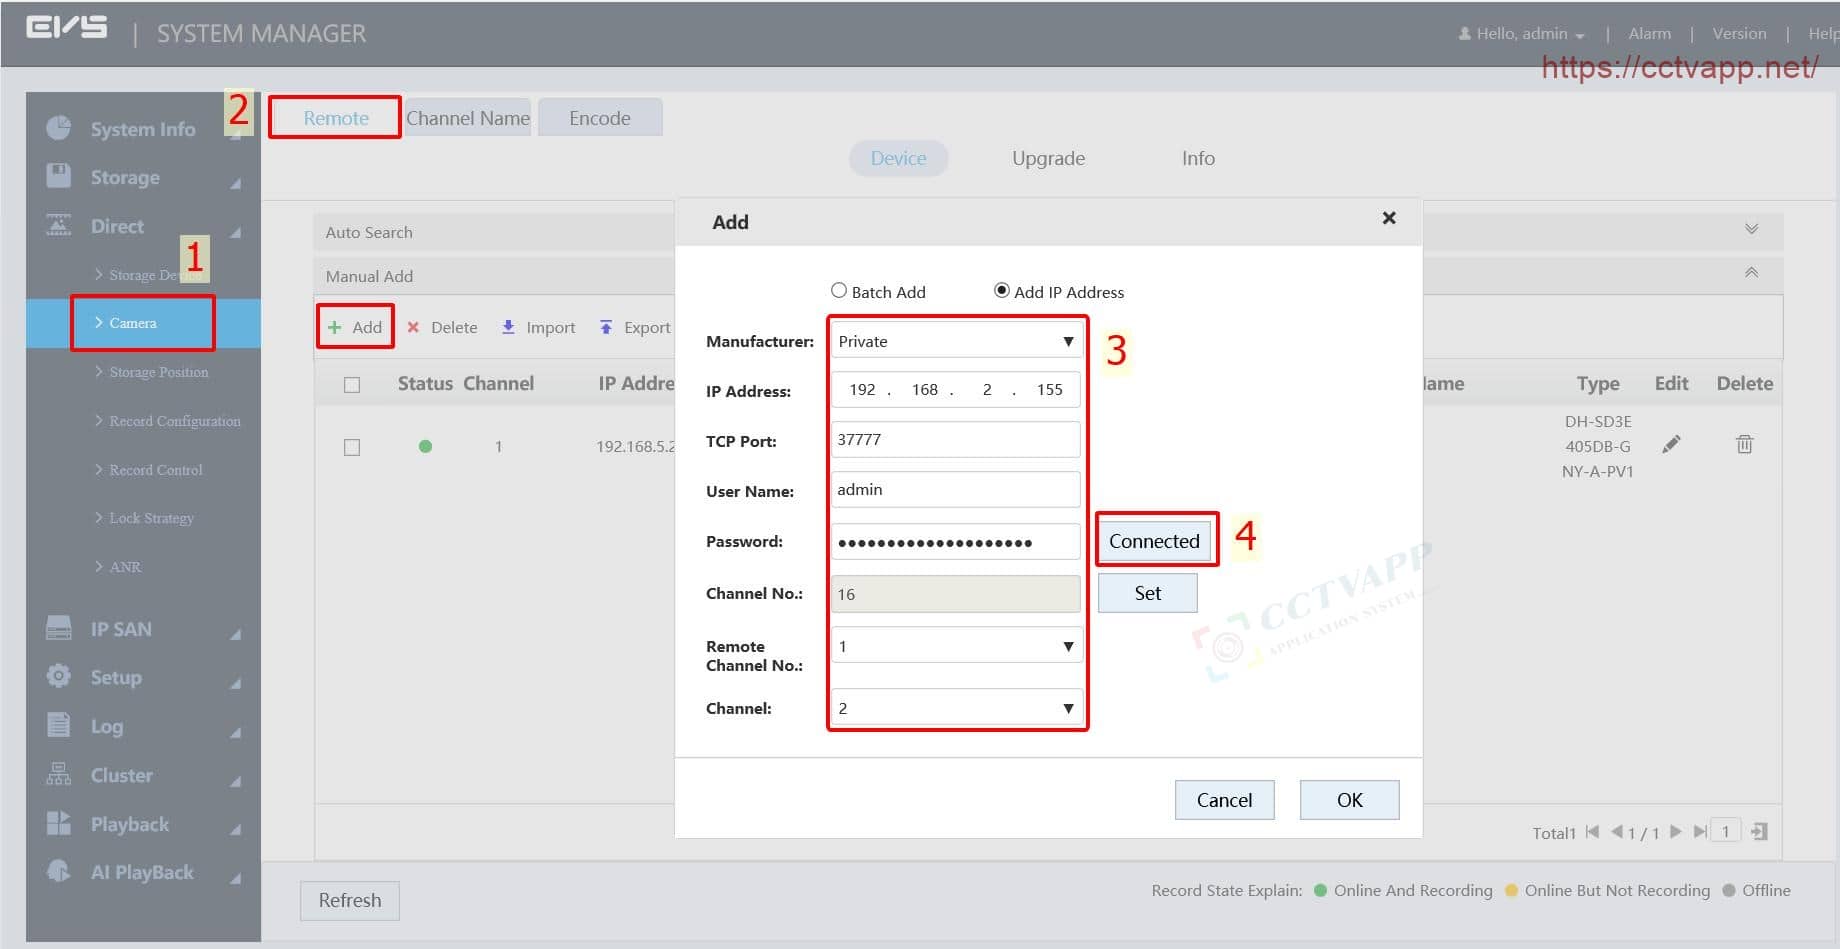
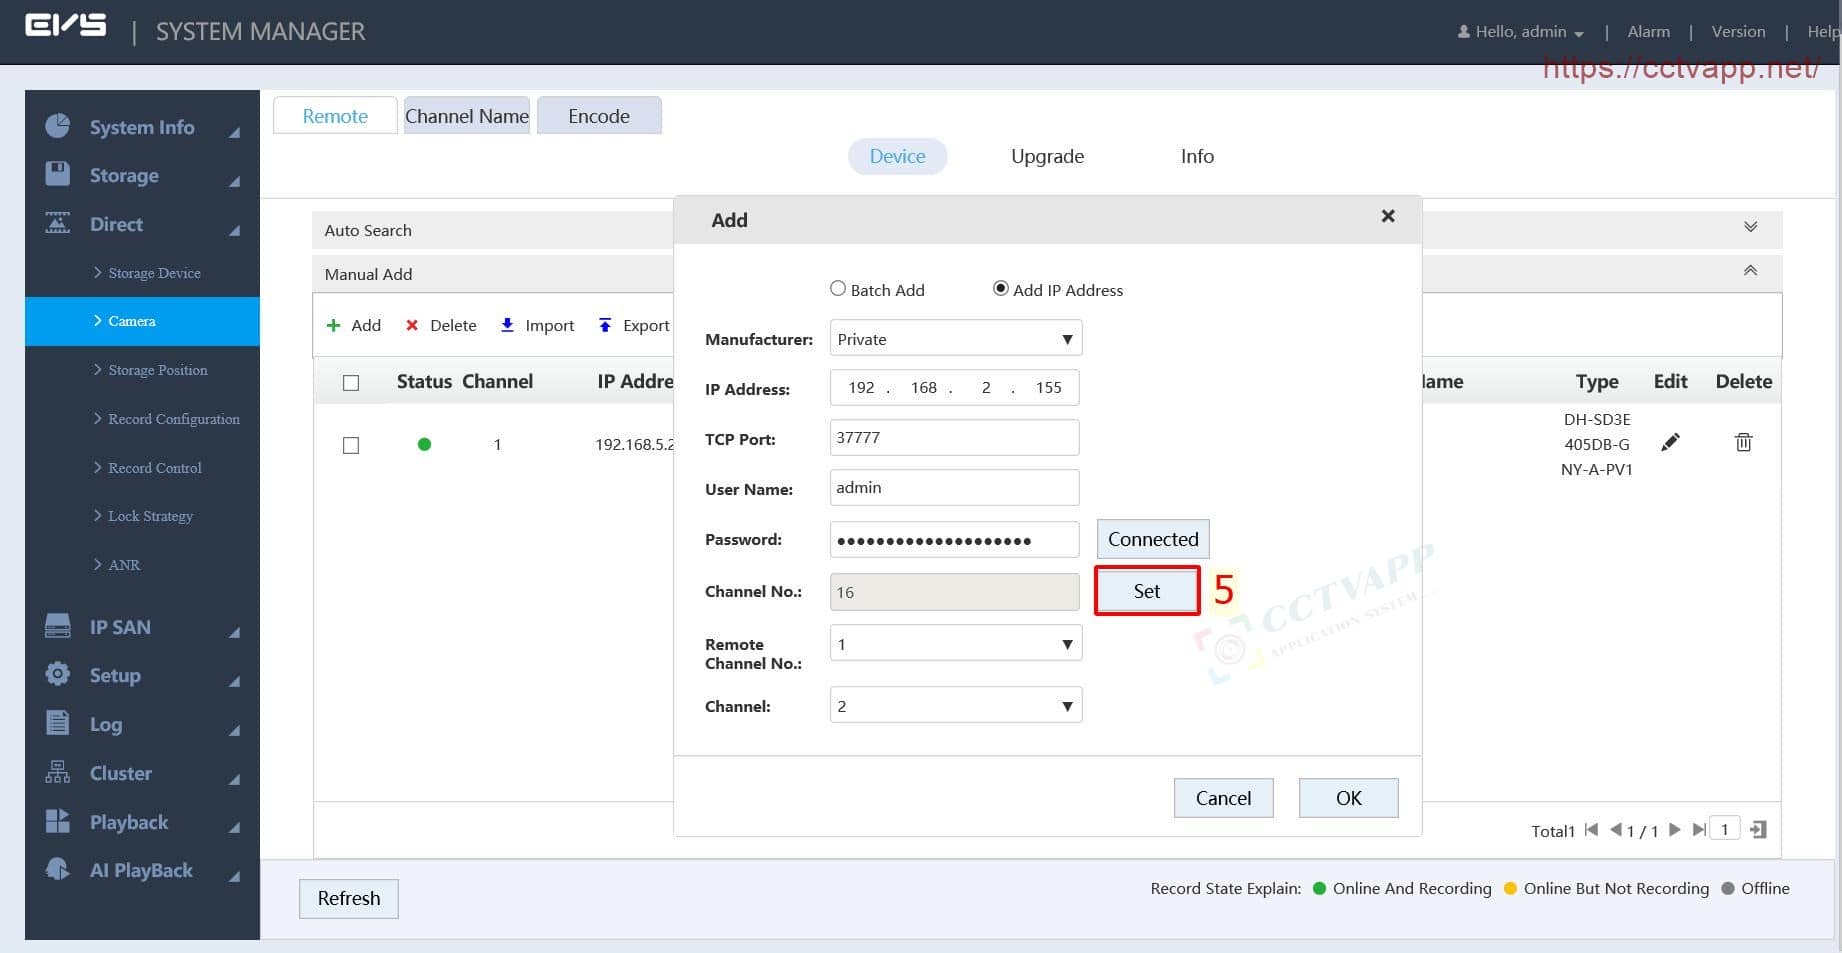
Select any channel to add to EVS:
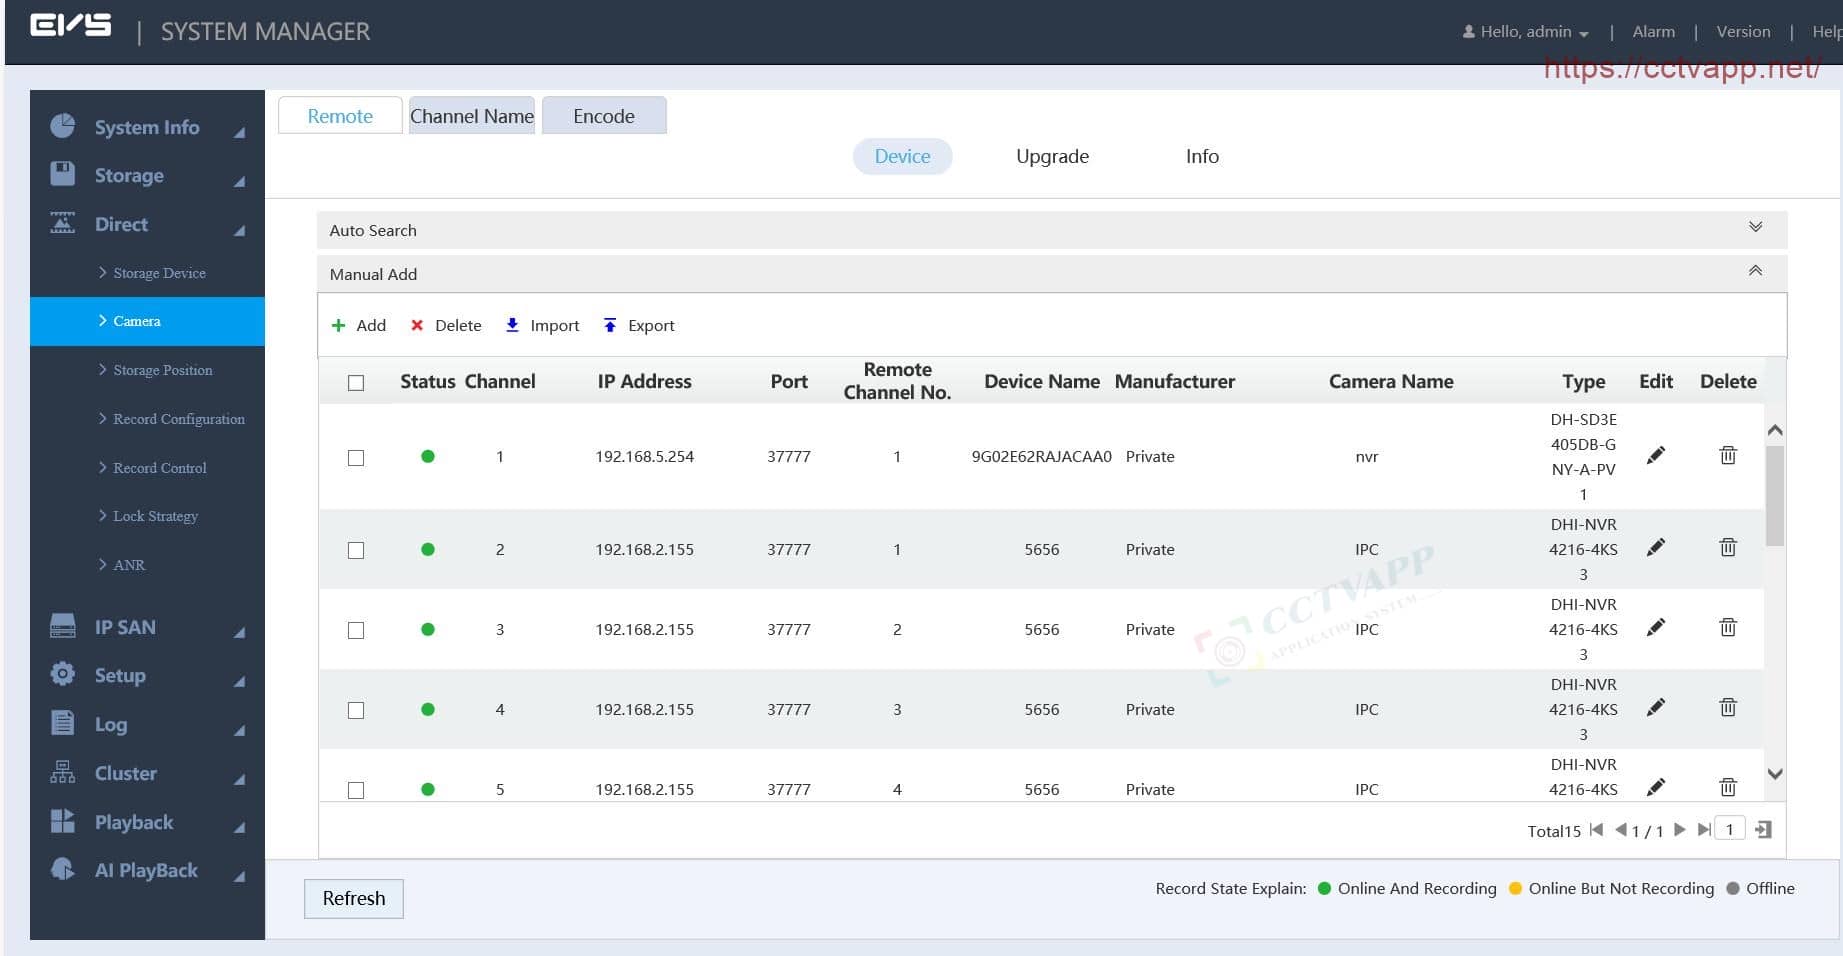
3. Schedule recording and Stream
By default, EVS will record continuously 24/24 based on stream 1 (Mainstream). However, you can customize the recording schedule according to a specific time frame.
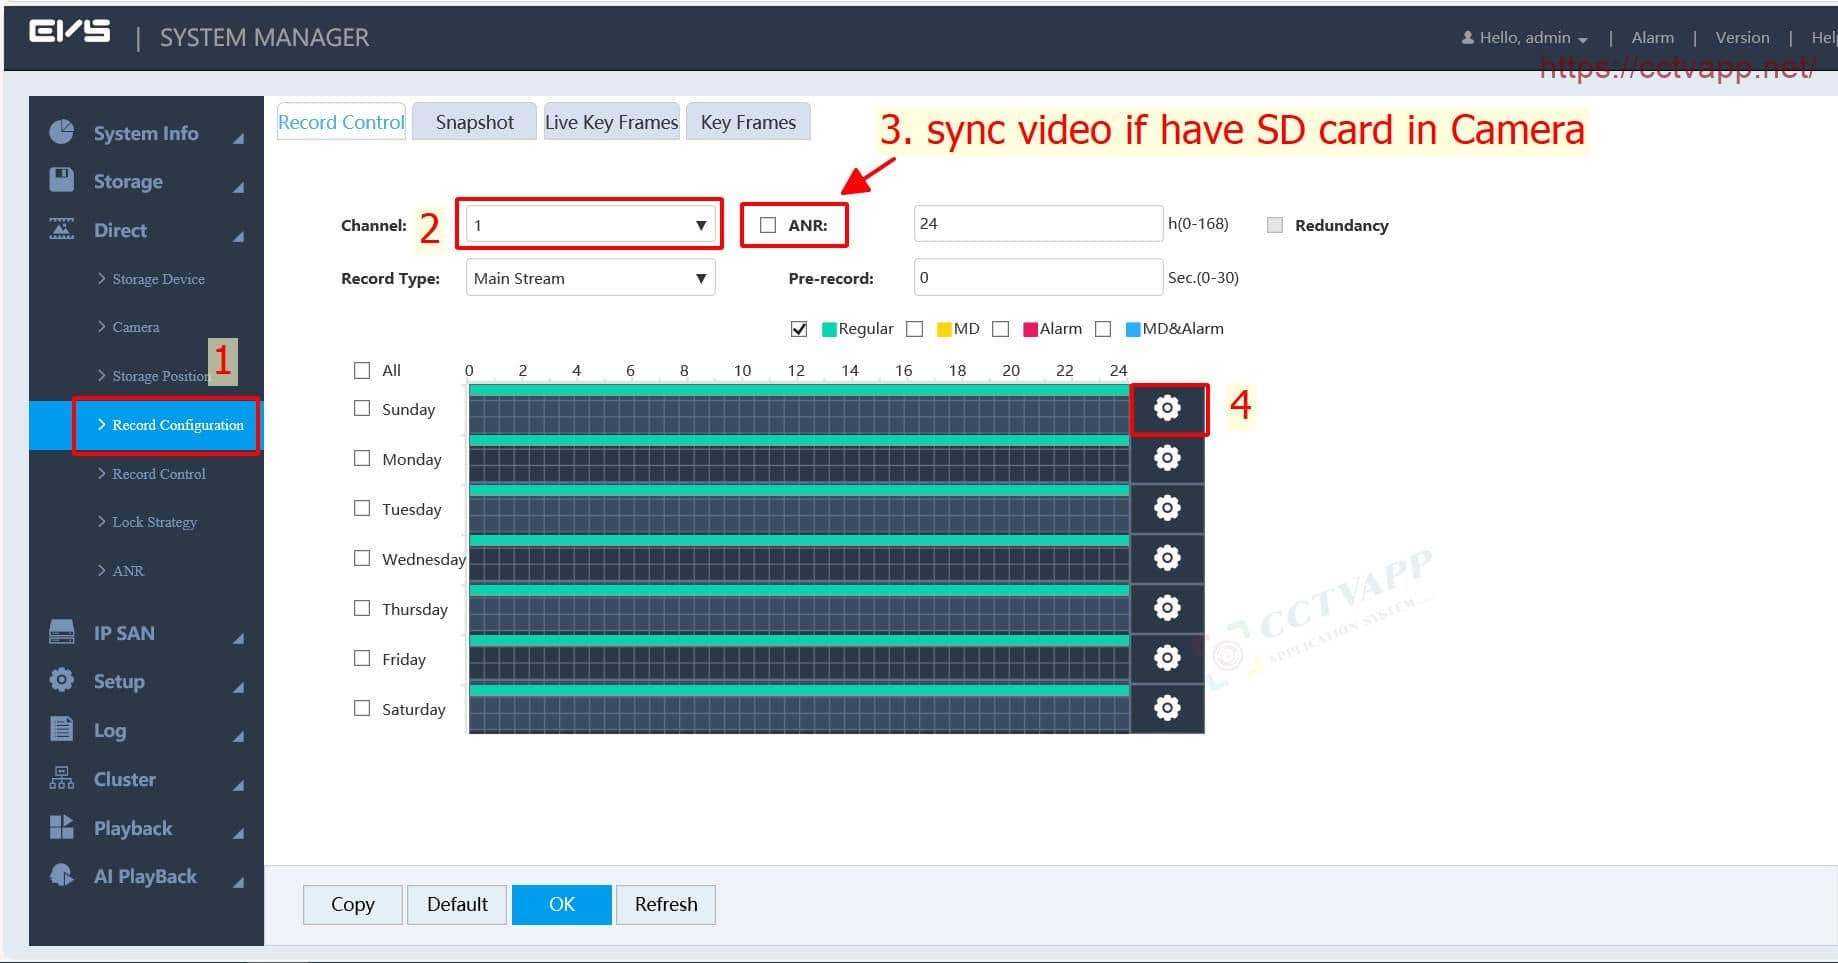
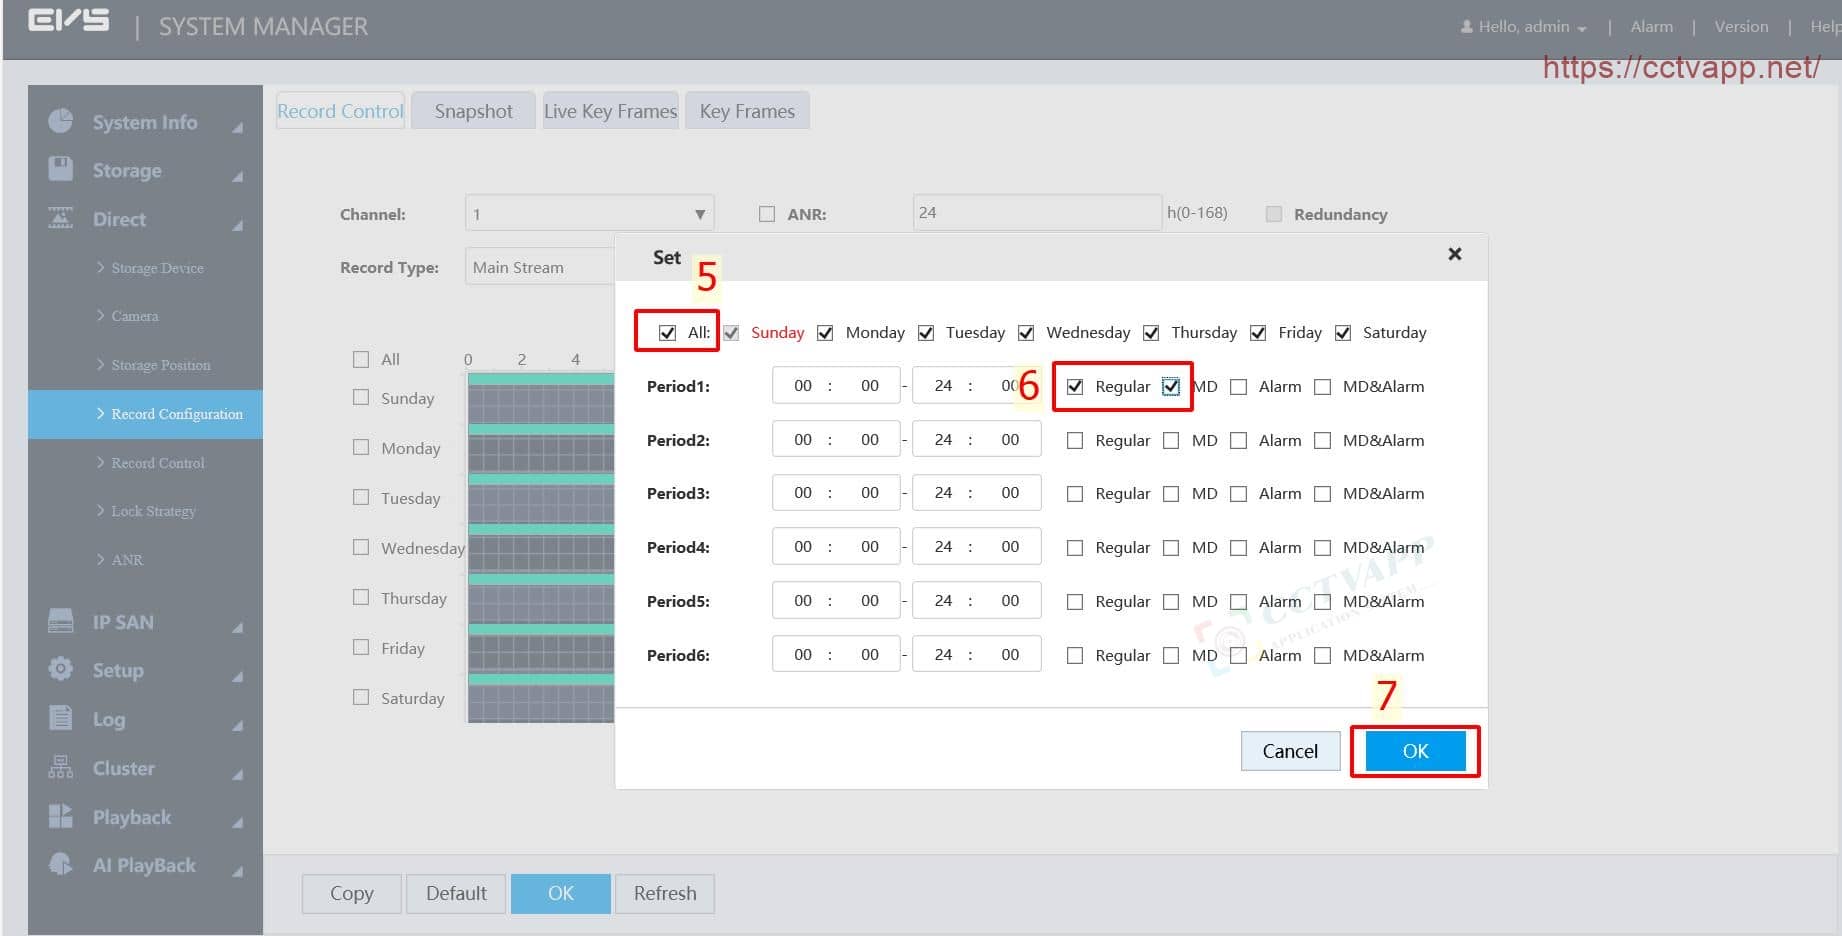
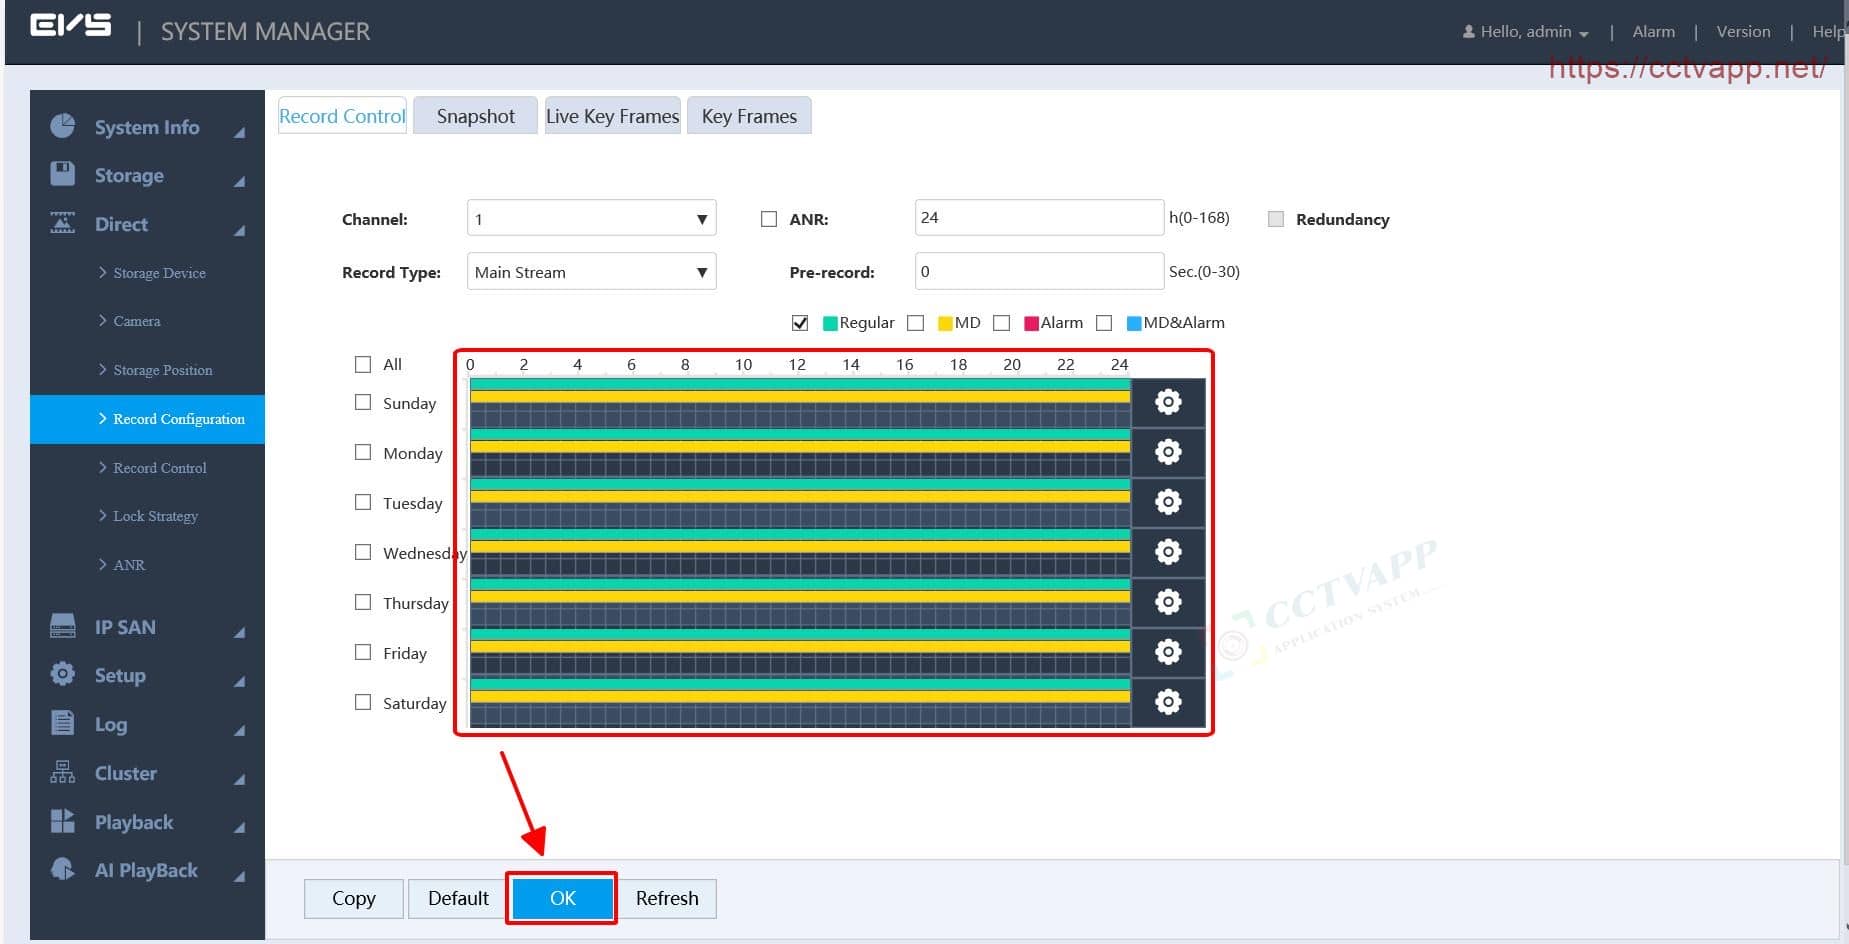
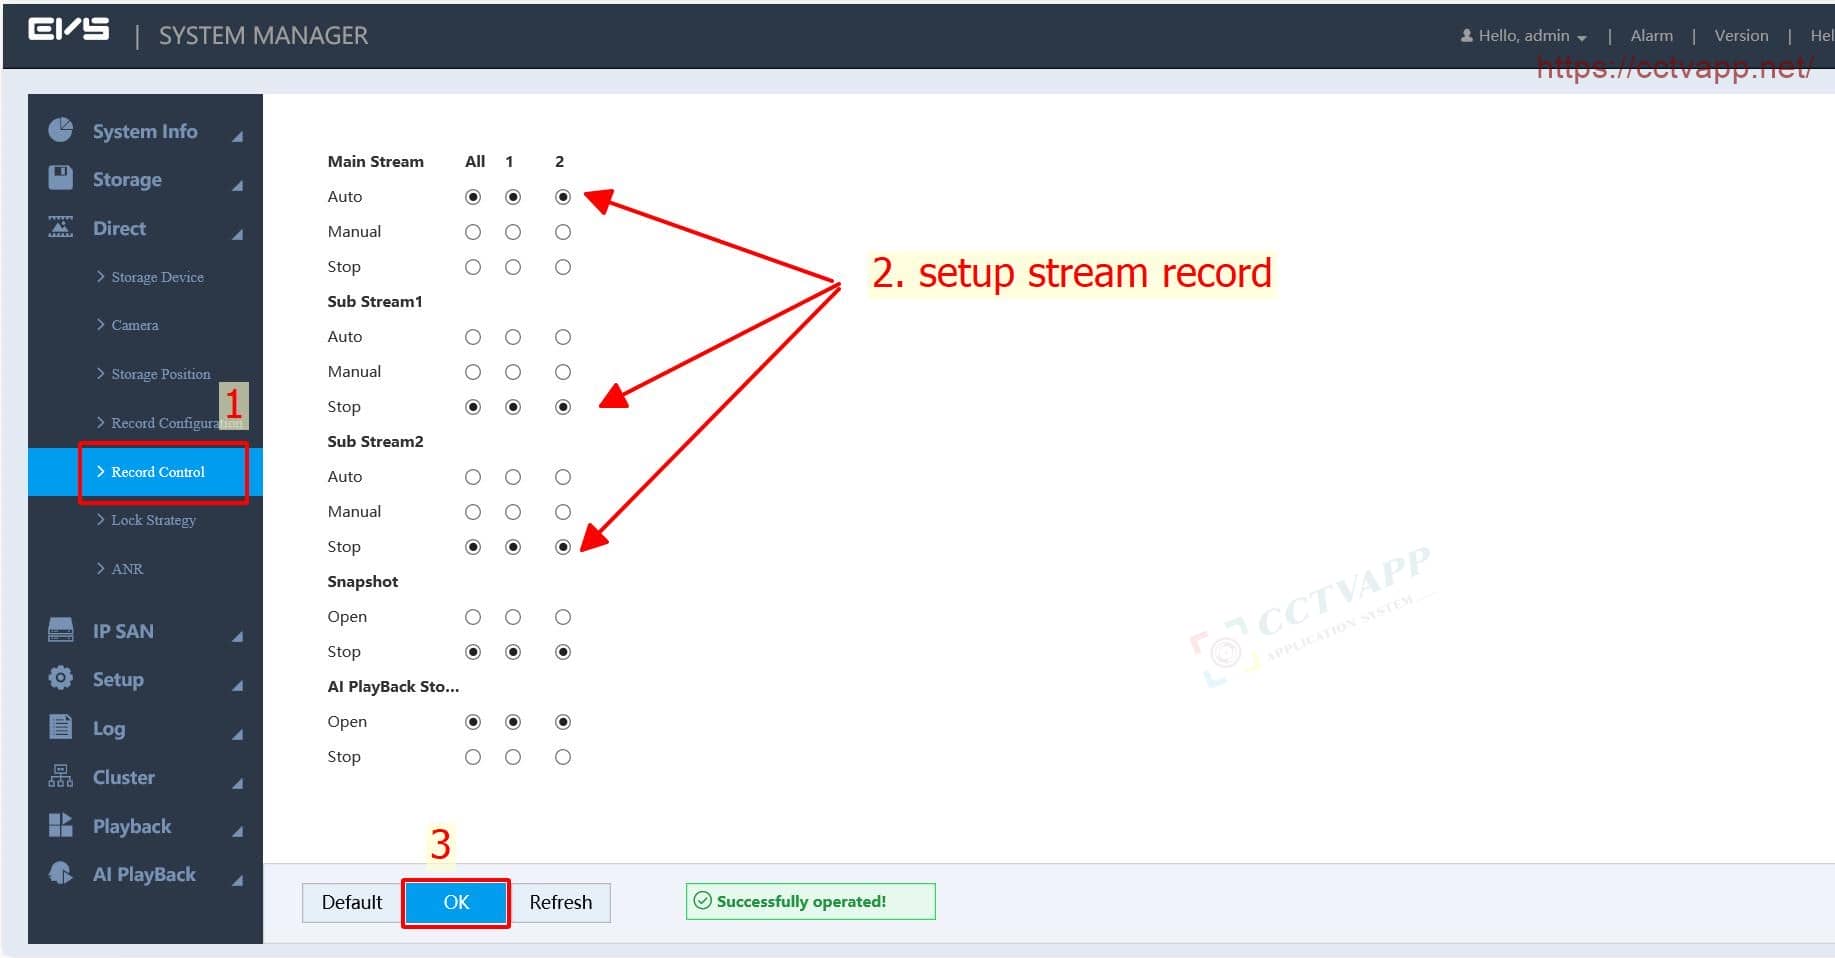
You can choose the recording stream as: Mainstream, substream 1, substream 2 (if available):
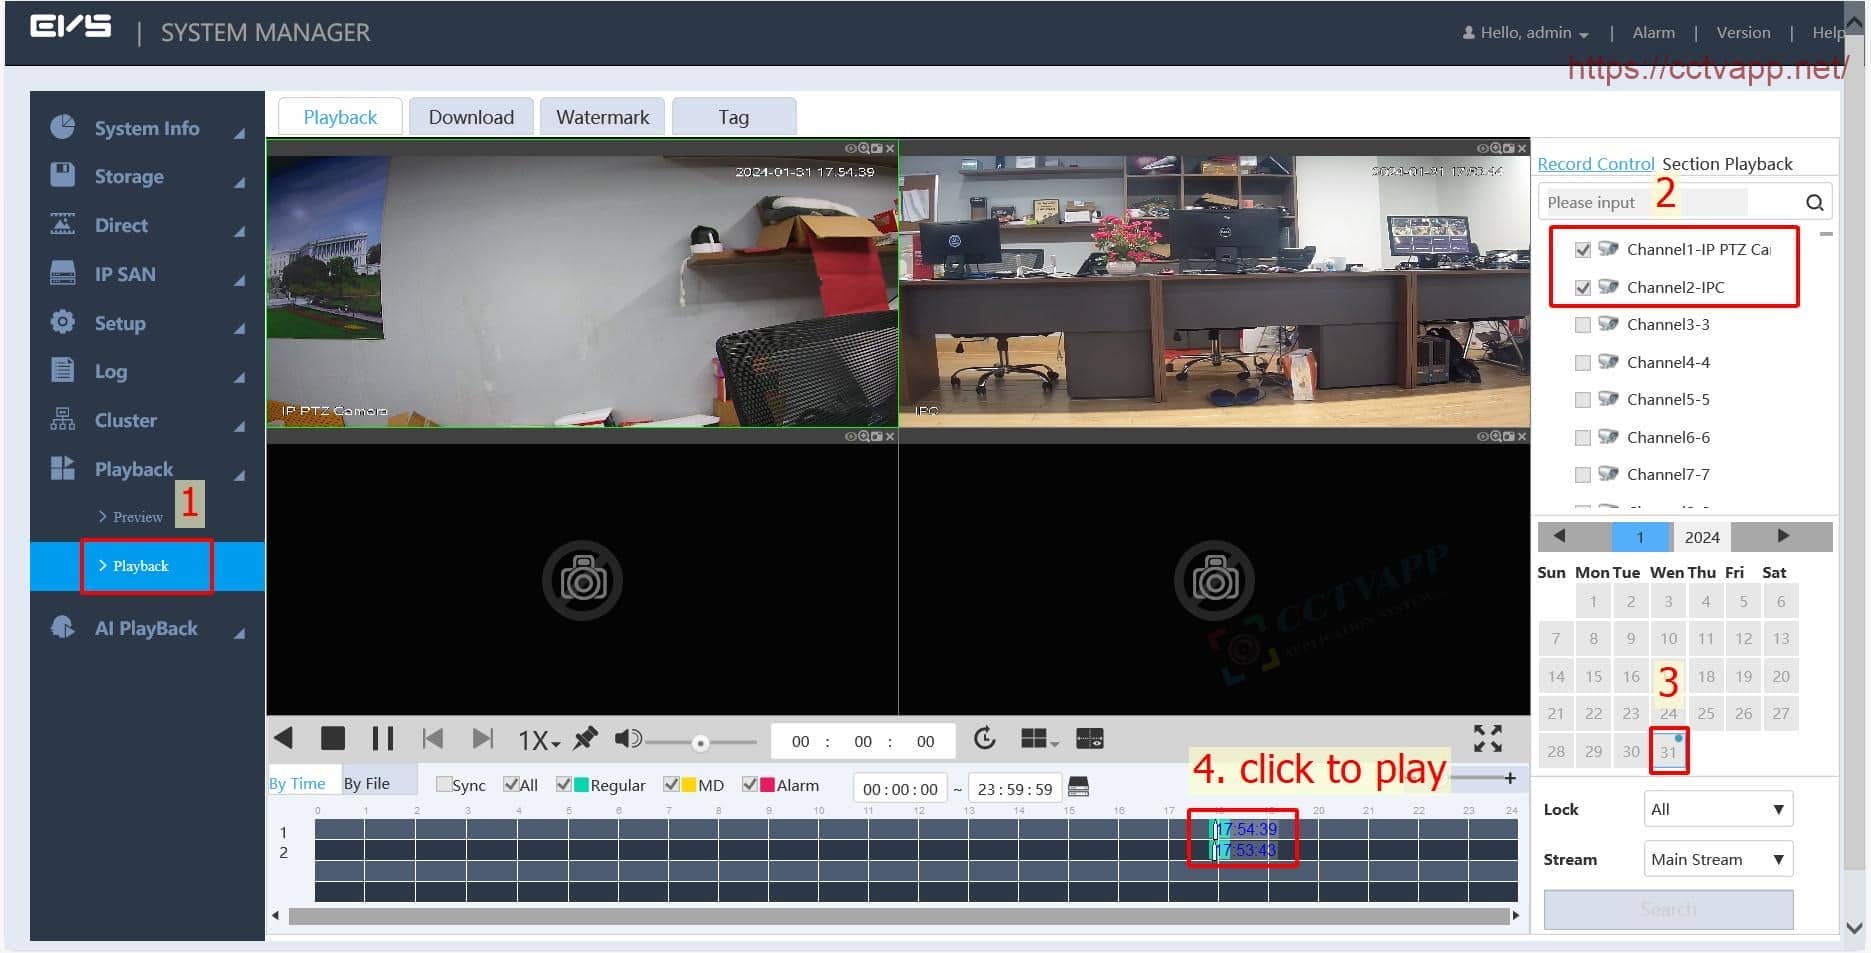
4. Review recordings and download recordings
To review the recording, in the browser, proceed as follows:
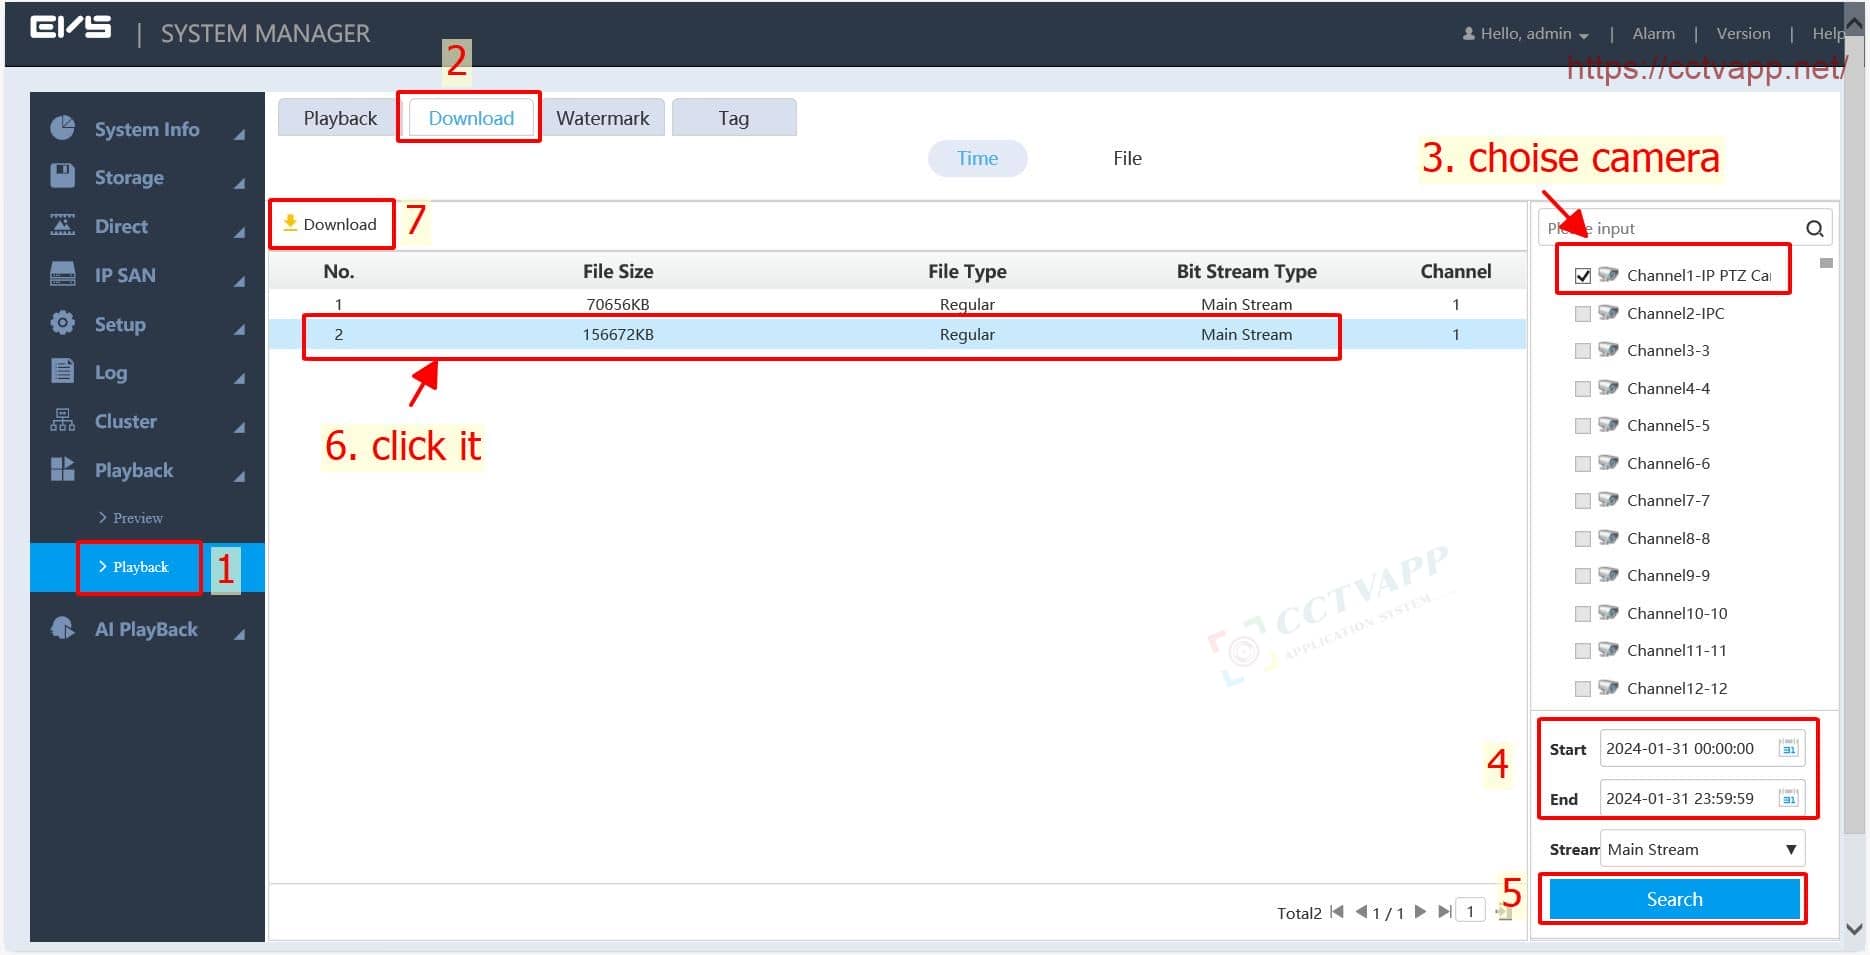
To download recorded data according to the specified time, operate as instructed below:
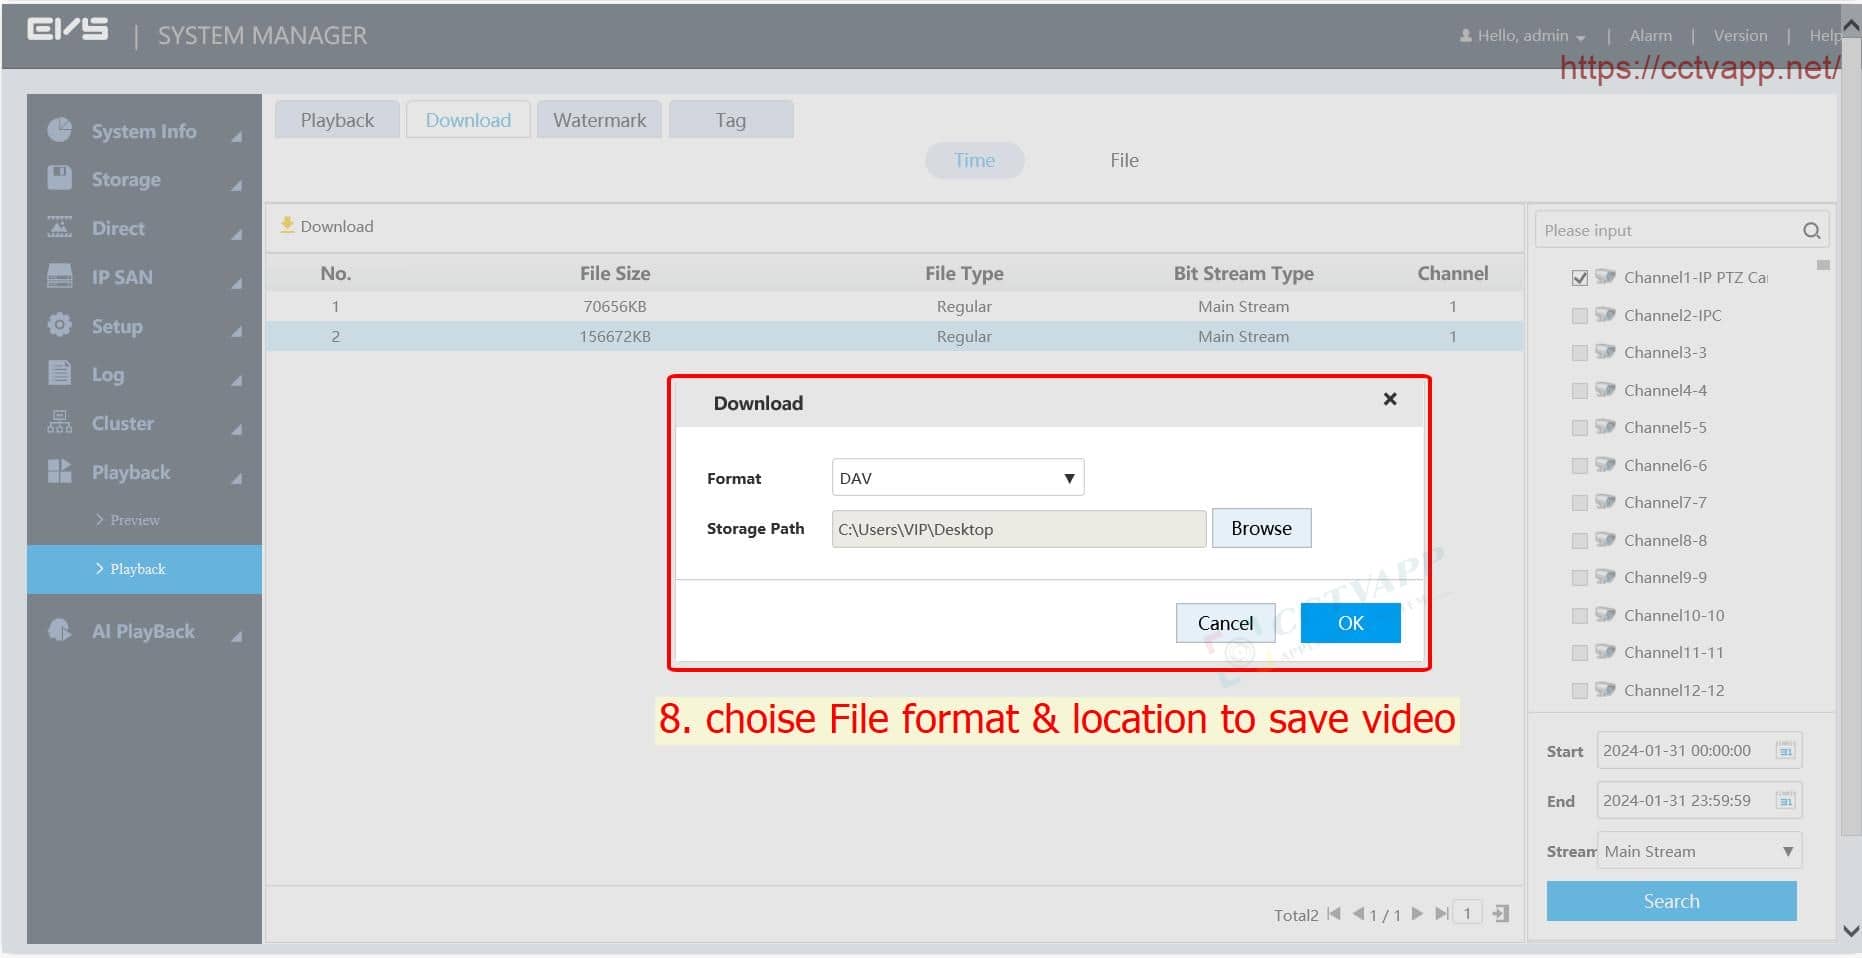
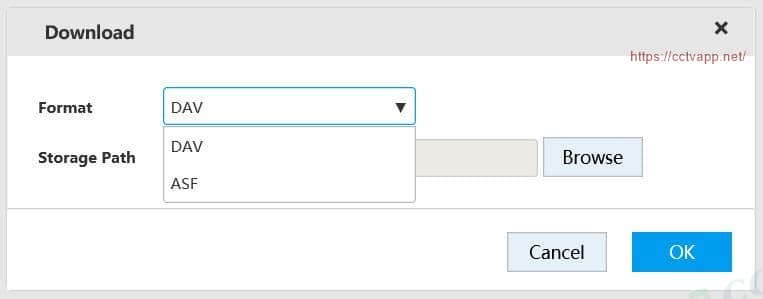
Select video format and save location, click OK to start downloading.
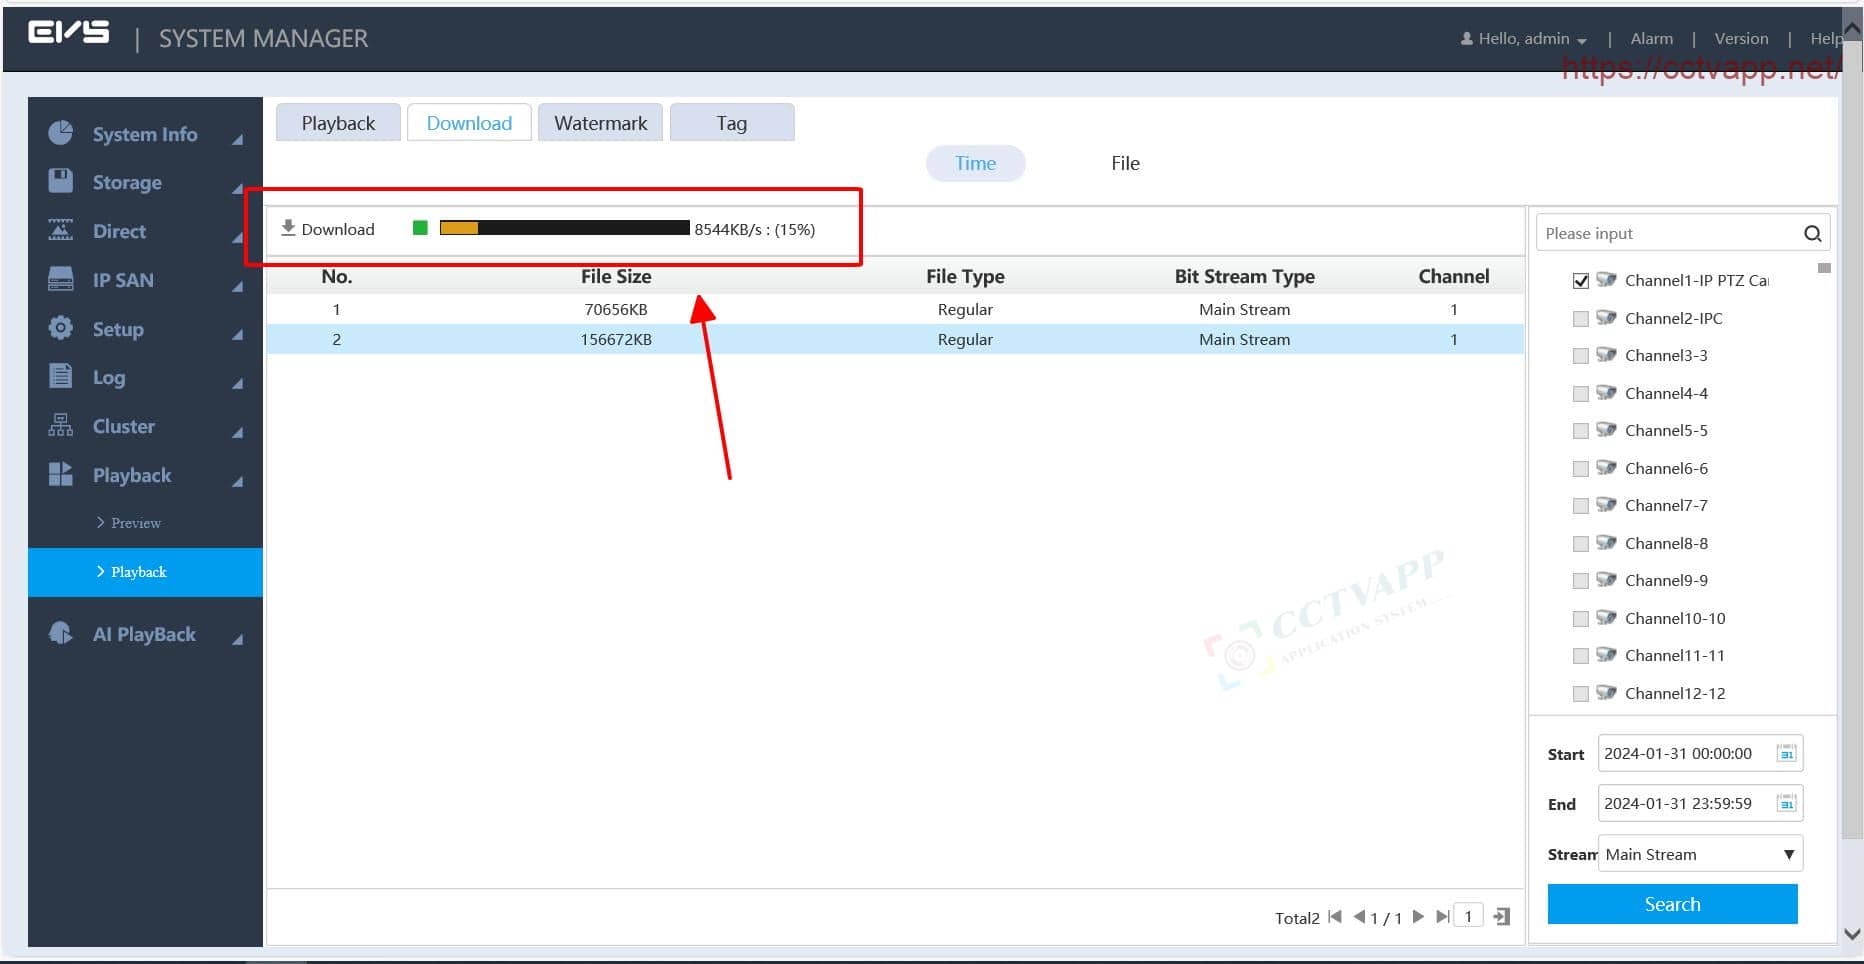
Video download is in progress.
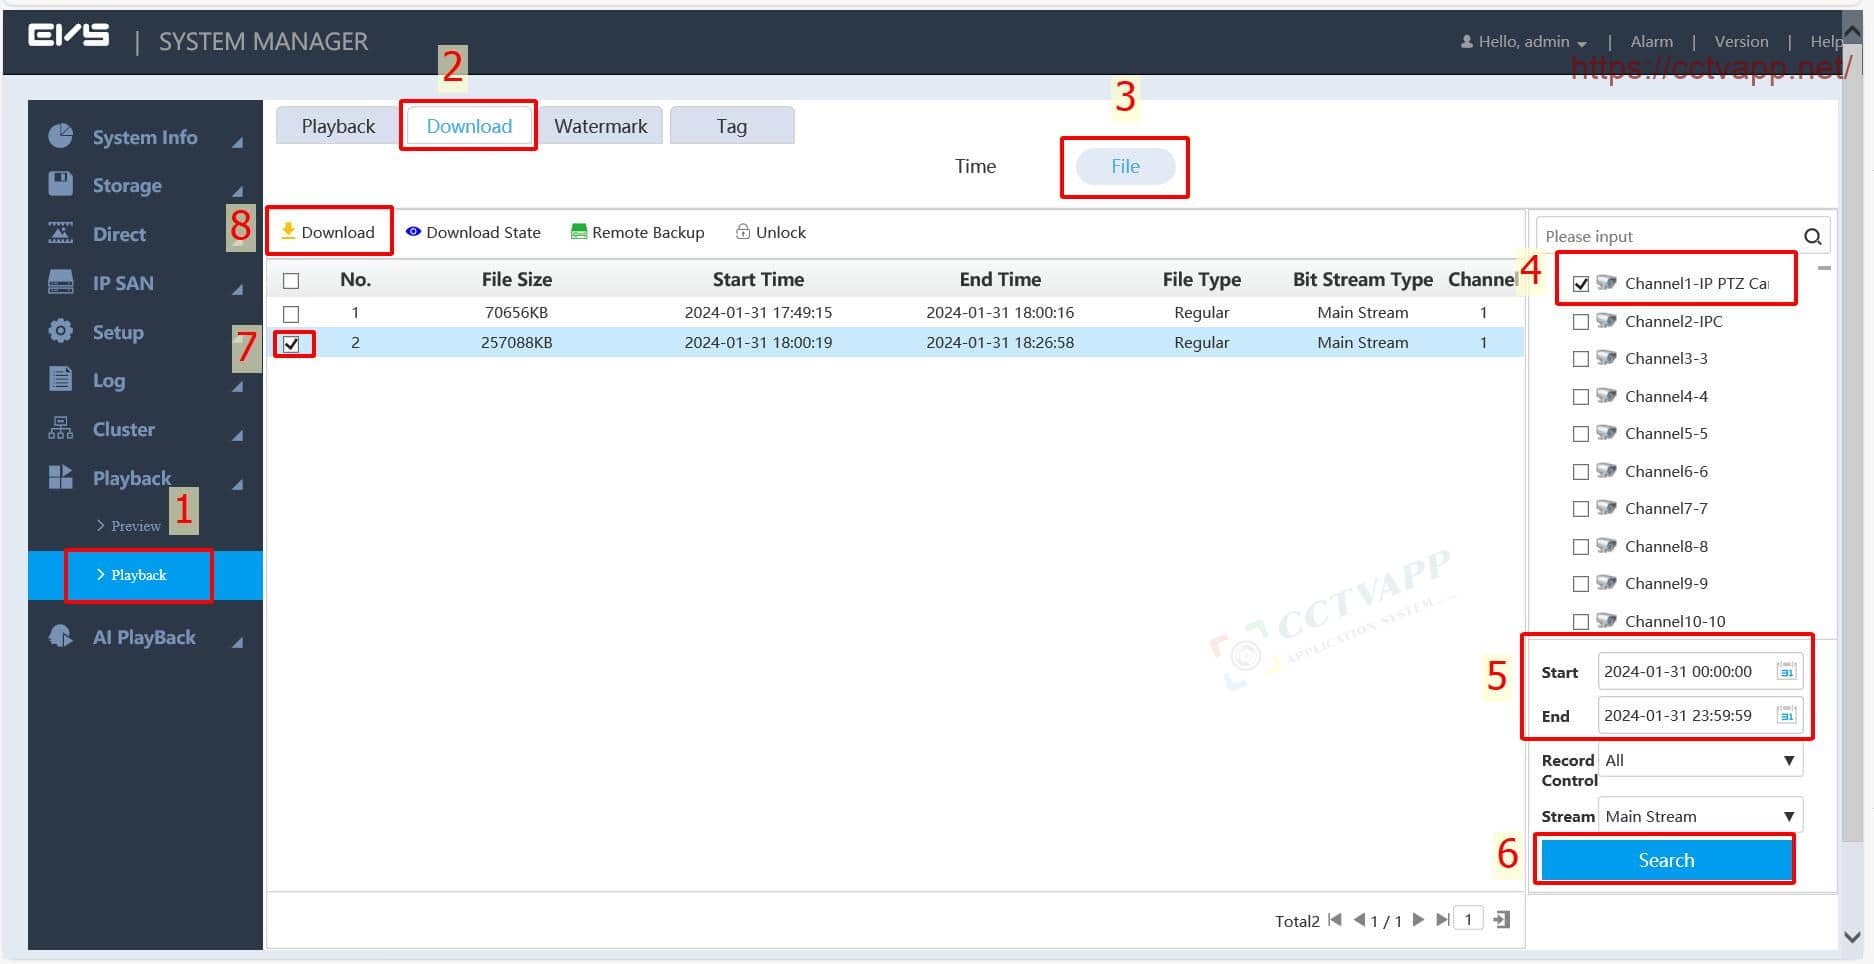
To download recorded data According to the file already created on EVS, proceed as instructed below:
Downloaded videos are supported in 2 formats: DAV and ASF. You can use the software VLC on your computer to play this video.
5. Enable P2P and add EVS to the phone software
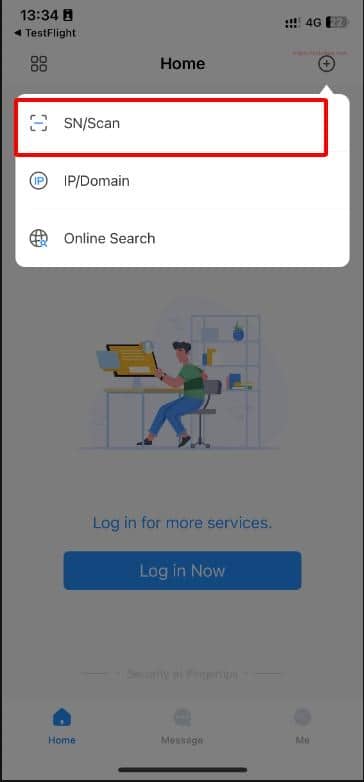
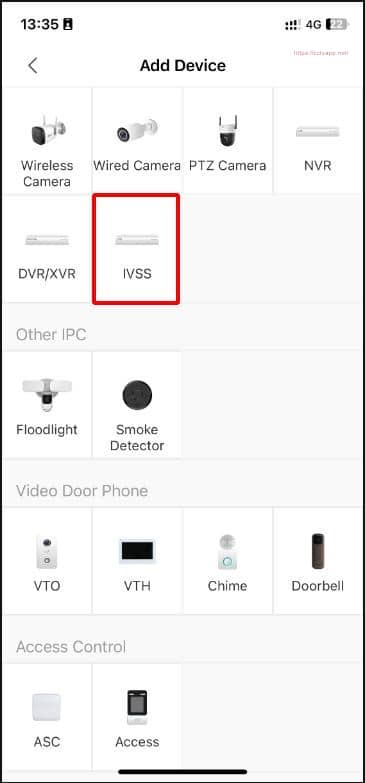
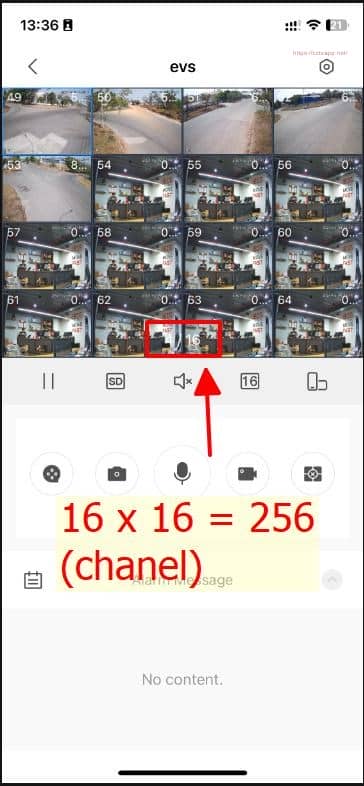
You can use the software DMSS to connect to EVS for video surveillance using P2P.
First enable the P2P function on EVS:
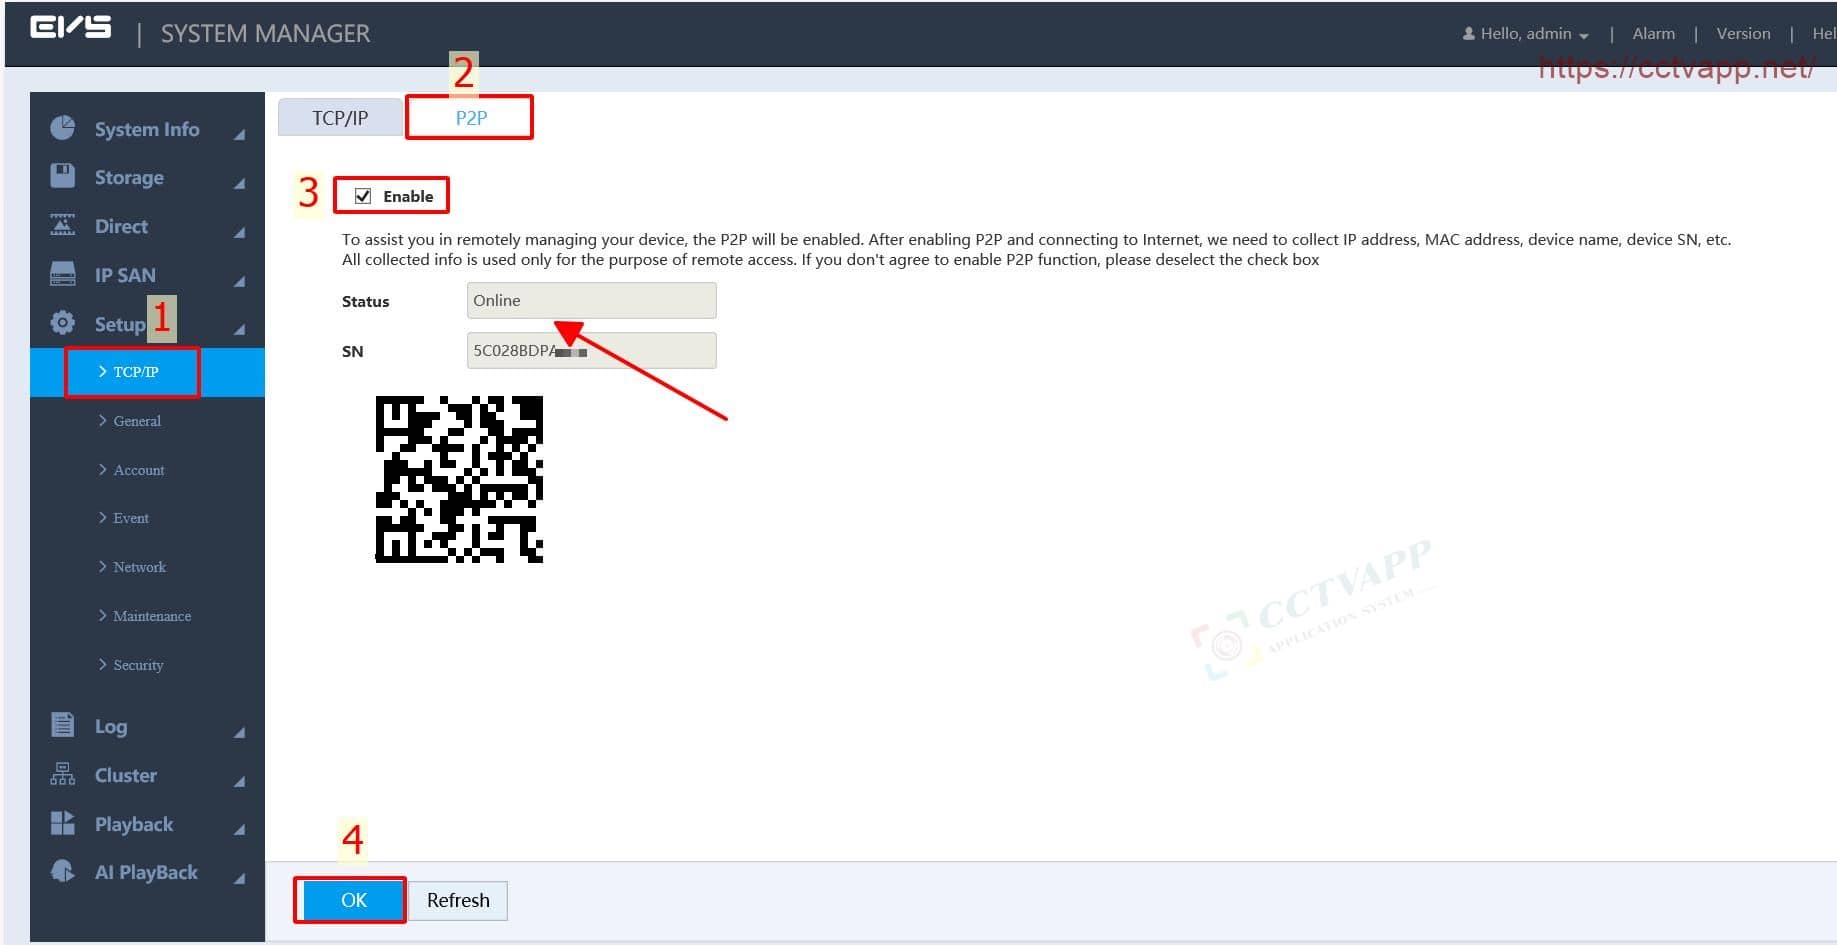
Then scan the QR code to add EVS to the software:
III. Advanced storage setup
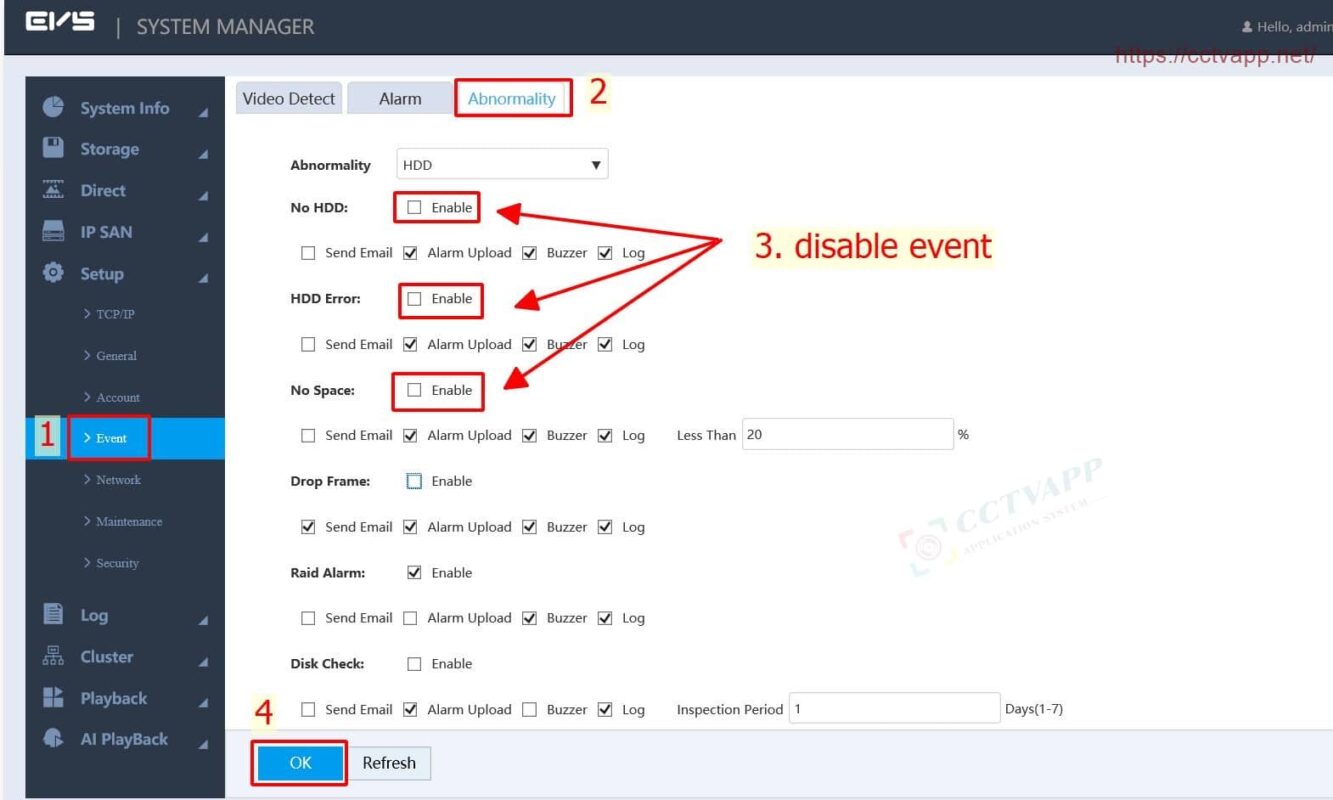
1. Mute ‘beep beep beep’ when there is no hard drive
When the hard drive is not installed, EVS will warn you by making a ‘beep beep beep’ sound. If you feel bothered, you can turn it off here.
2. Disk Group settings
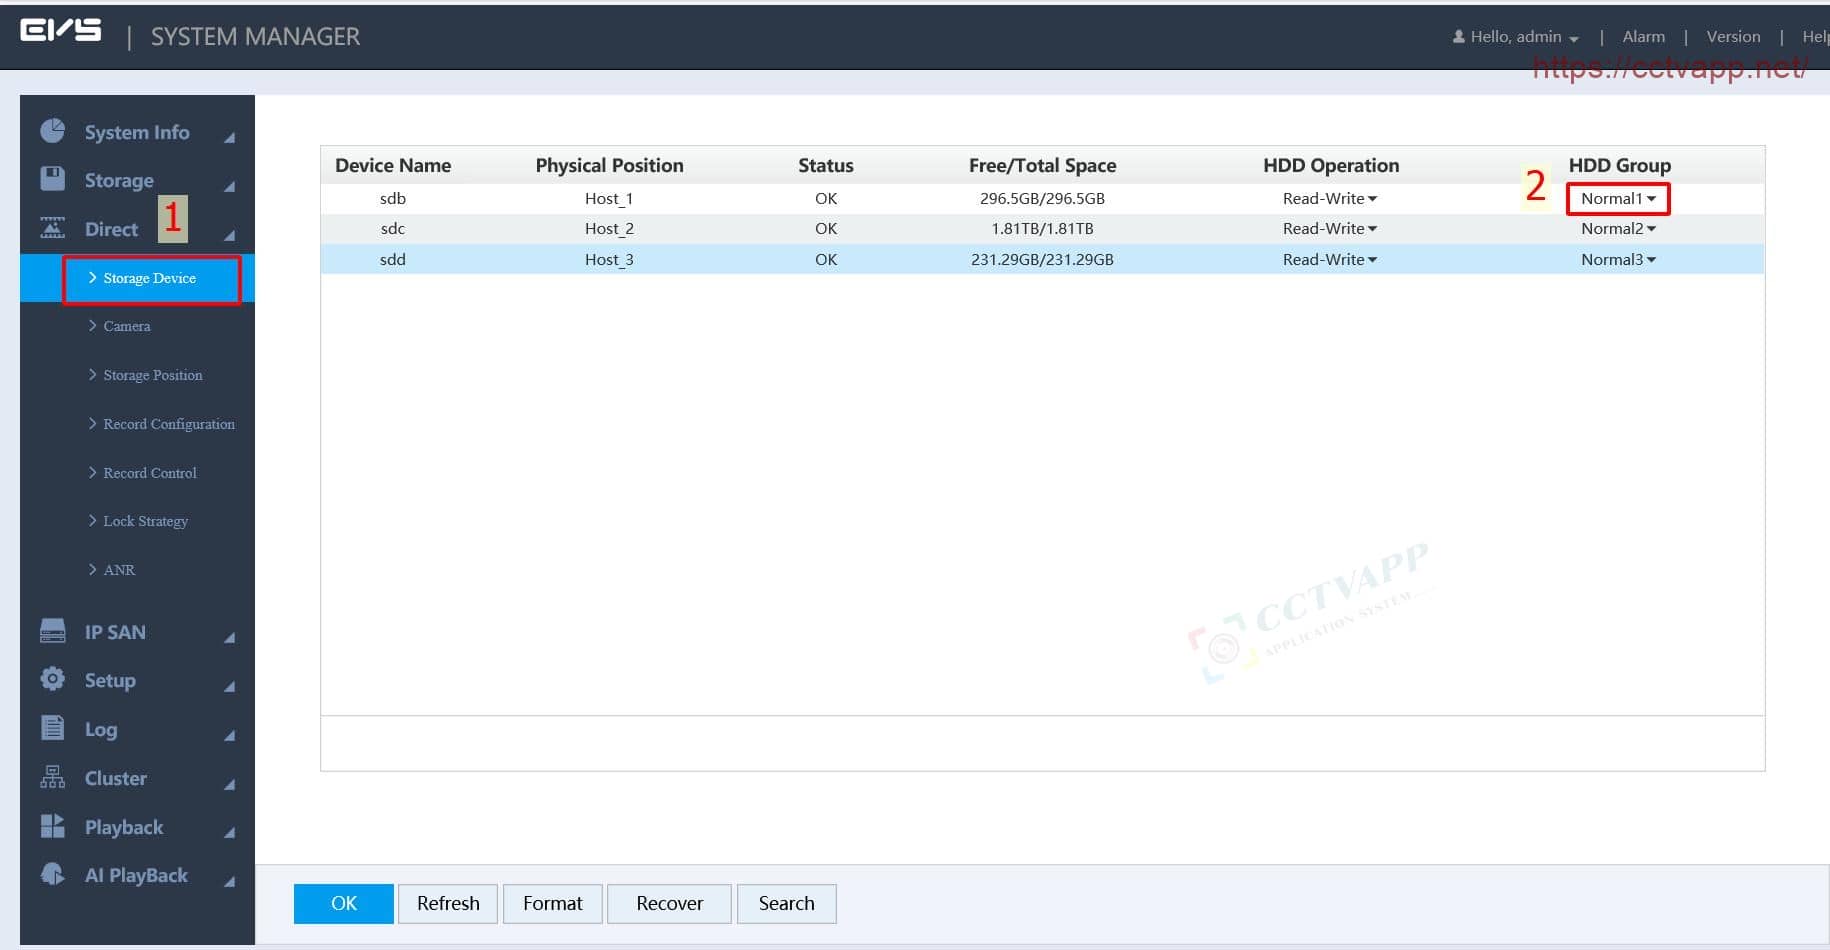
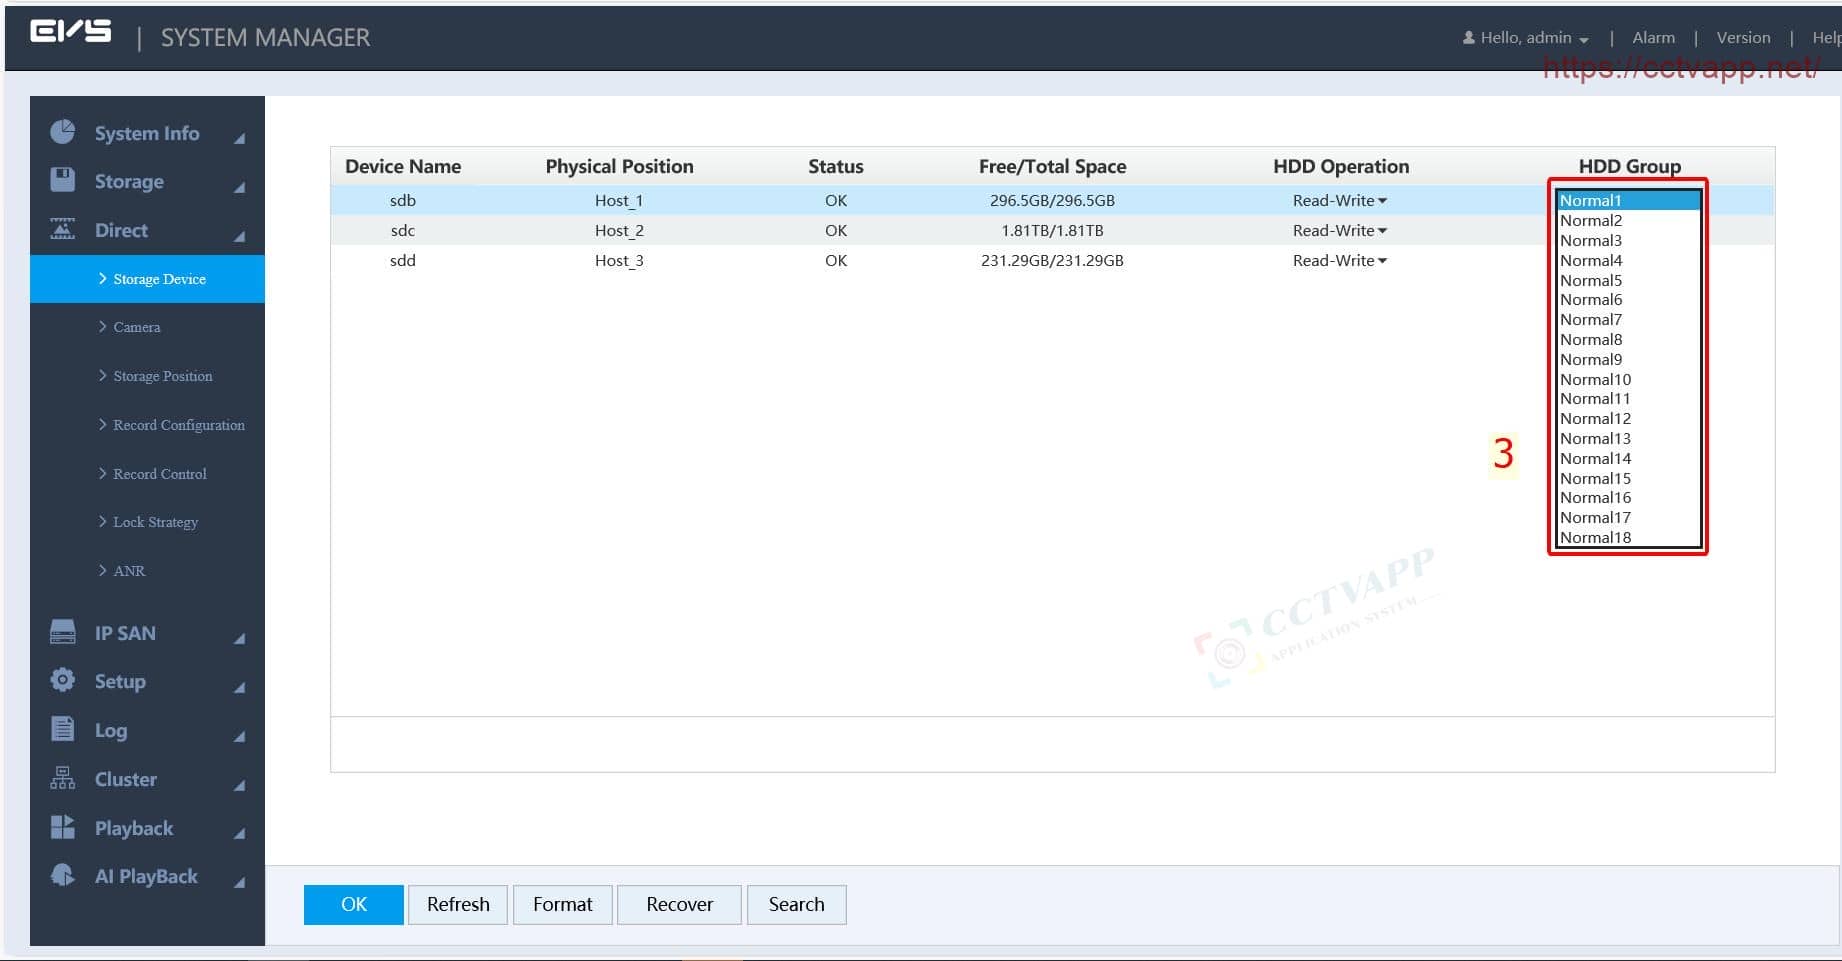
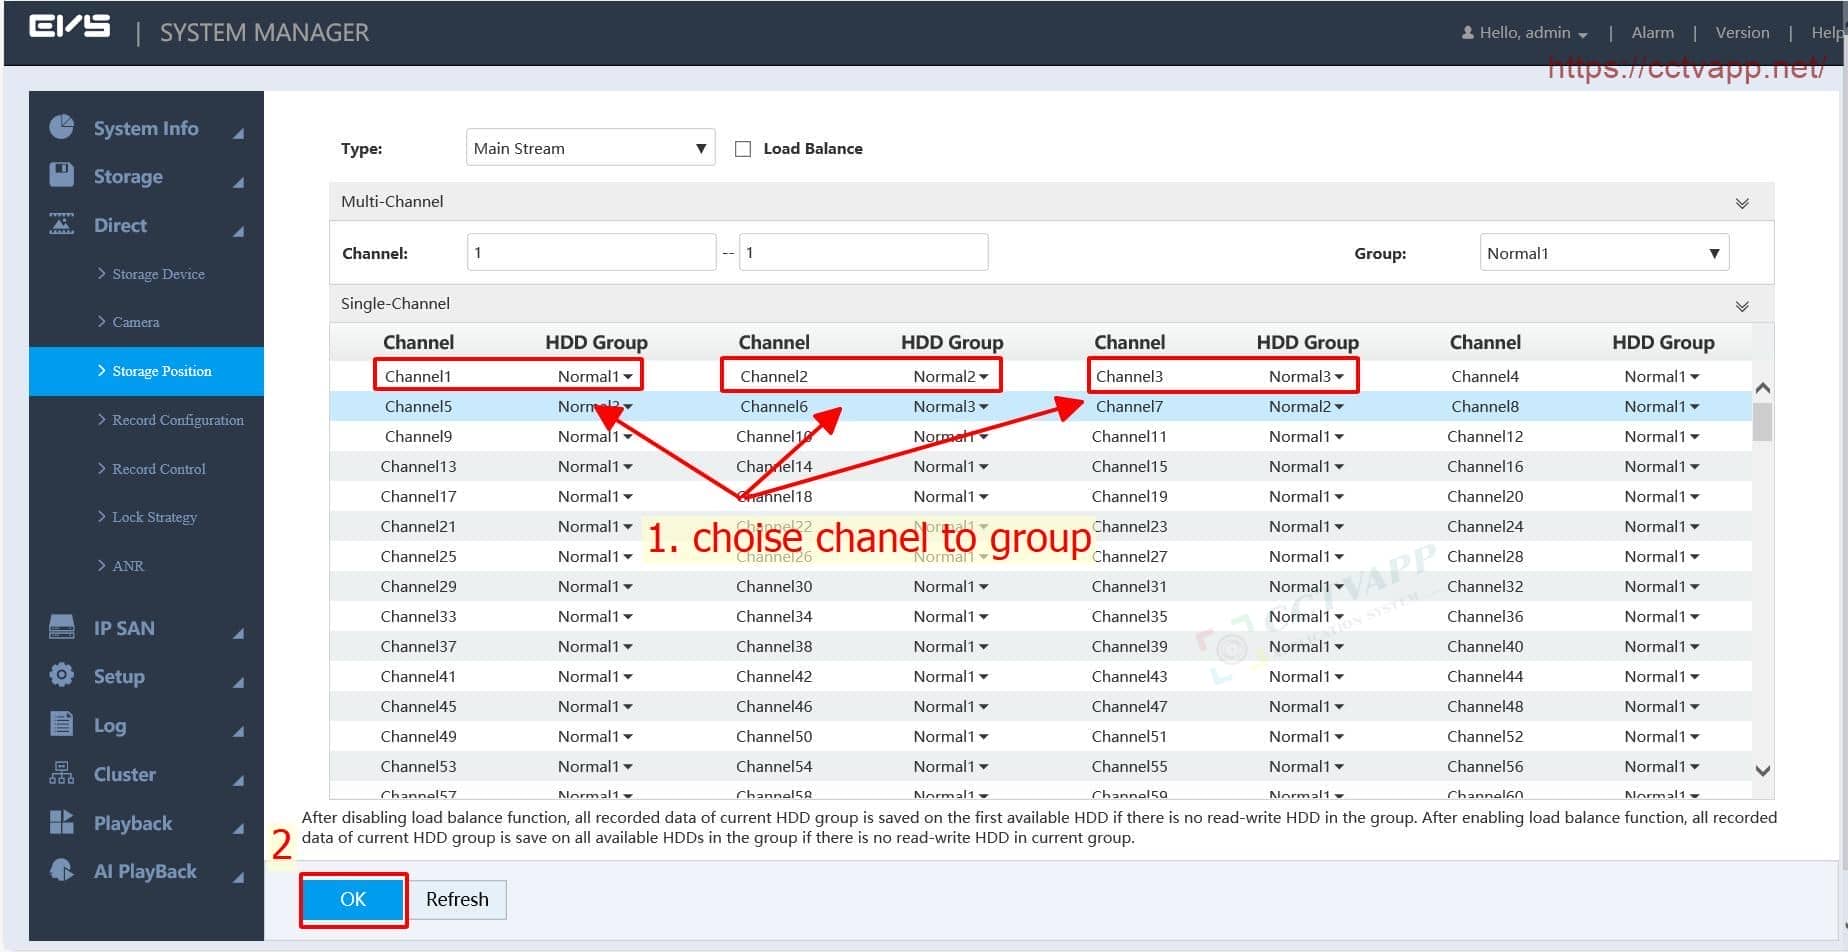
Disk group mode will help you designate a dedicated hard drive to store a specific group of Cameras. To use this function, first assign a group to each of your hard disks. By default, all hard drives will be assigned to disk group 1.
You can add hard drives to up to 18 different disk groups.
Then proceed to specify which Camera to save to the corresponding disk group. By default all Cameras will be stored in disk group 1.
3. Install RAID (RAID 5)
RAID is an abbreviation for Redundant Array of Independent Disks. Initially, RAID is used as a protection solution because it allows data to be written to multiple hard disks at the same time. Later, RAID there have been many variations that allow not only to ensure data security but also to significantly increase the speed of accessing data from the hard disk
Currently, all EVS support RAID to ensure your data storage is safe. When using RAID, you should pay attention to the following issues:
- EVS supports multiple RAID, but it is recommended that you should use RAID 5
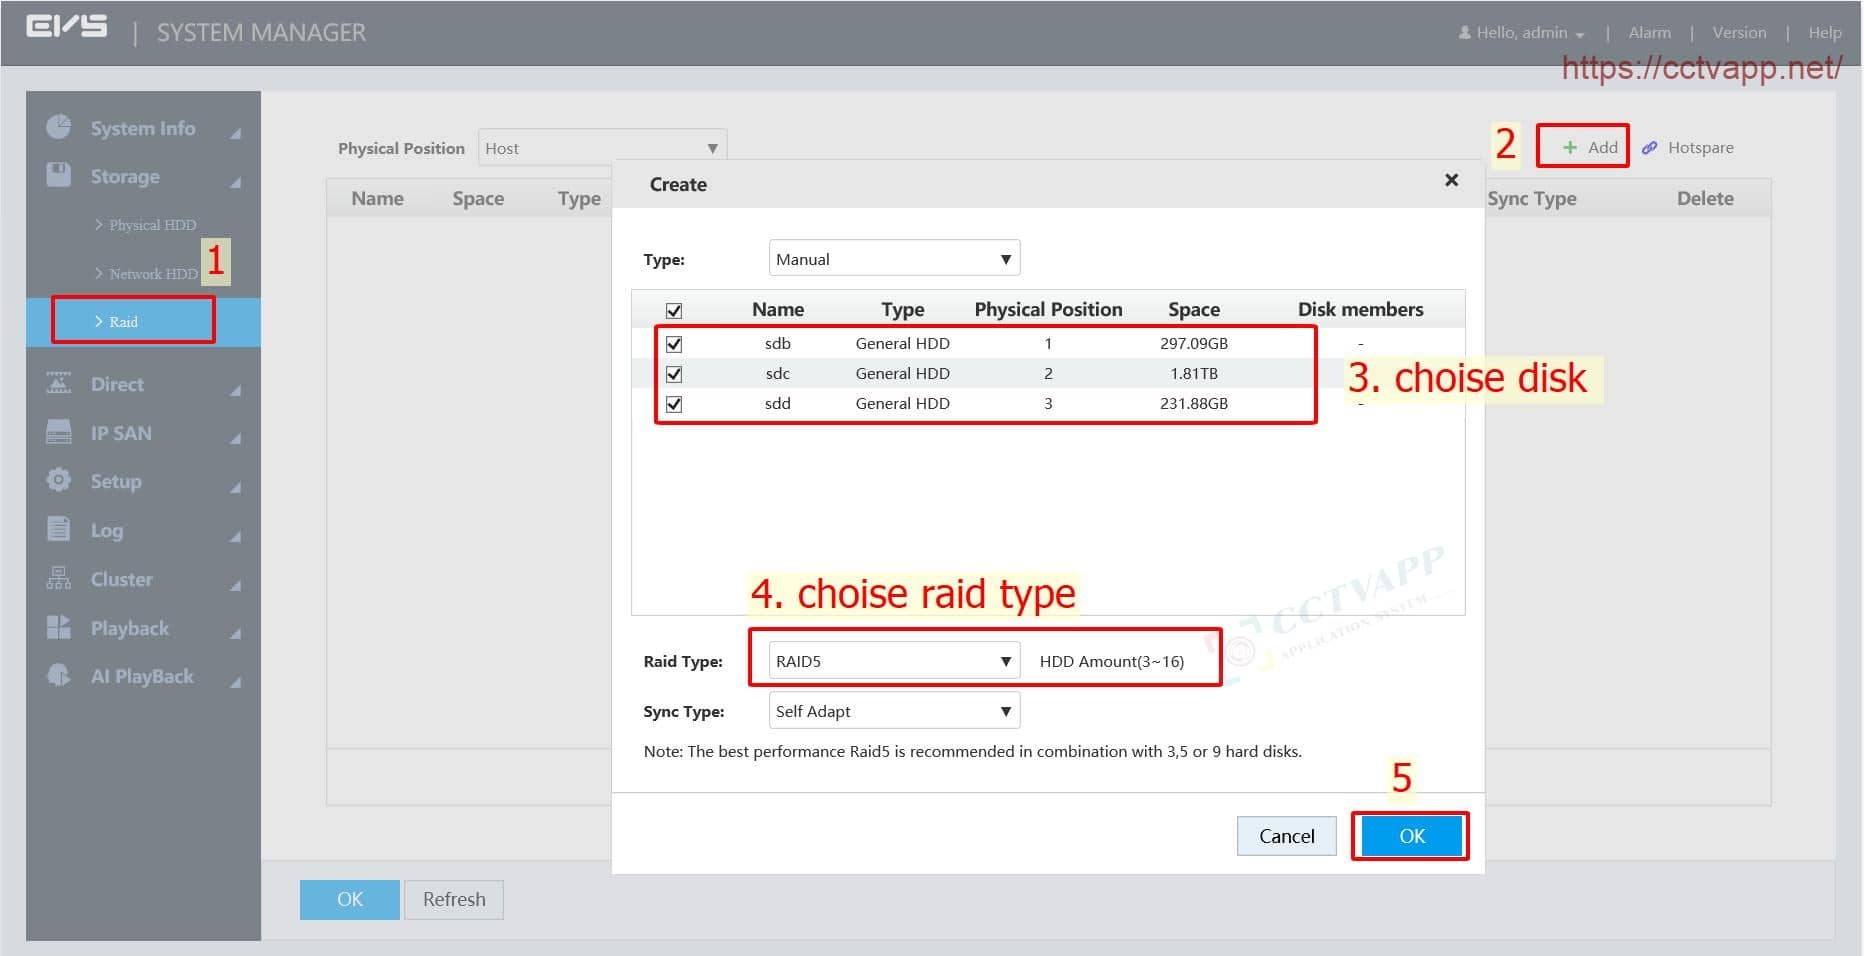
- It is possible to create multiple RAID 5 clusters, the number of hard drives in each cluster is calculated according to the formula 2n + 1, for example: 3 hard drives, 5 hard drives, 9 hard drives, 17 drives hard, …
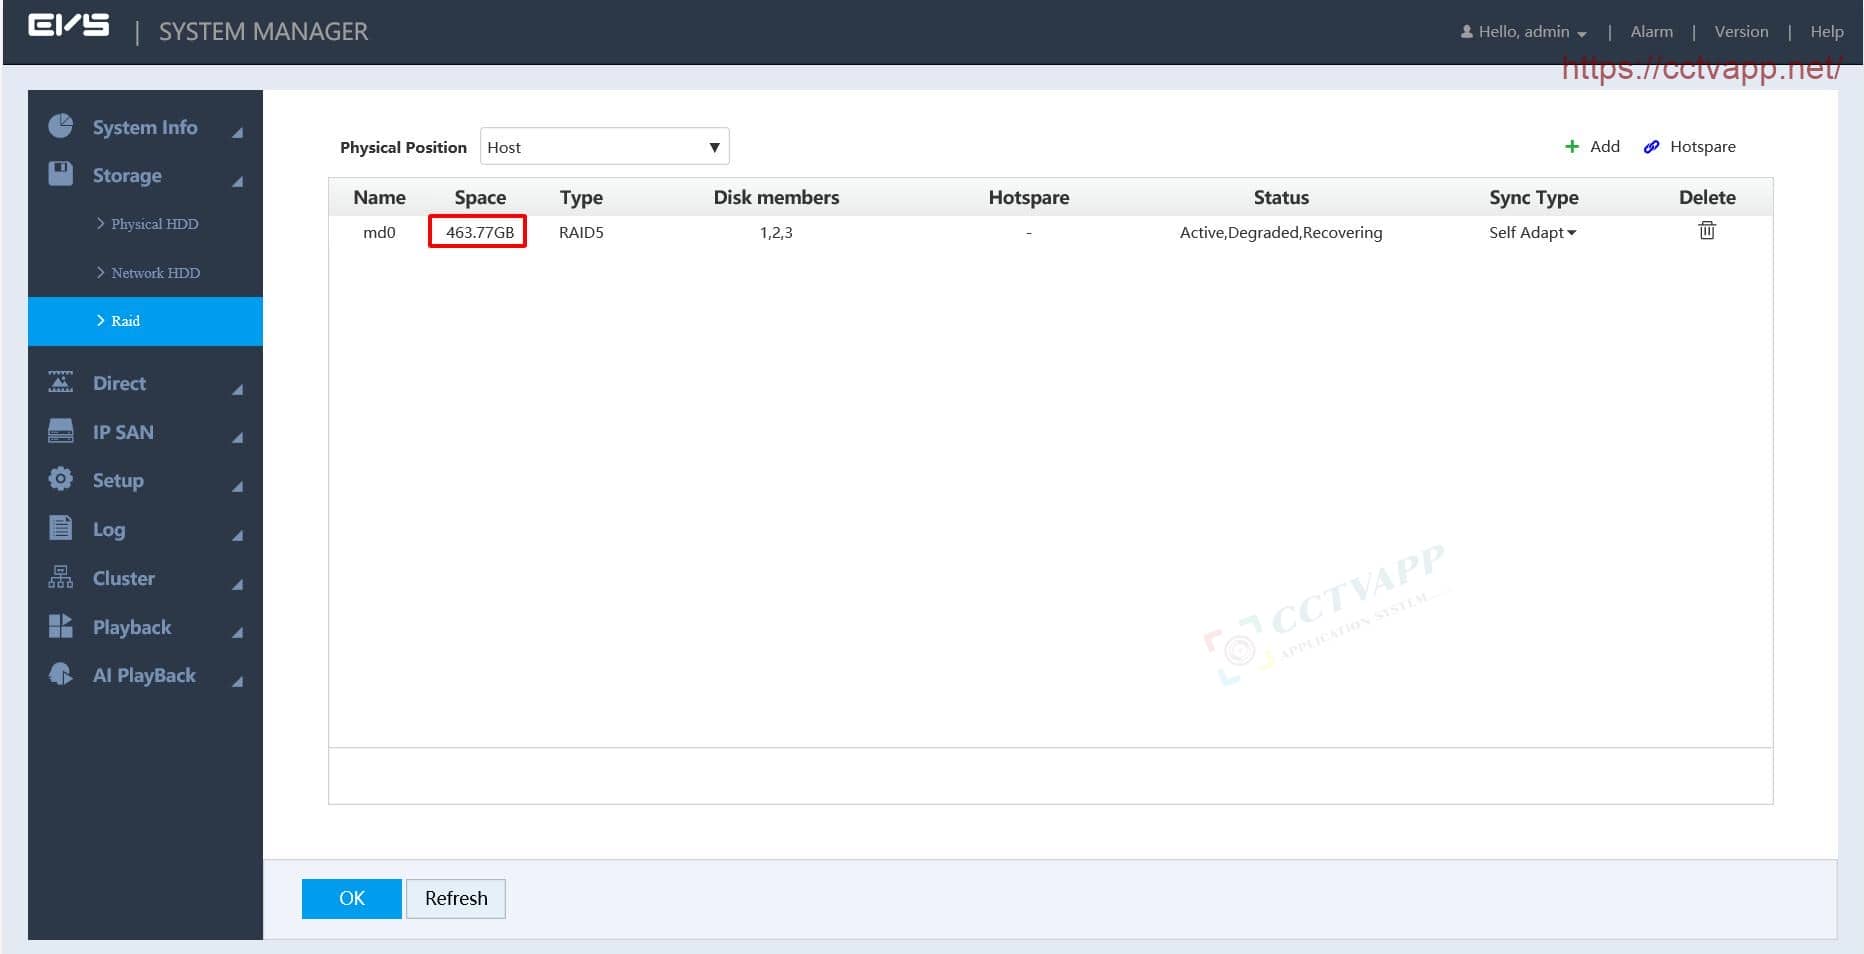
- Available capacity per RAID 5 will be equal to ( n – 1) * drive capacity. For example, creating RAID 5 with 5 hard drives, the actual capacity will be equal to 4 drives combined.
- You should use an Enreprise hard drive of the same capacity and the same manufacturer for best results.
- In case you use multiple hard drives of different capacities, the calculation will be based on the hard drive with the lowest capacity.
Detailed installation instructions:
First, create a new RAID, select the hard drive and choose the RAID type.
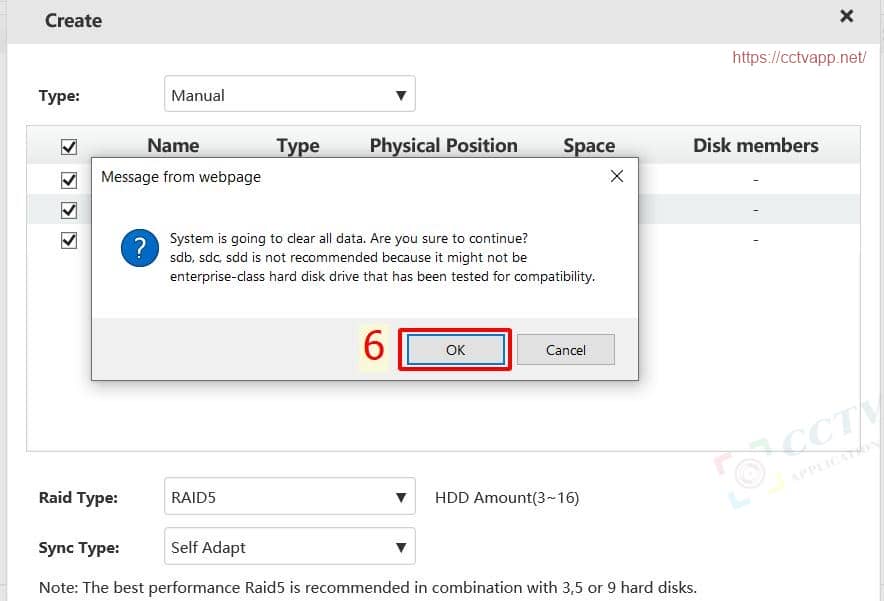
When starting to create RAID, all data saved on the hard drive (if any) will be deleted.
The RAID cluster has been created and is ready to use.
4. Hotspare – Hot spare hard drive
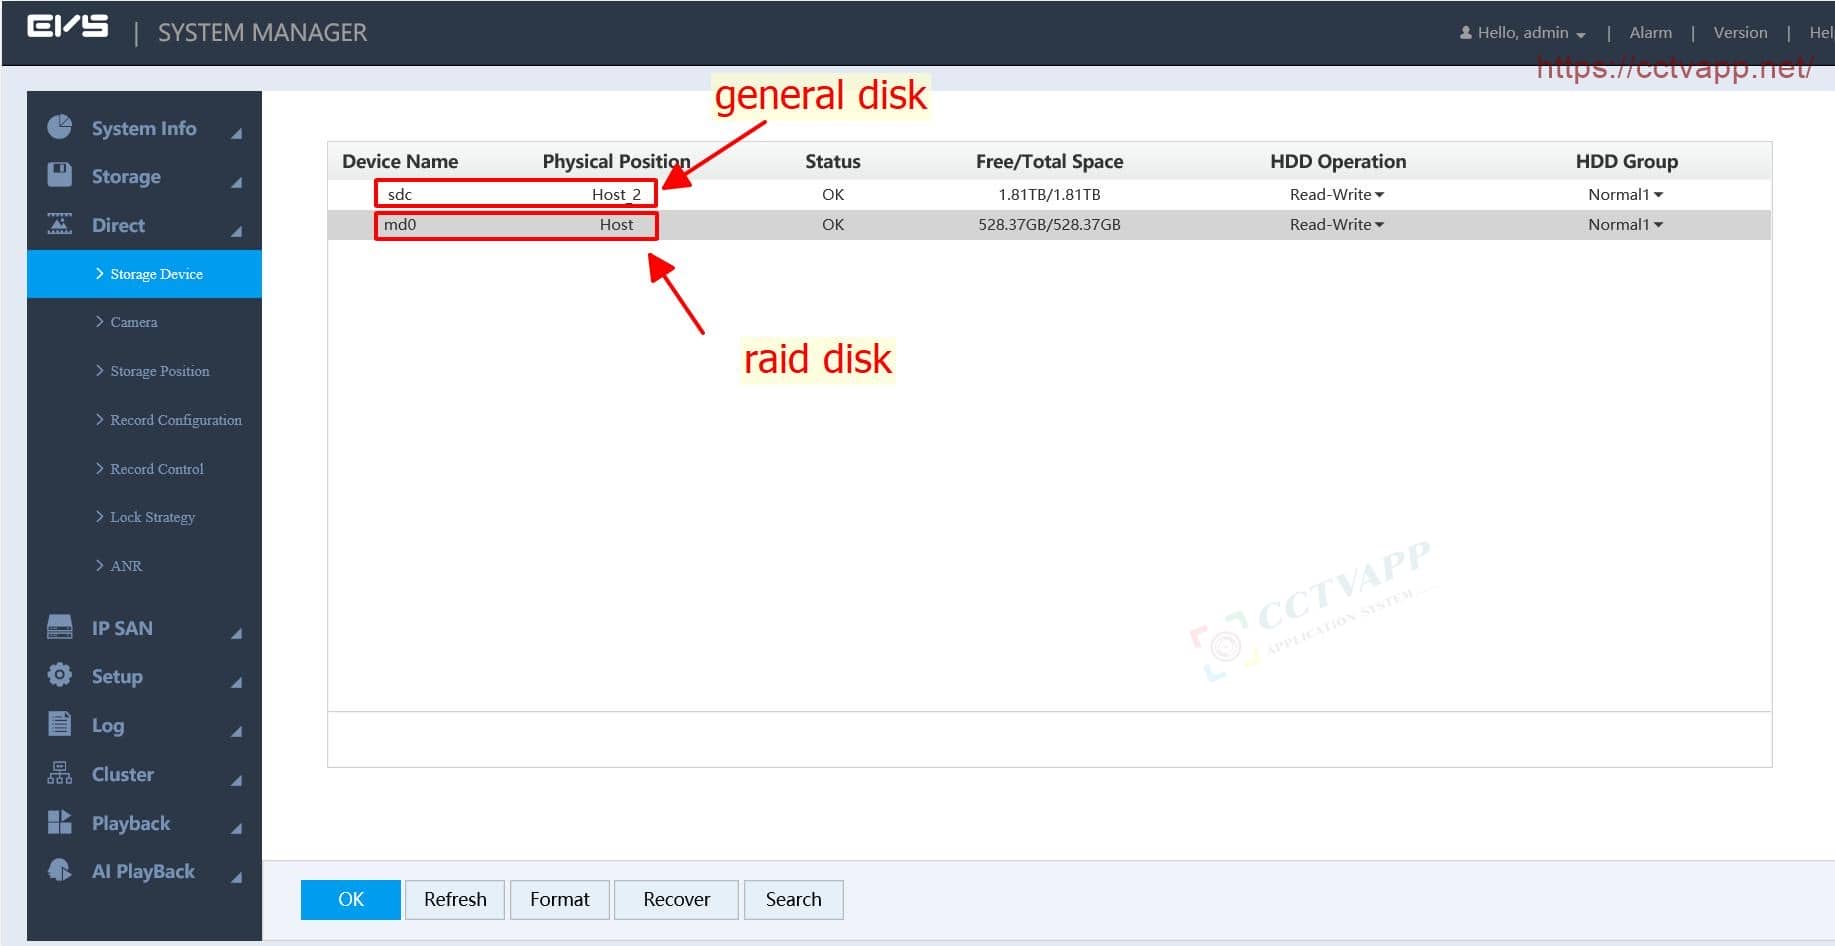
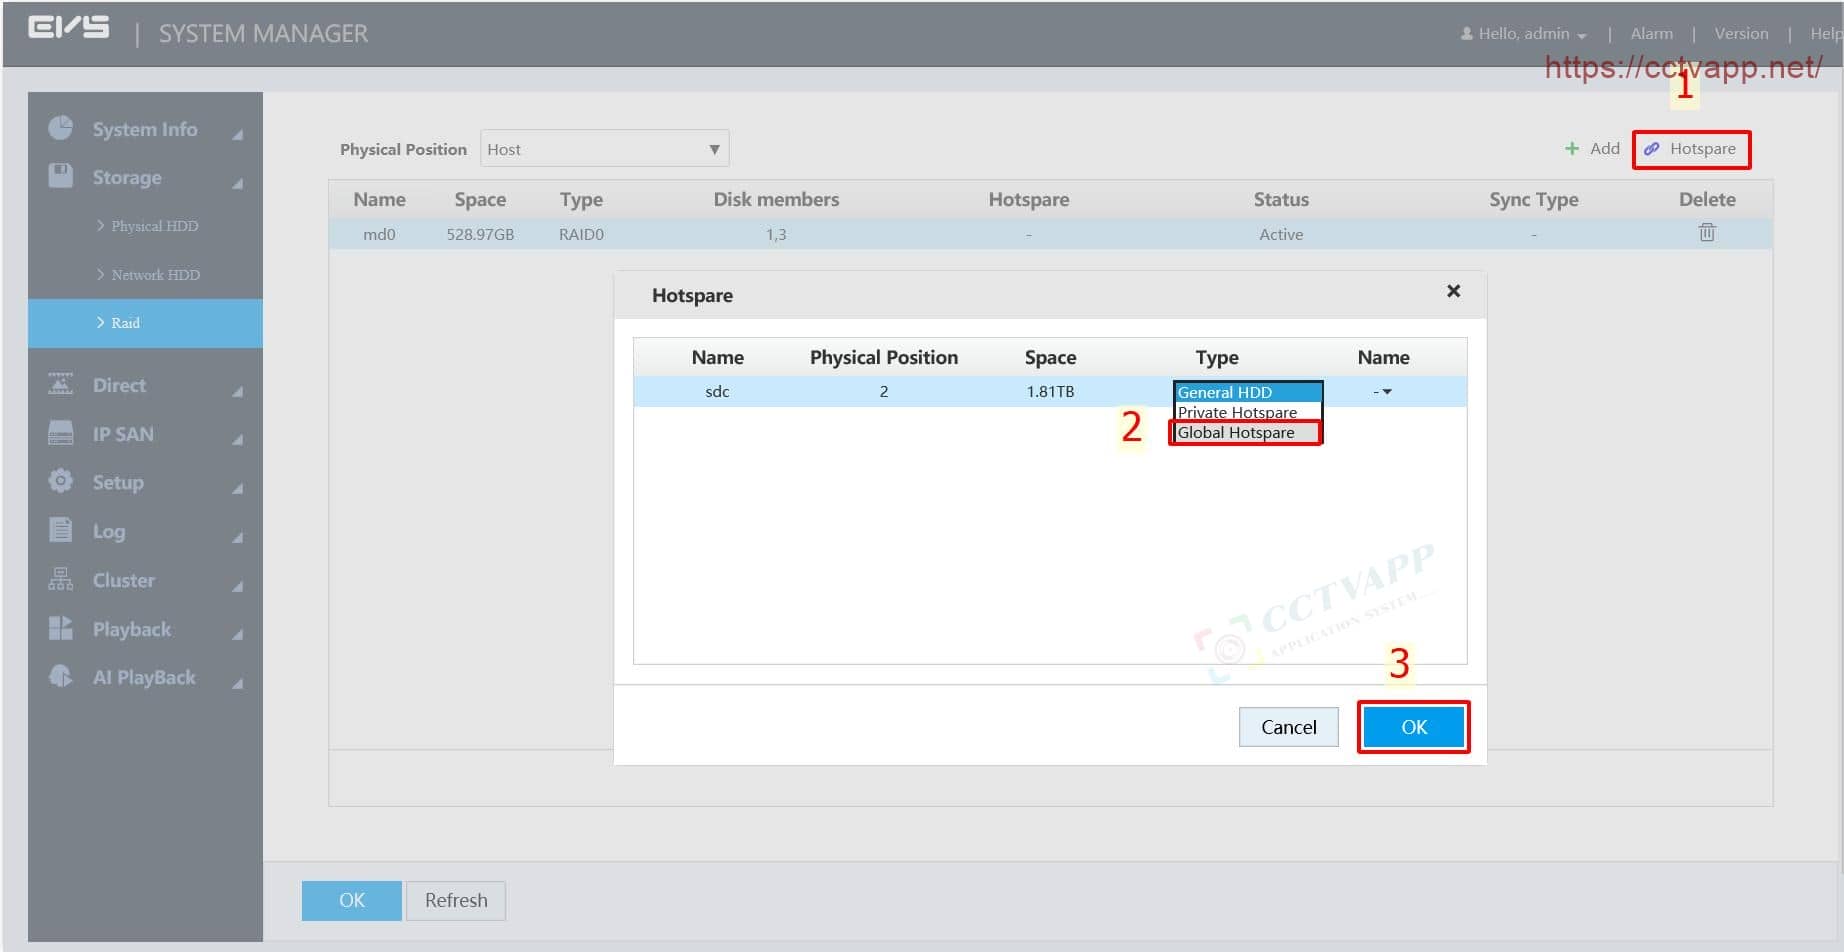
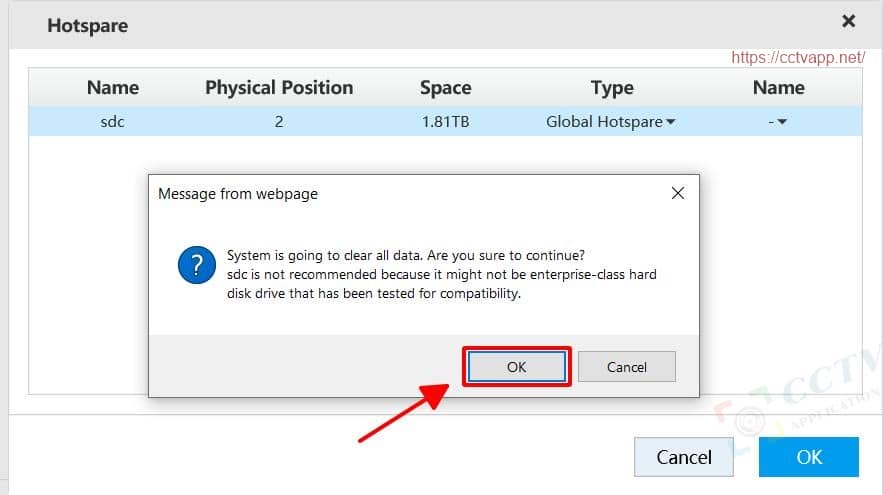
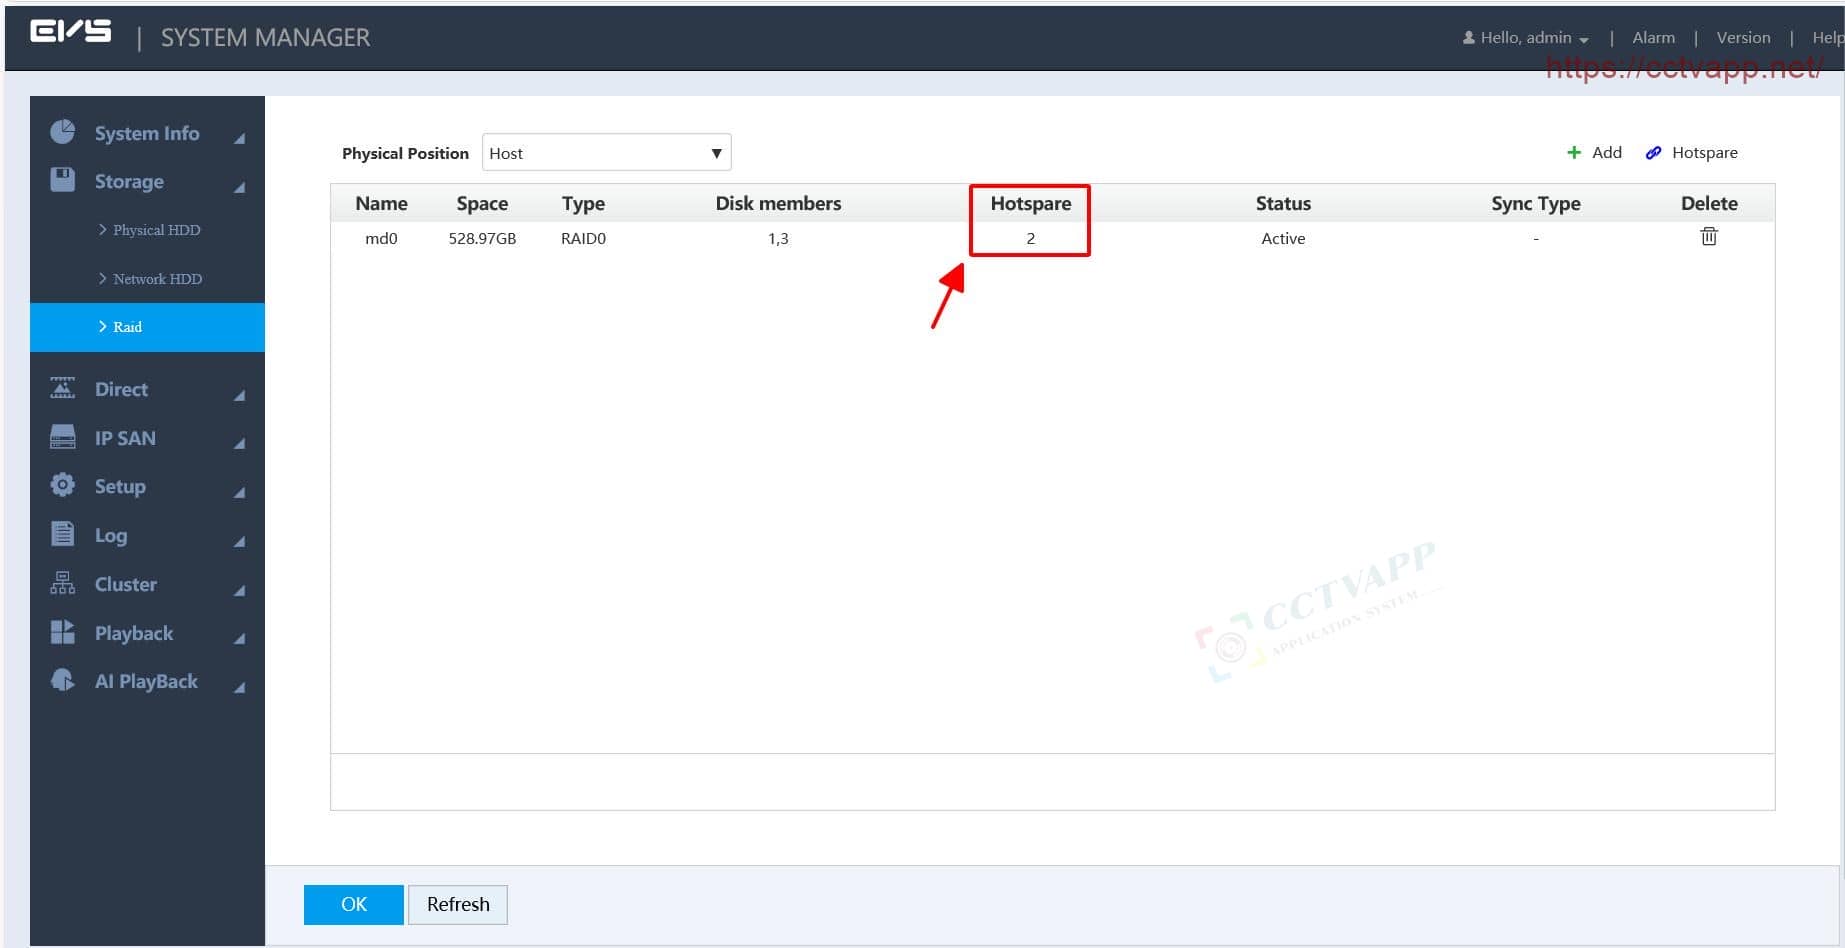
Hotspare – Hot spare hard drive is an indispensable function when using RAID. When the RAID fails, this Hotspare drive will automatically replace the failed position in your RAID.
You can create one or more hot spare drives for RAID, proceed as follows:
5. Create ISCSI network storage on EVS
First, create a new Storage Pool and select the hard drive to use.
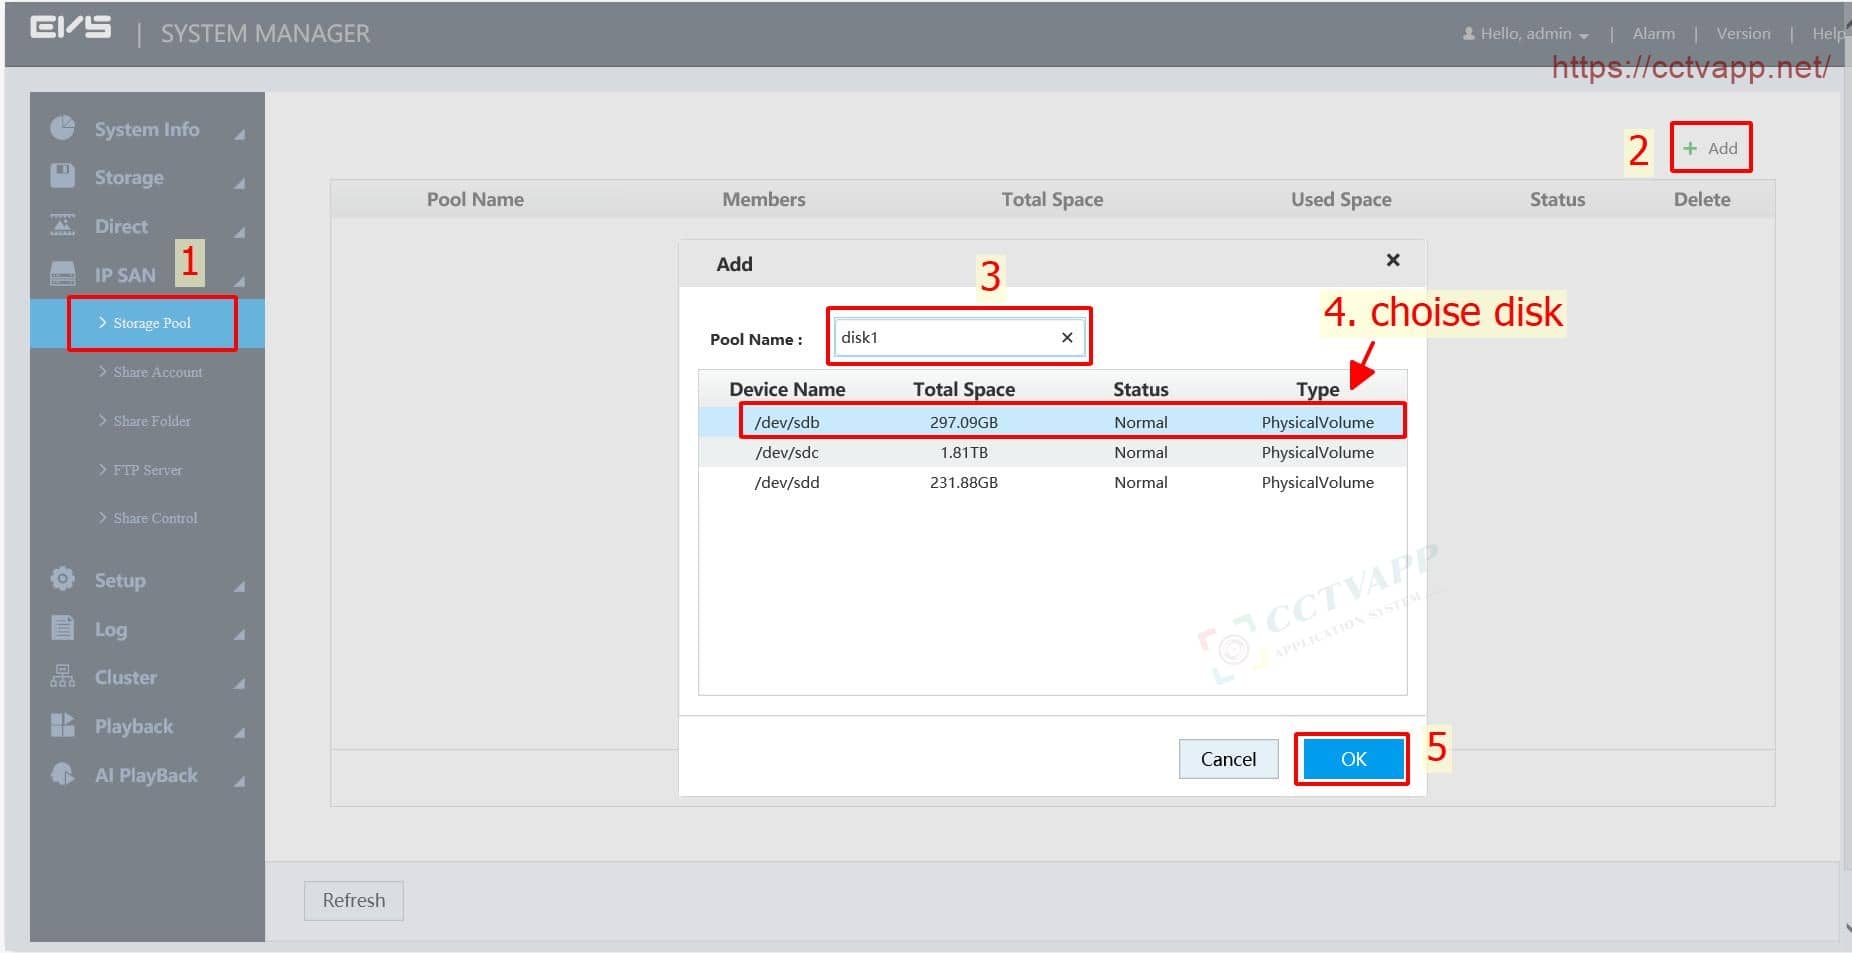
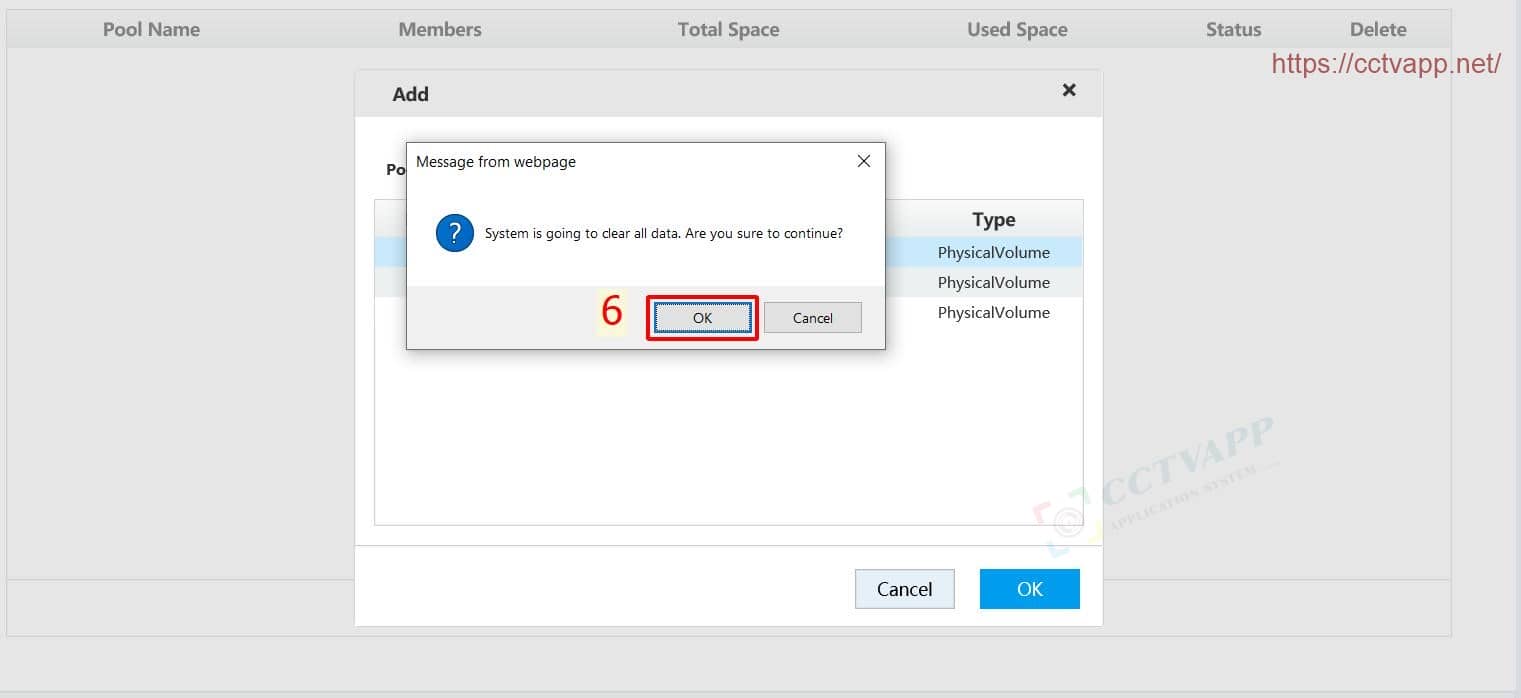
Next, you need to create an account to use ISCSI:
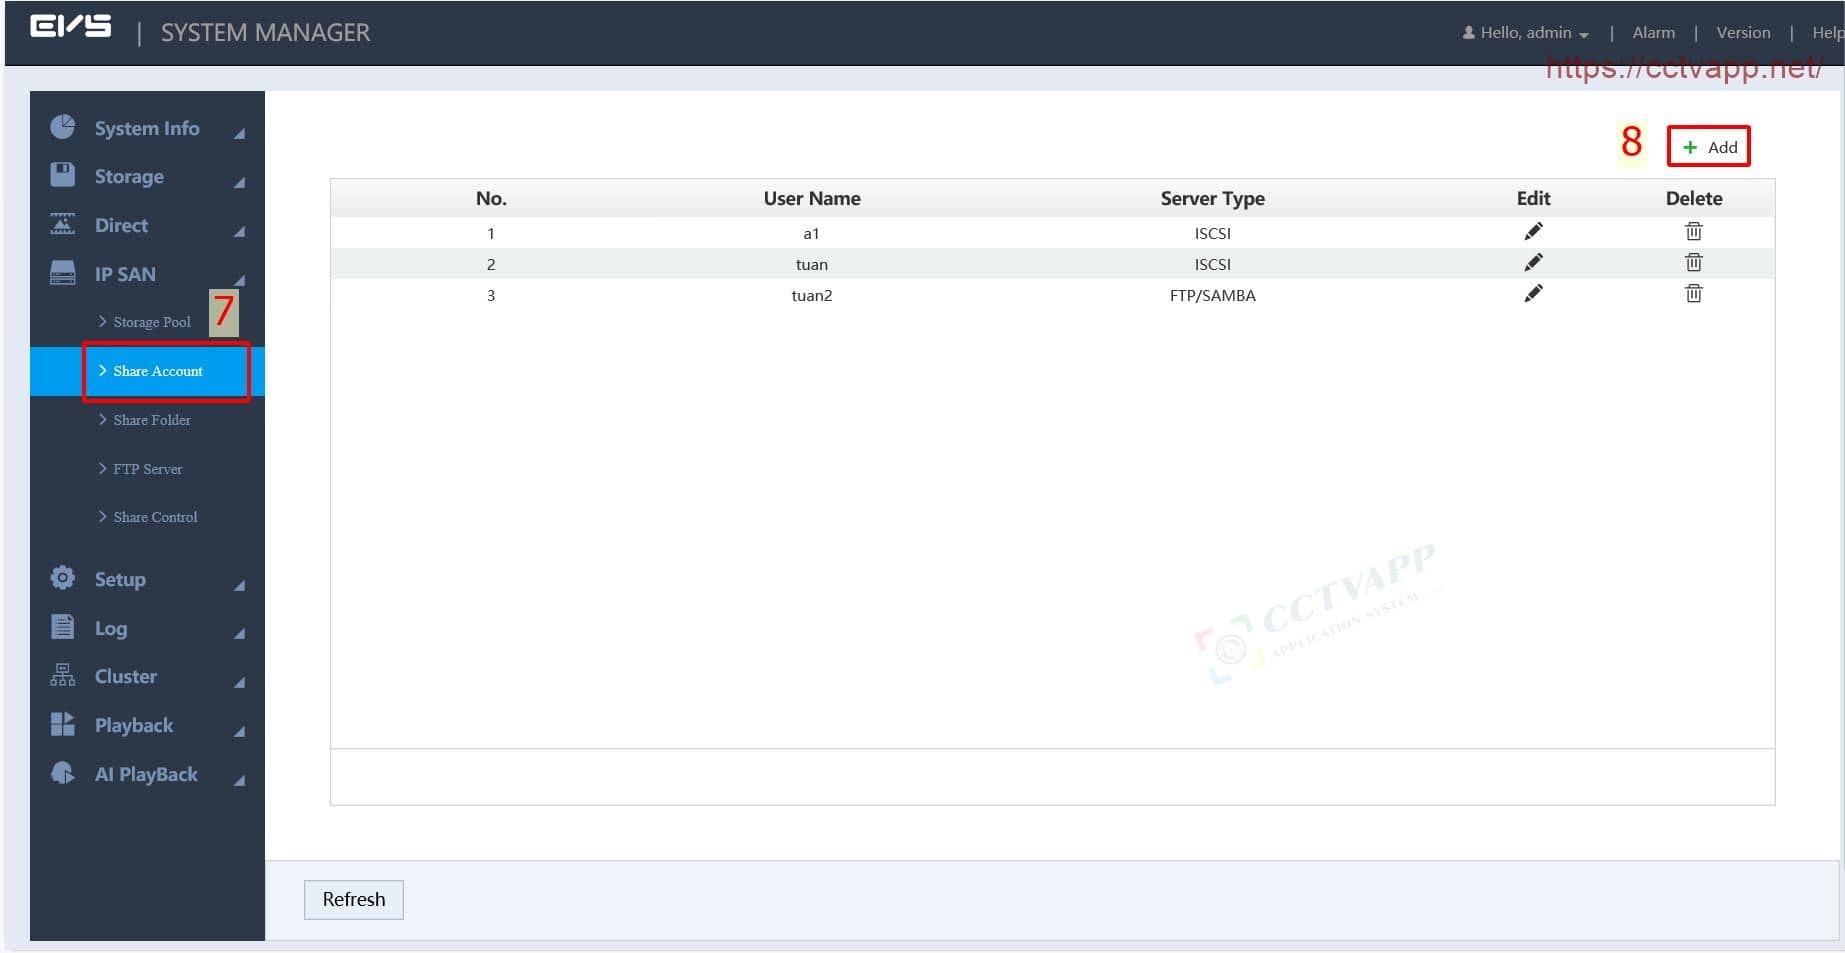
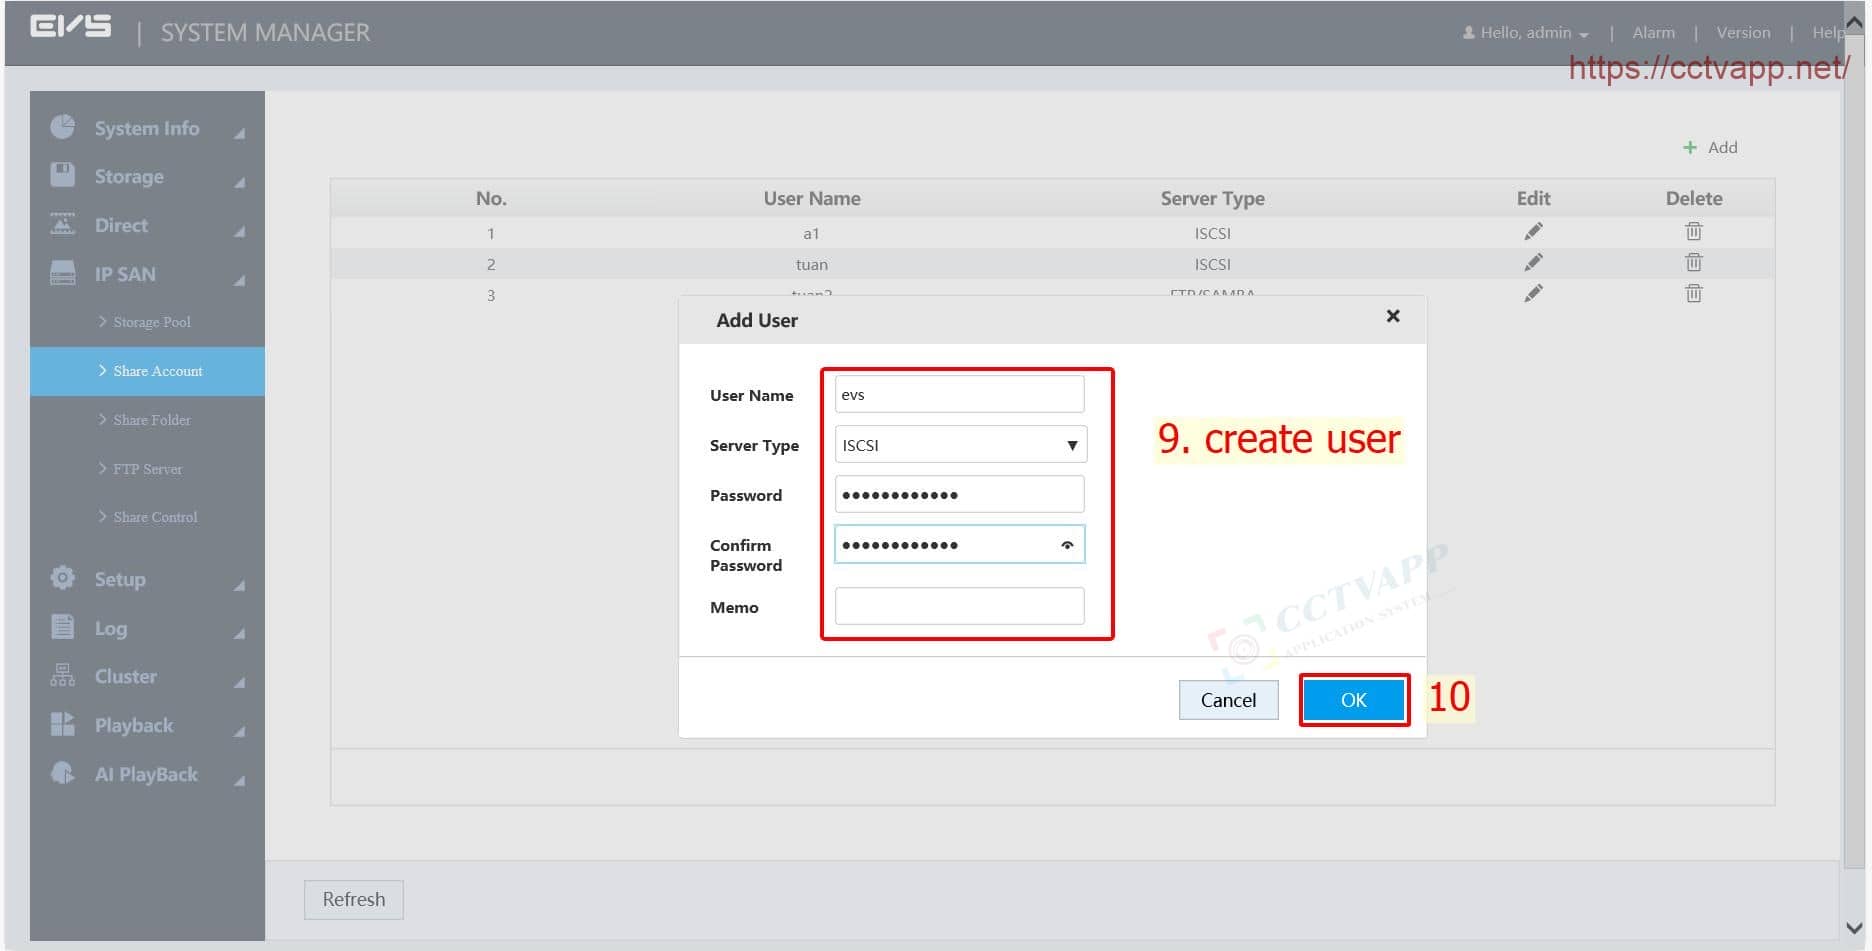
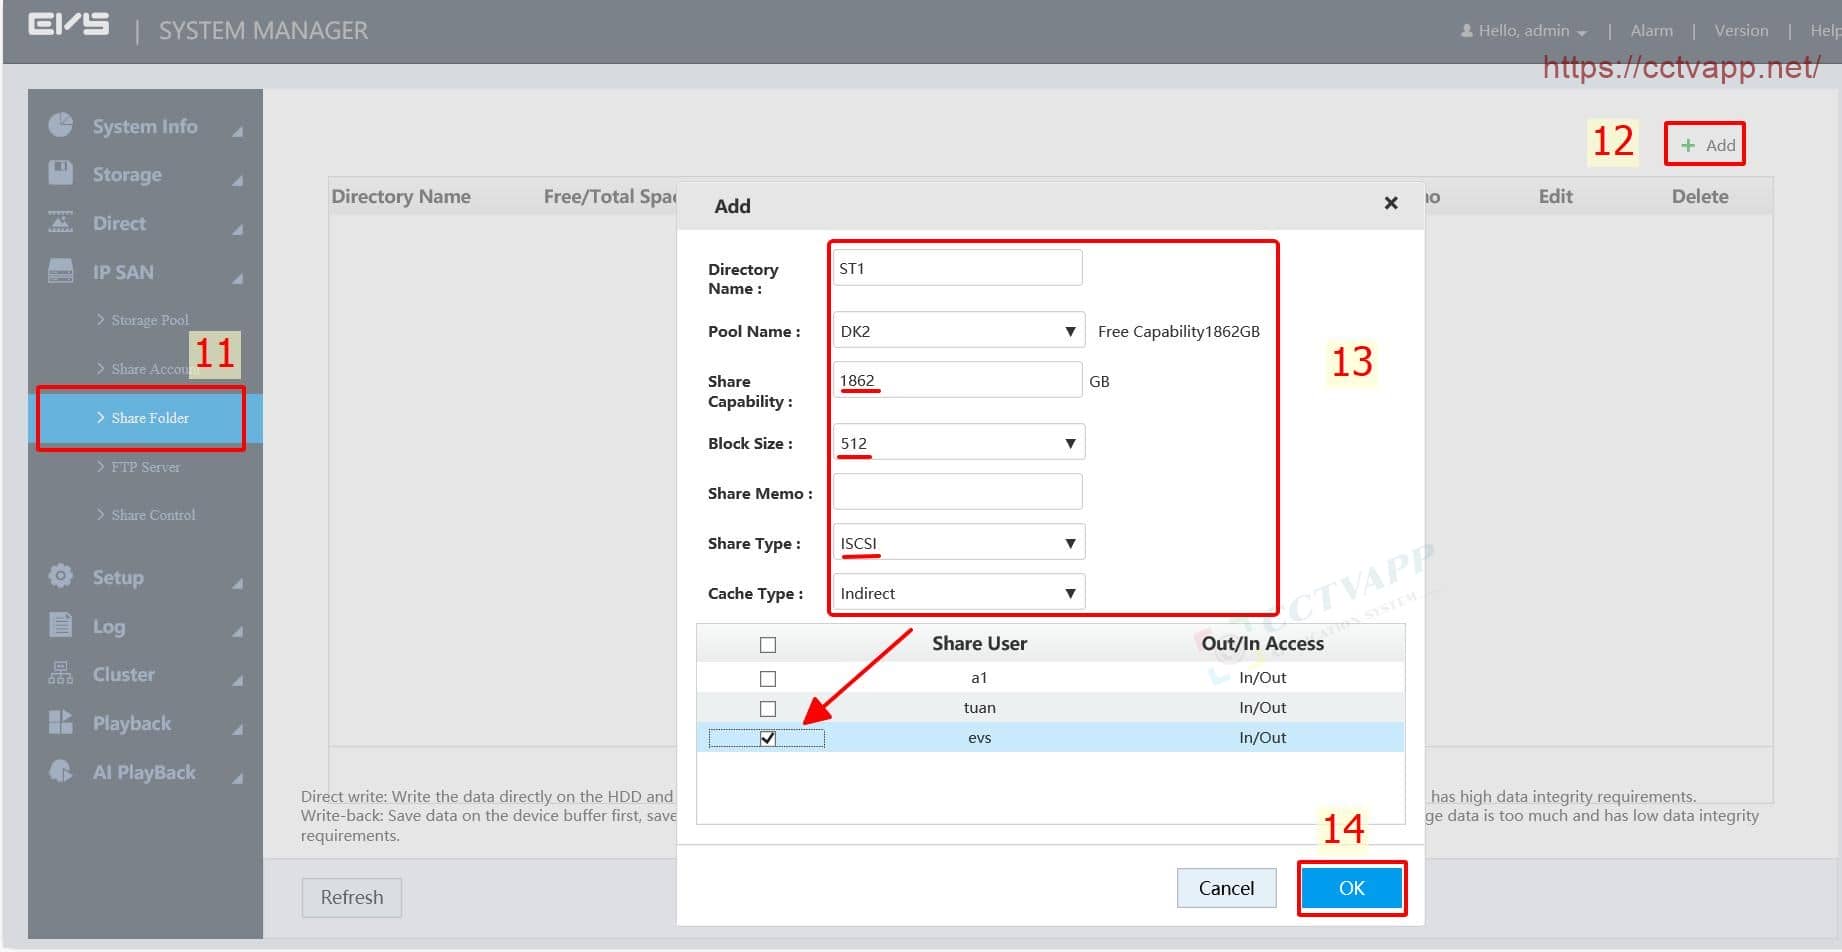
Set hard drive permissions for the newly created ISCSI account. Important note:
- Share Capability: Enter the capacity you want to share for your account.
- Block size: Choose 512
- Share type: Select ISCSI
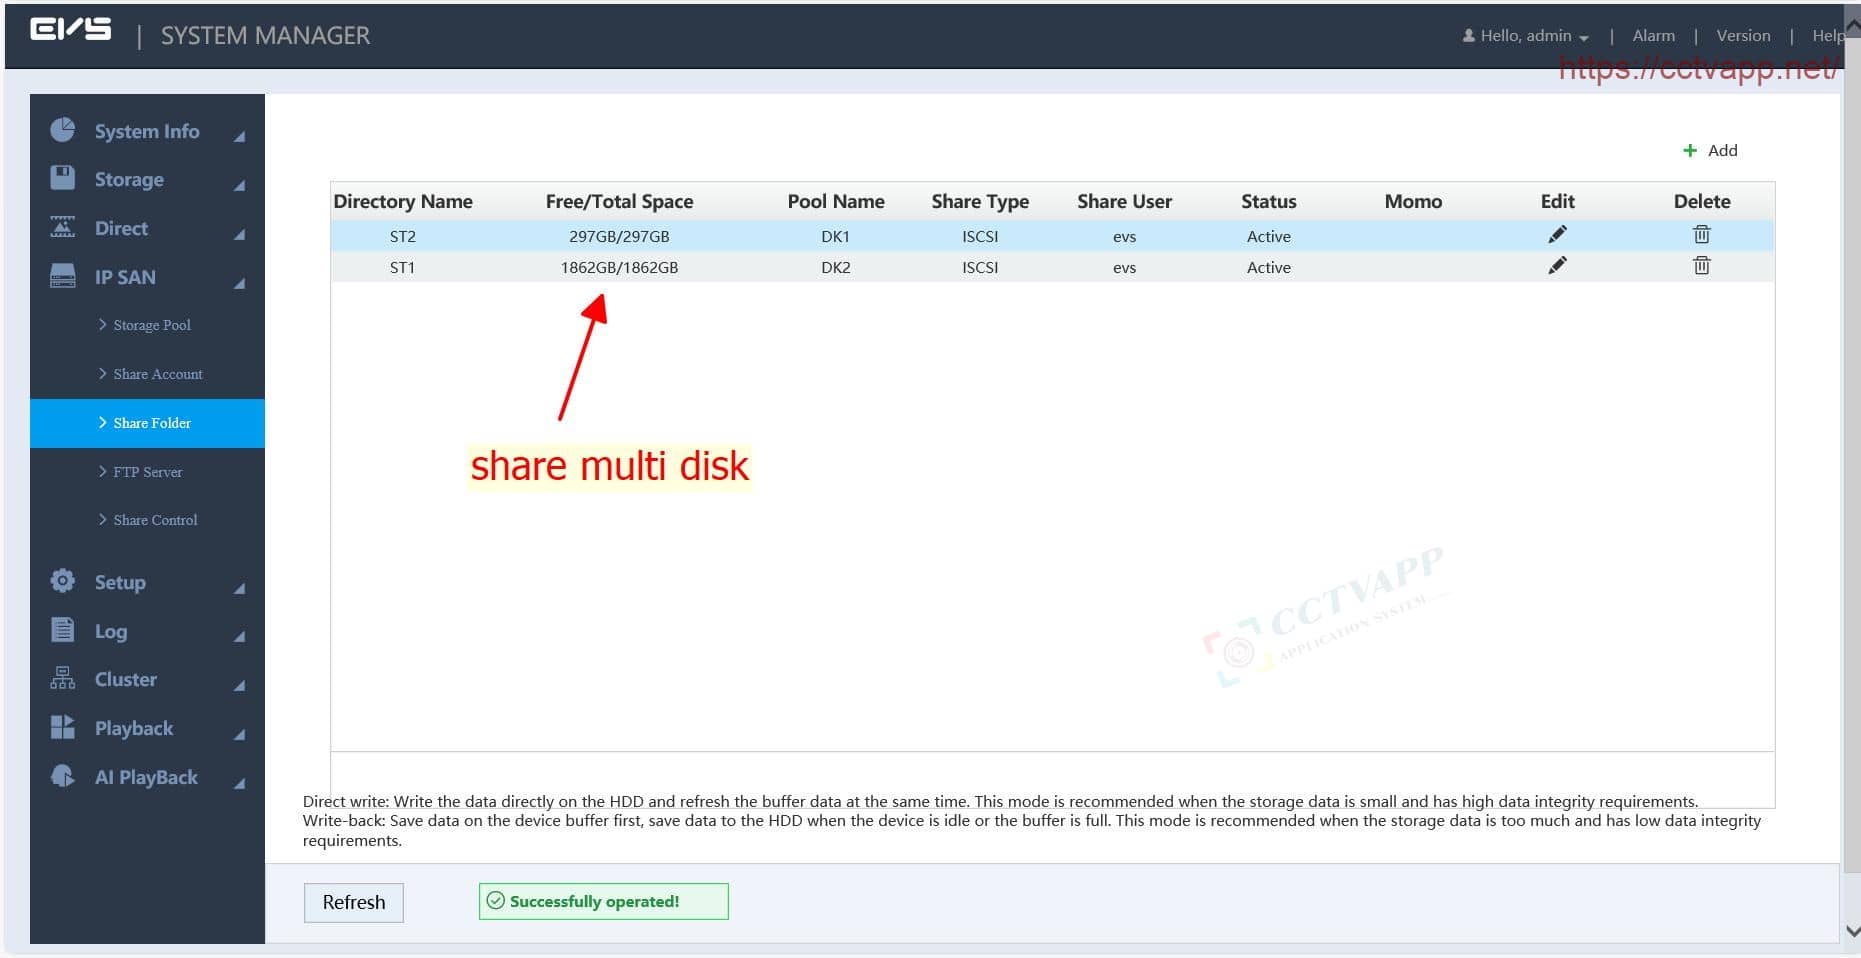
You can assign multiple hard drives to the same ISCSI account.
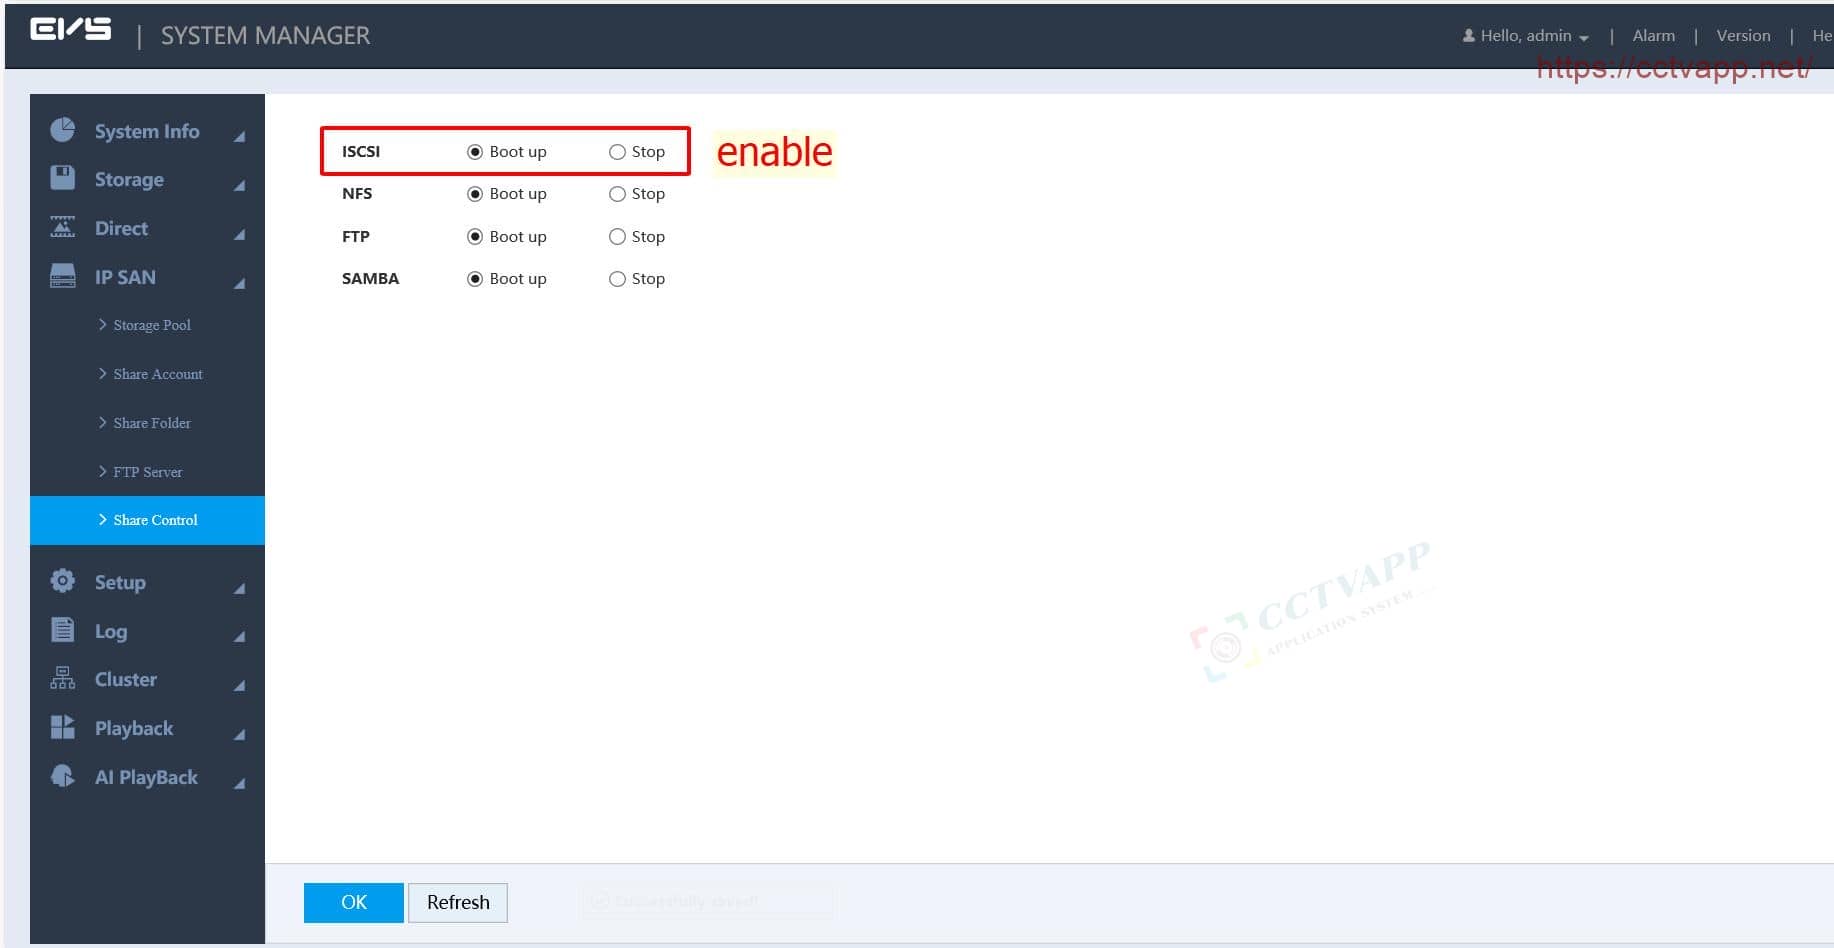
Enable ISCSI operating mode.
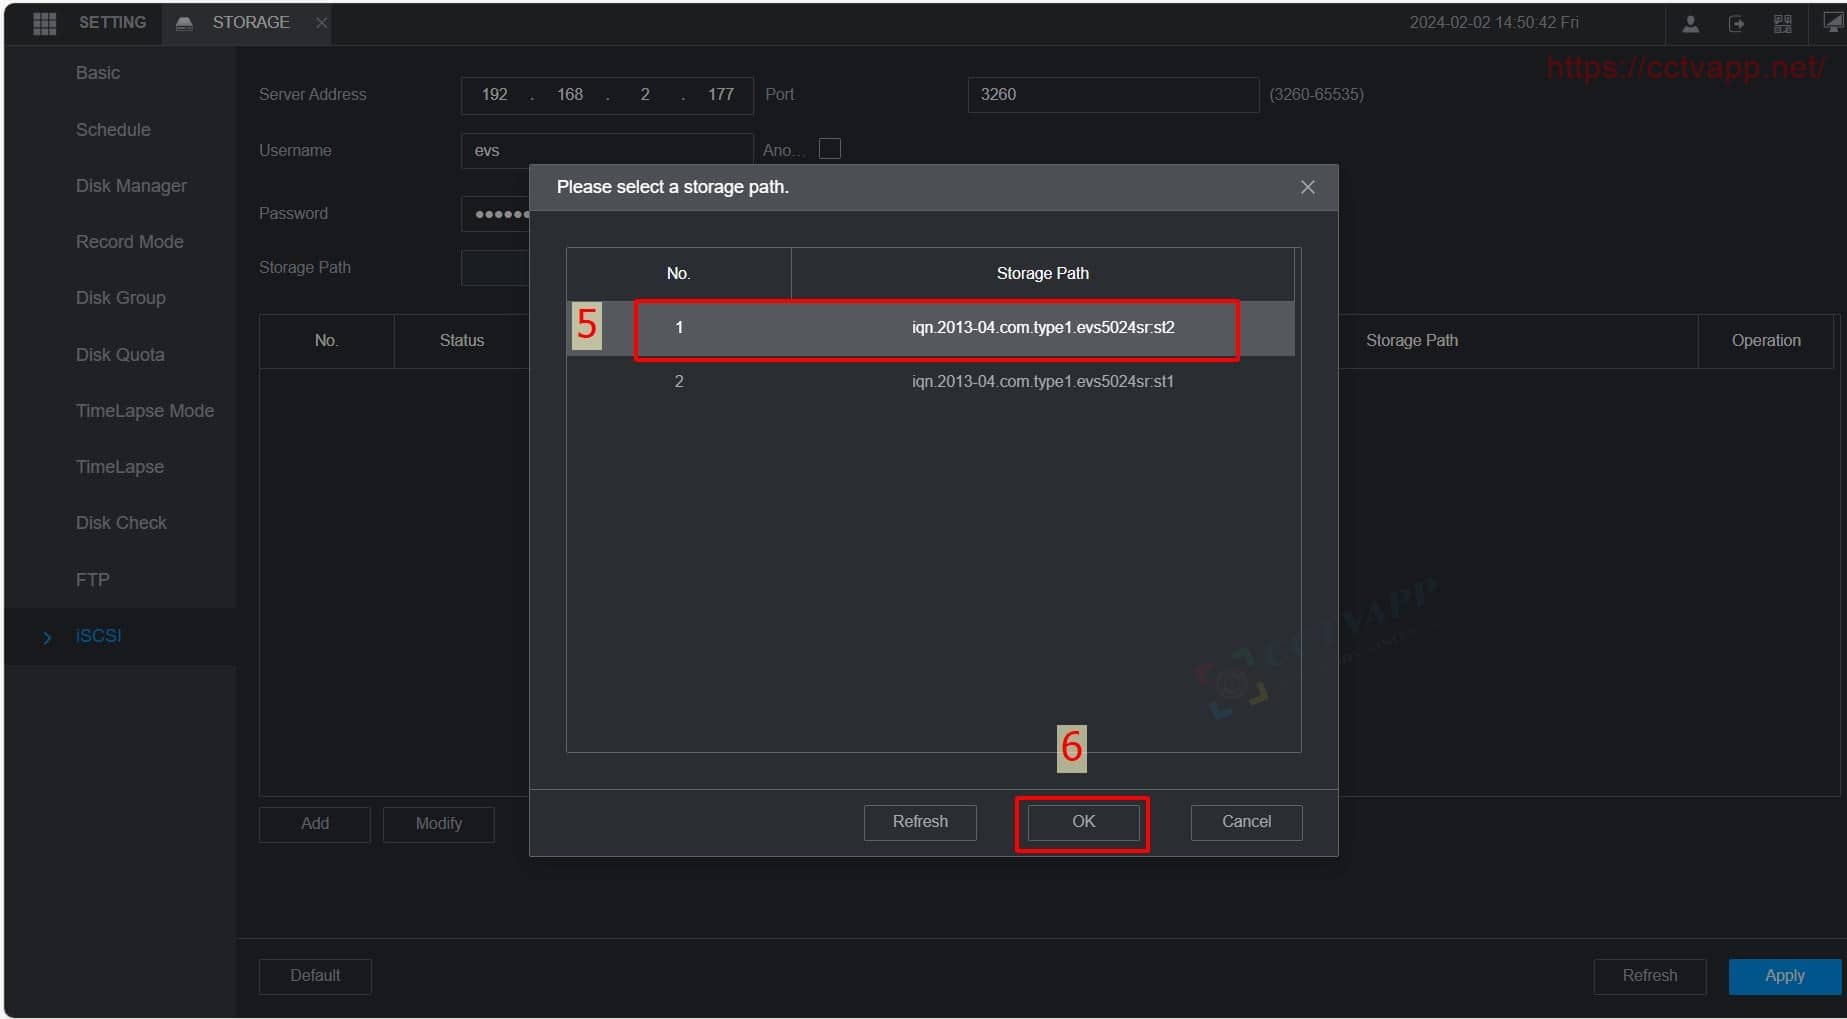
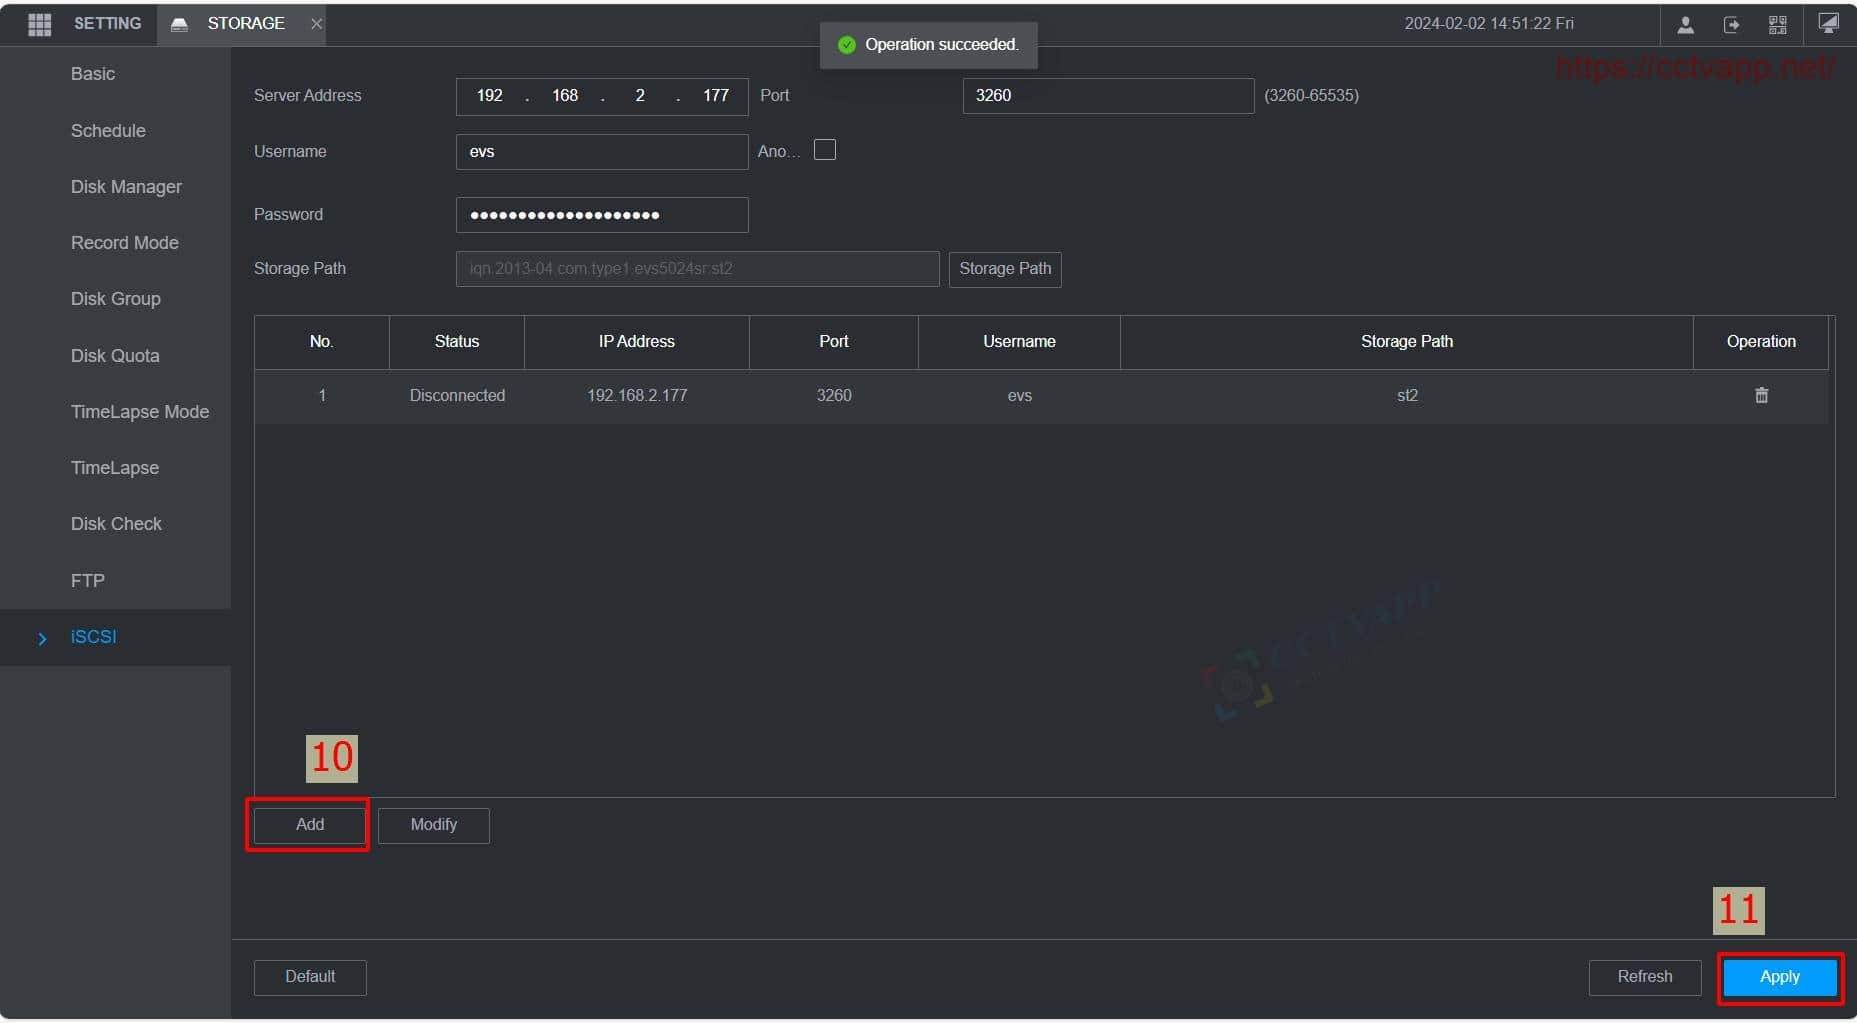
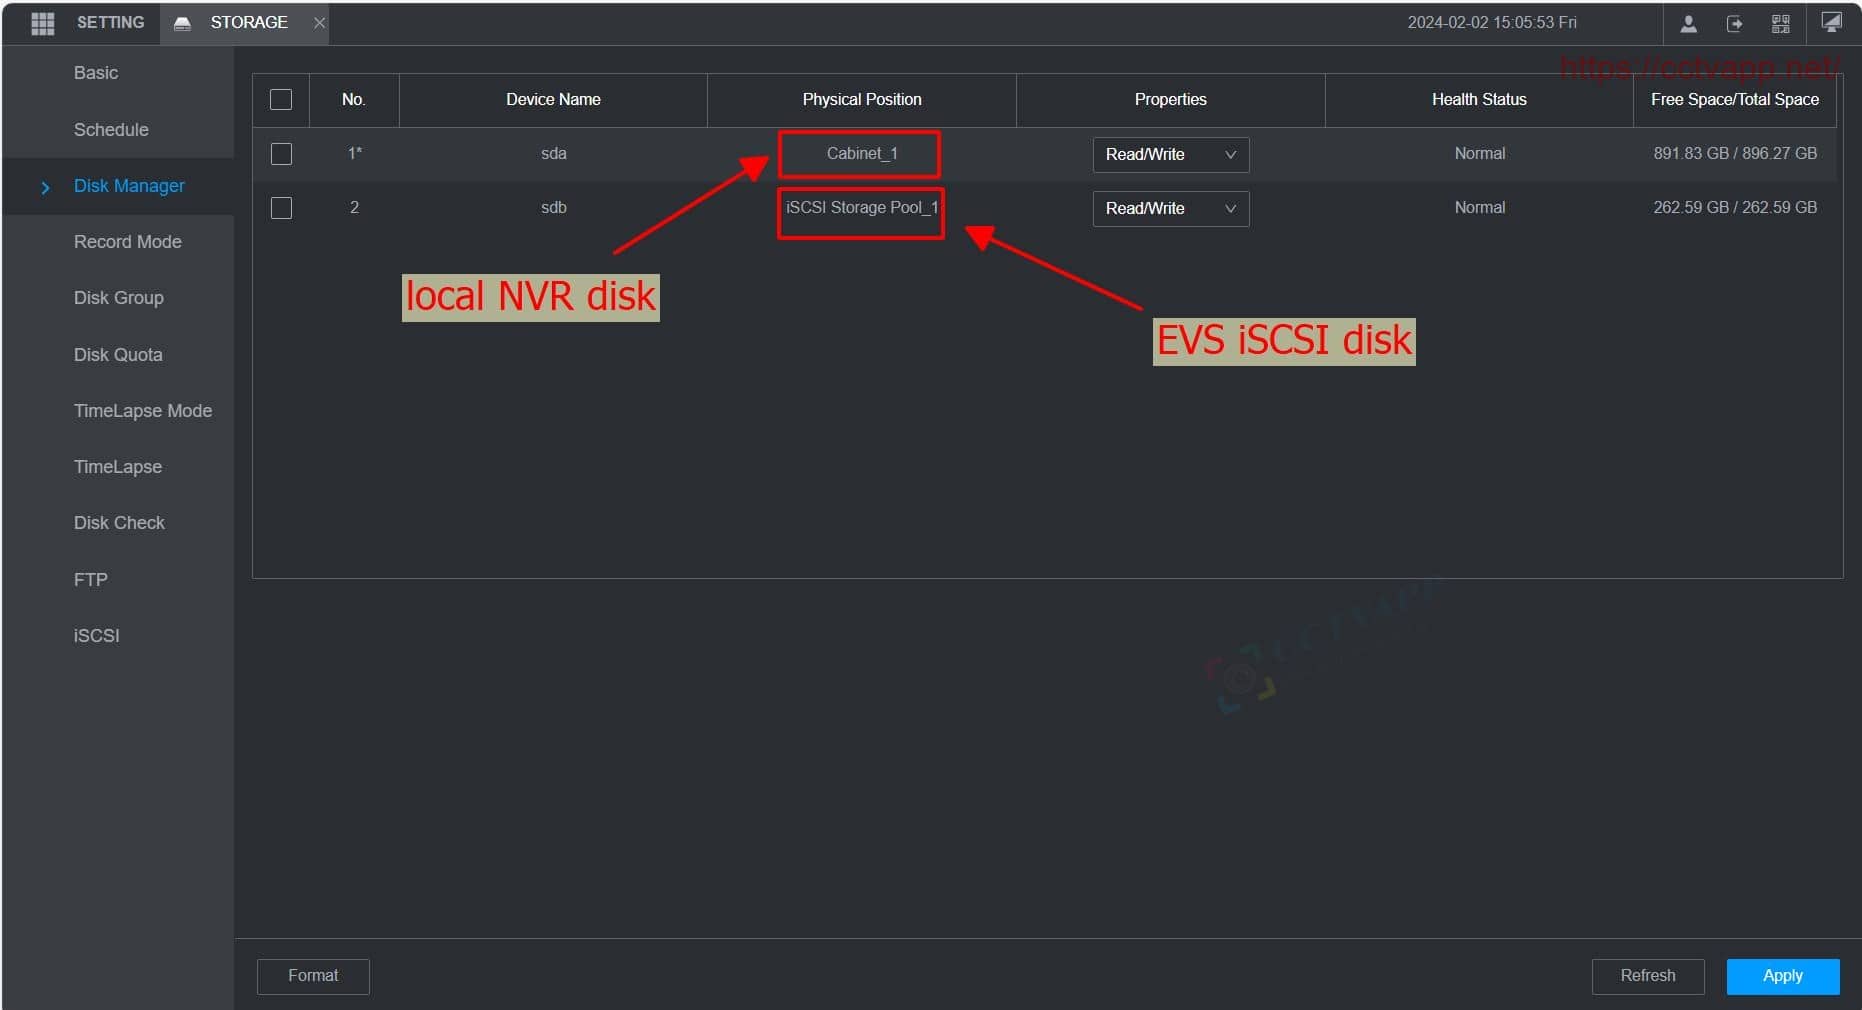
You can log in to the Recoder and establish a connection to the ISCSI network drive just created on EVS as follows:
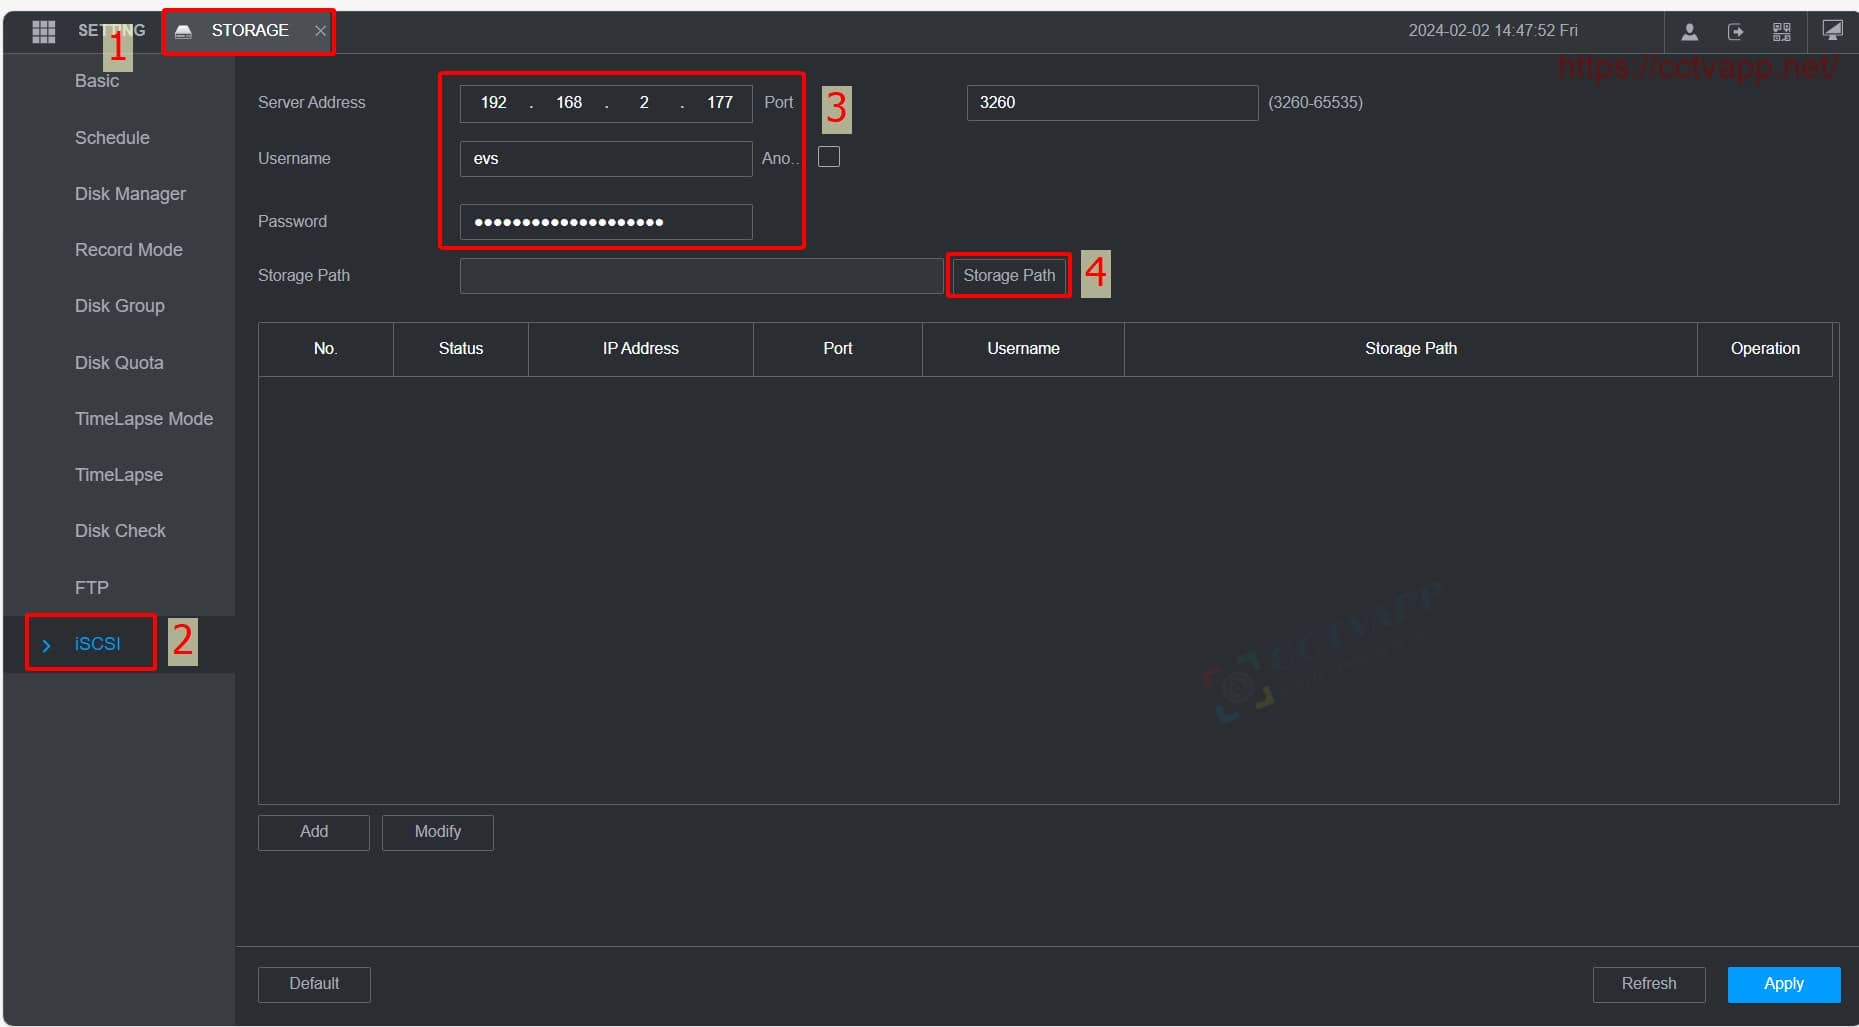
6. Add network storage to EVS with ISCSI
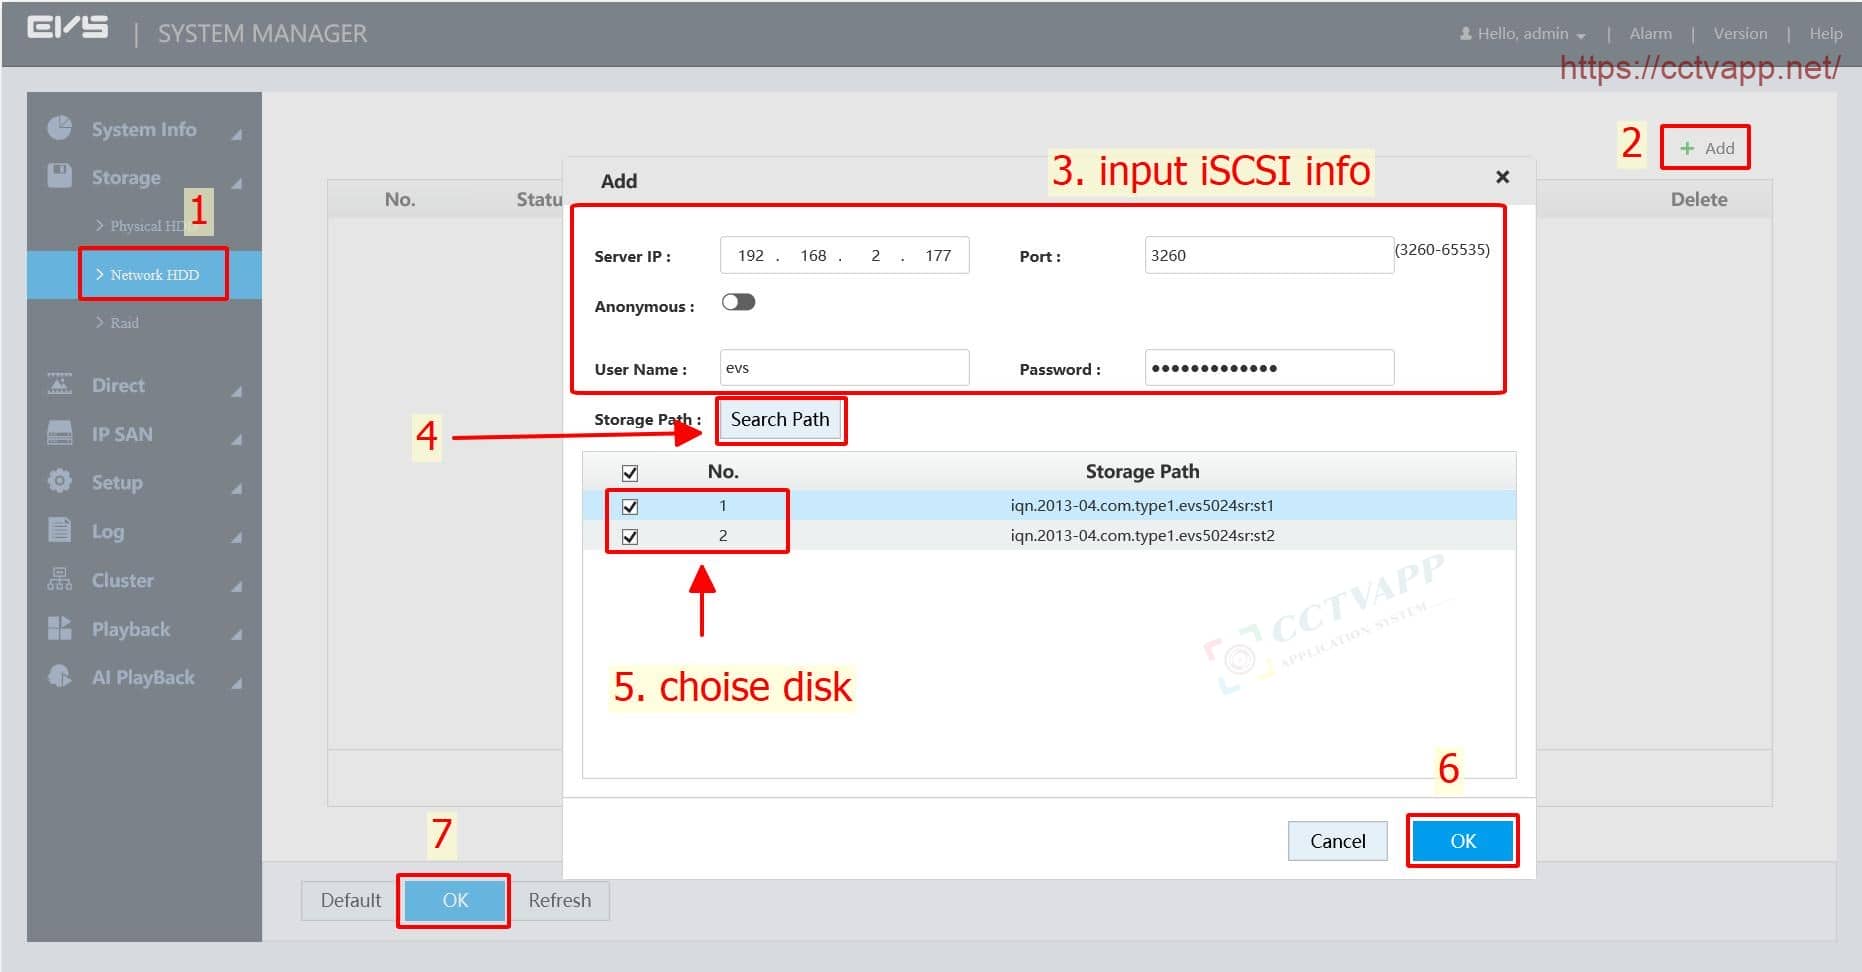
If you already have a network storage device, you can add it to EVS in the following way:
IV. Set up advanced functions
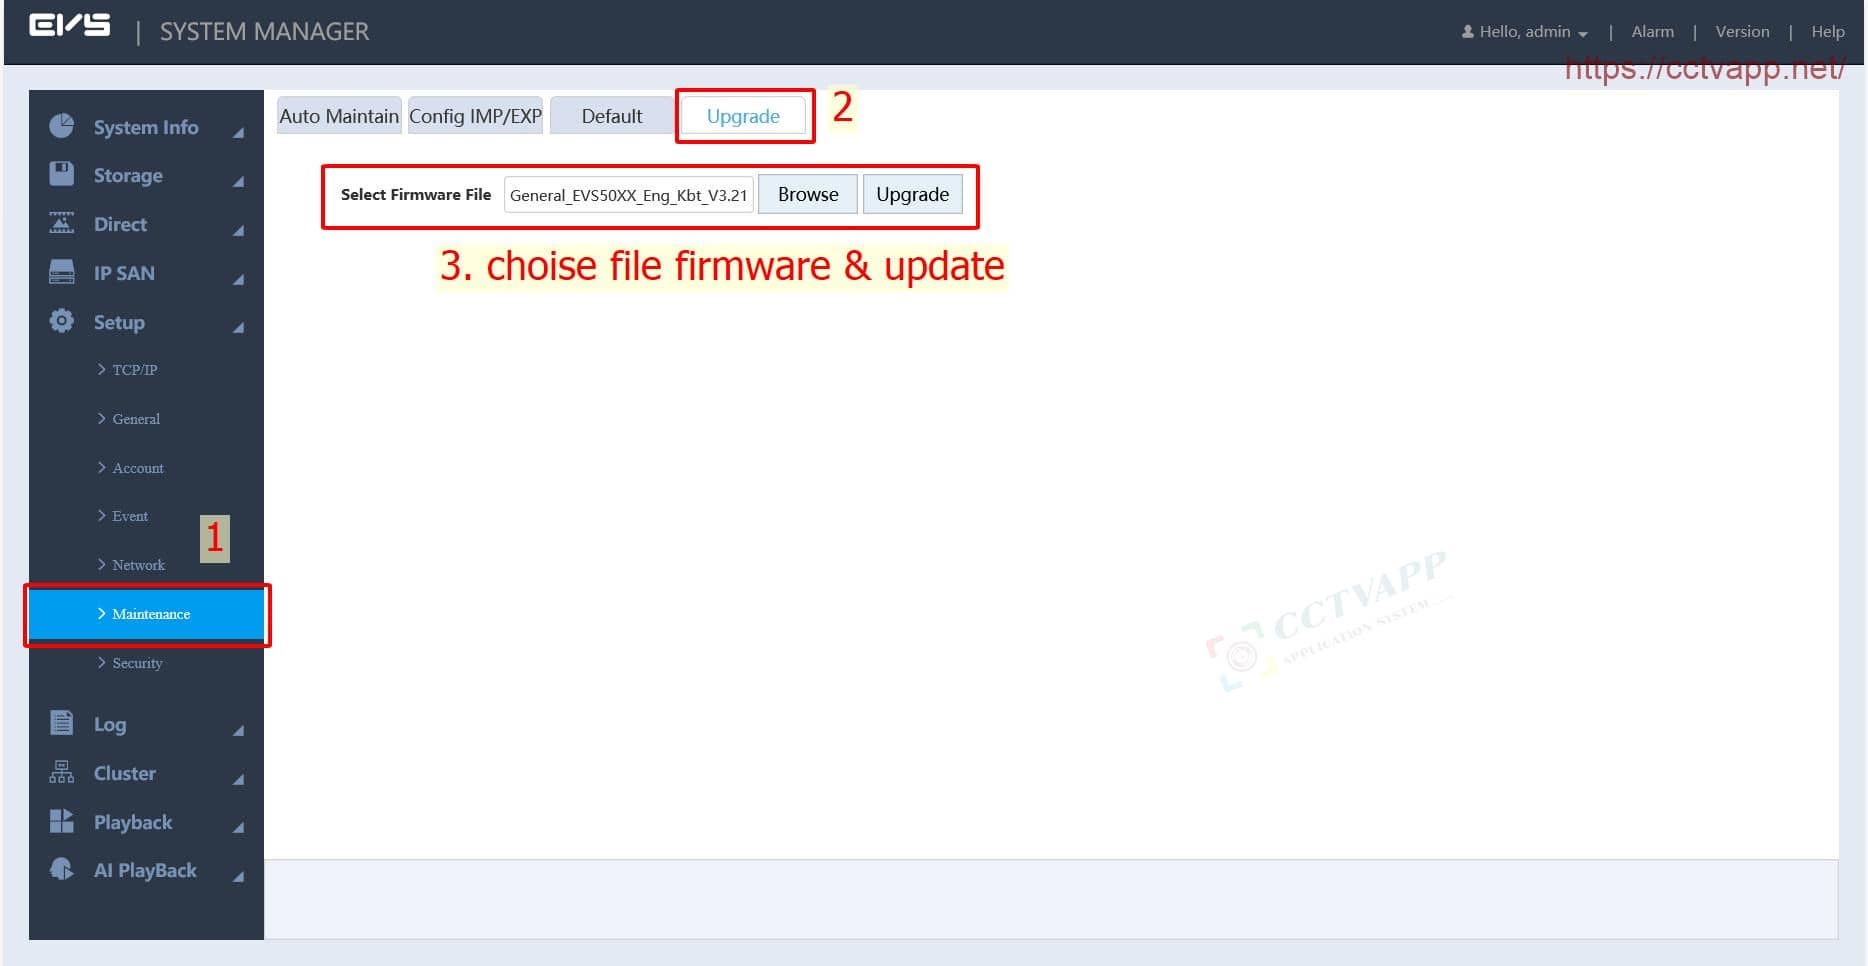
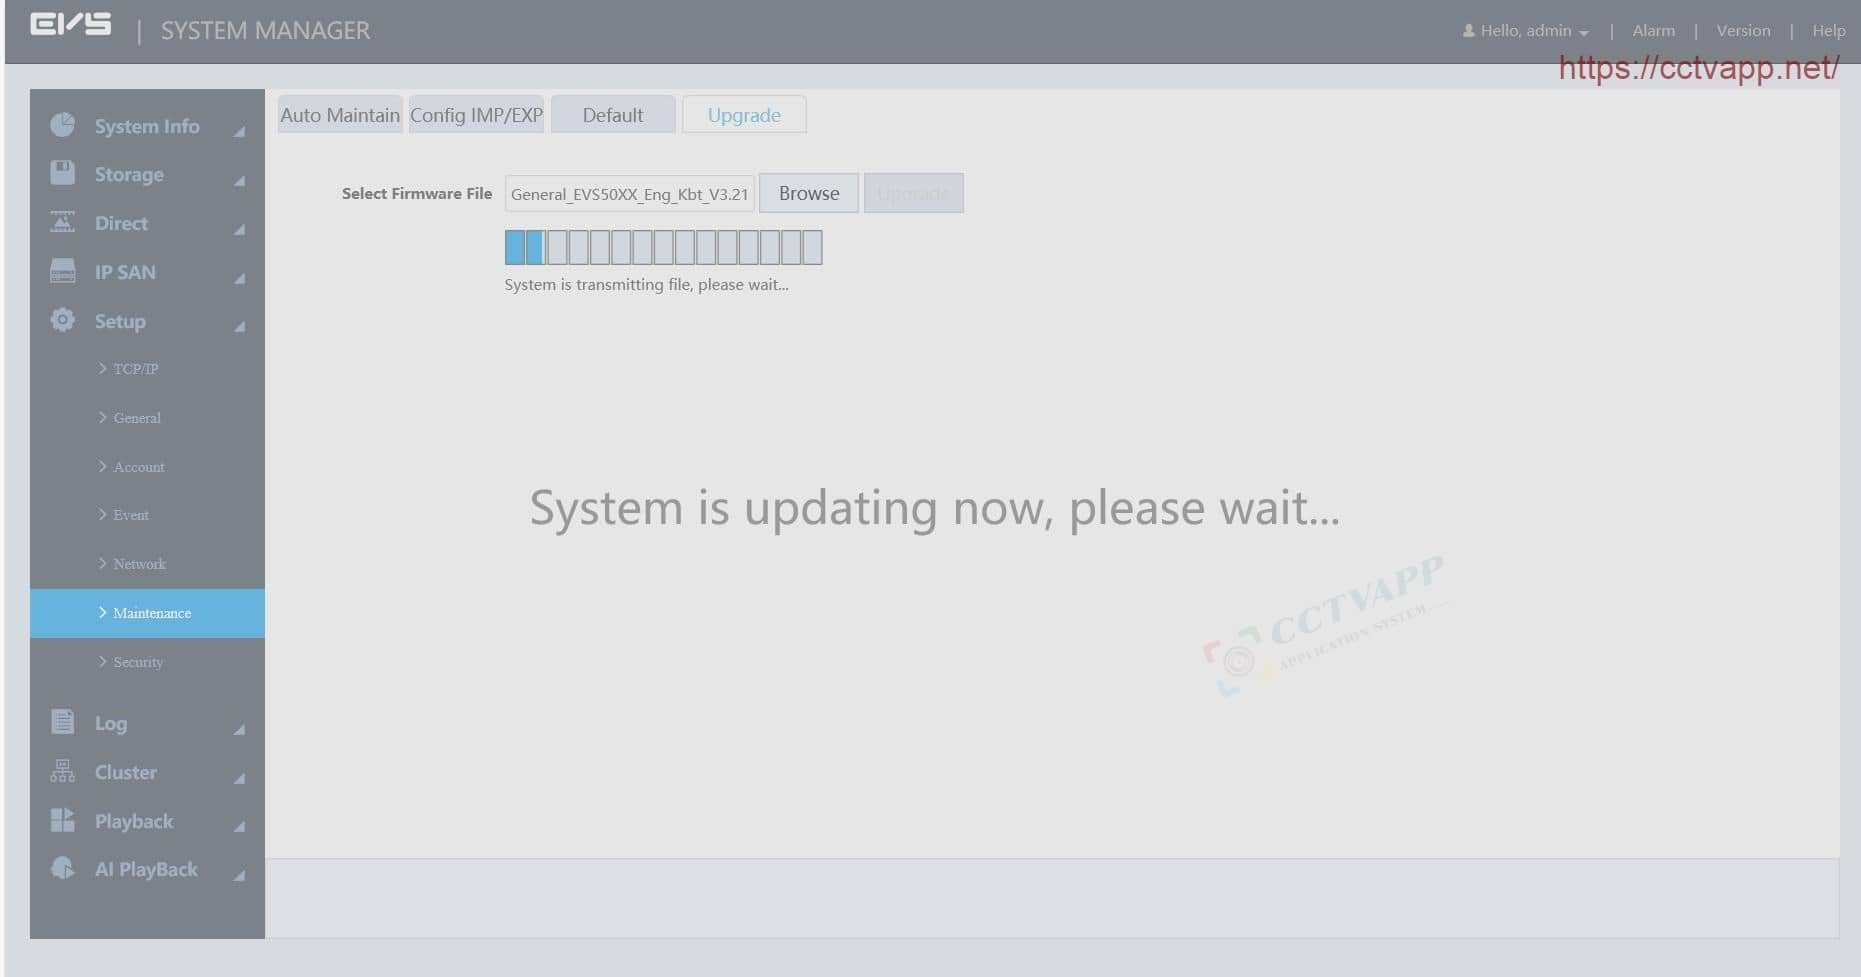
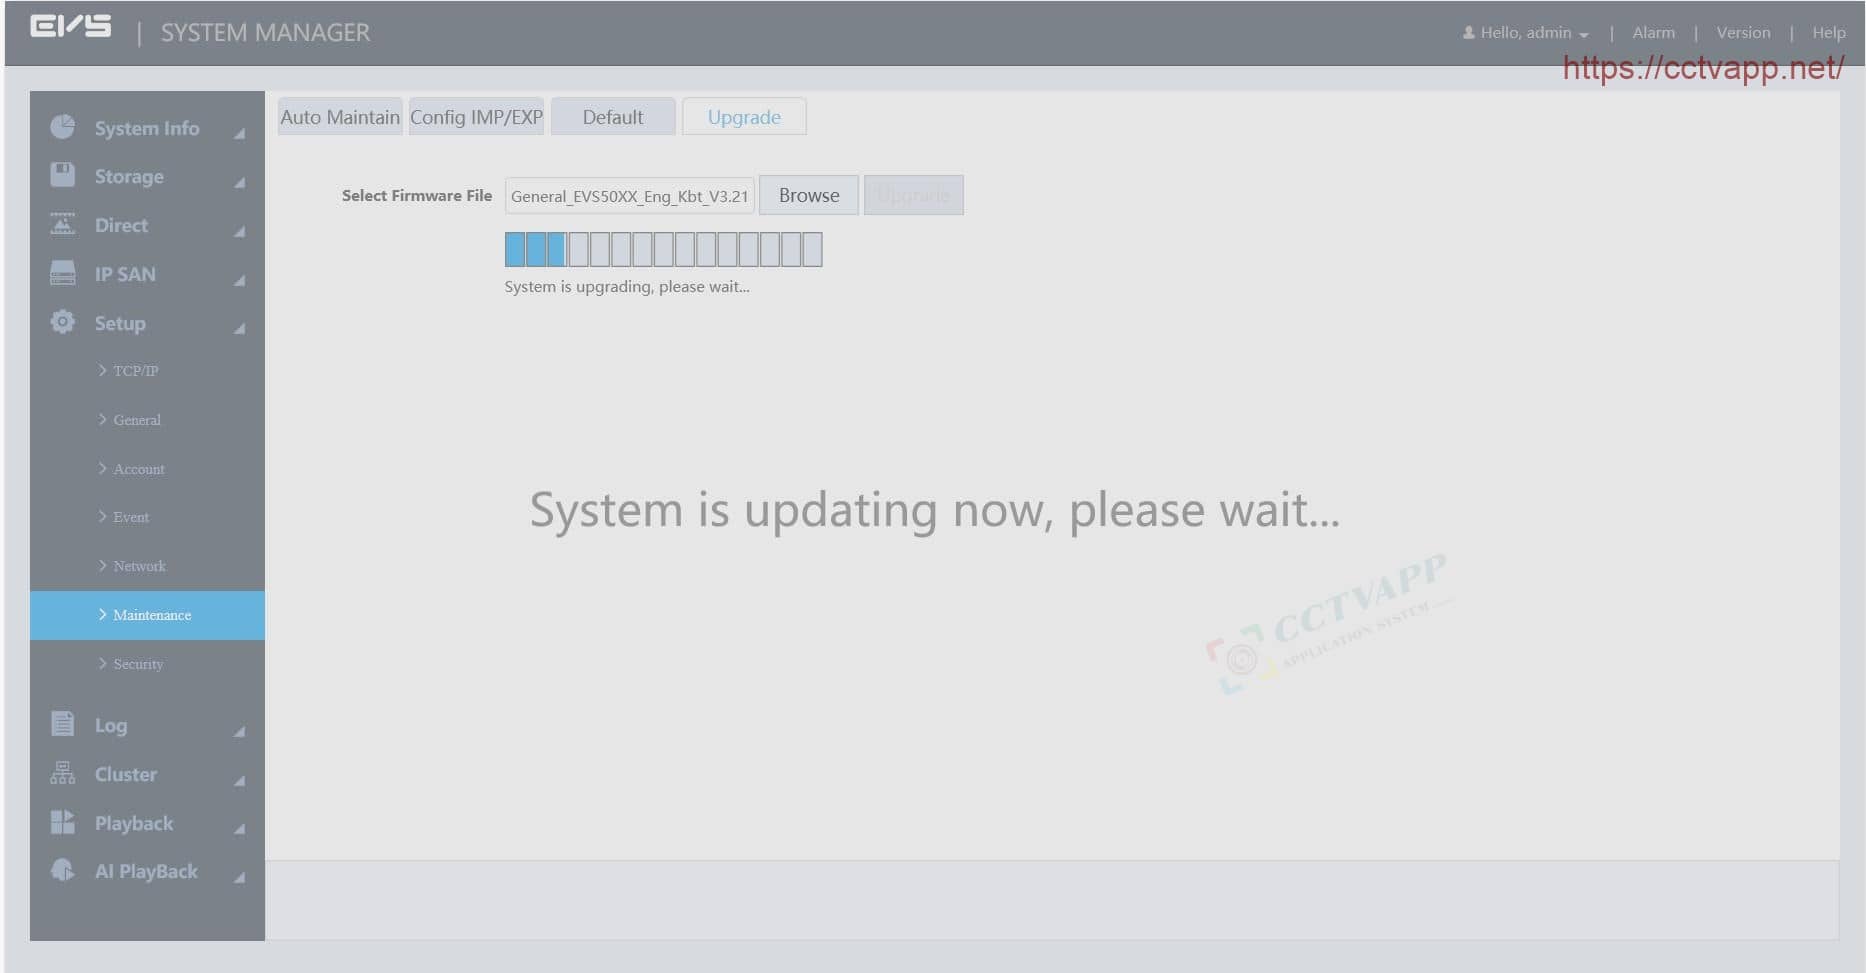
1. Firmware Upgrade
To upgrade Firmware for EVS, proceed as follows:
2. Restore default settings
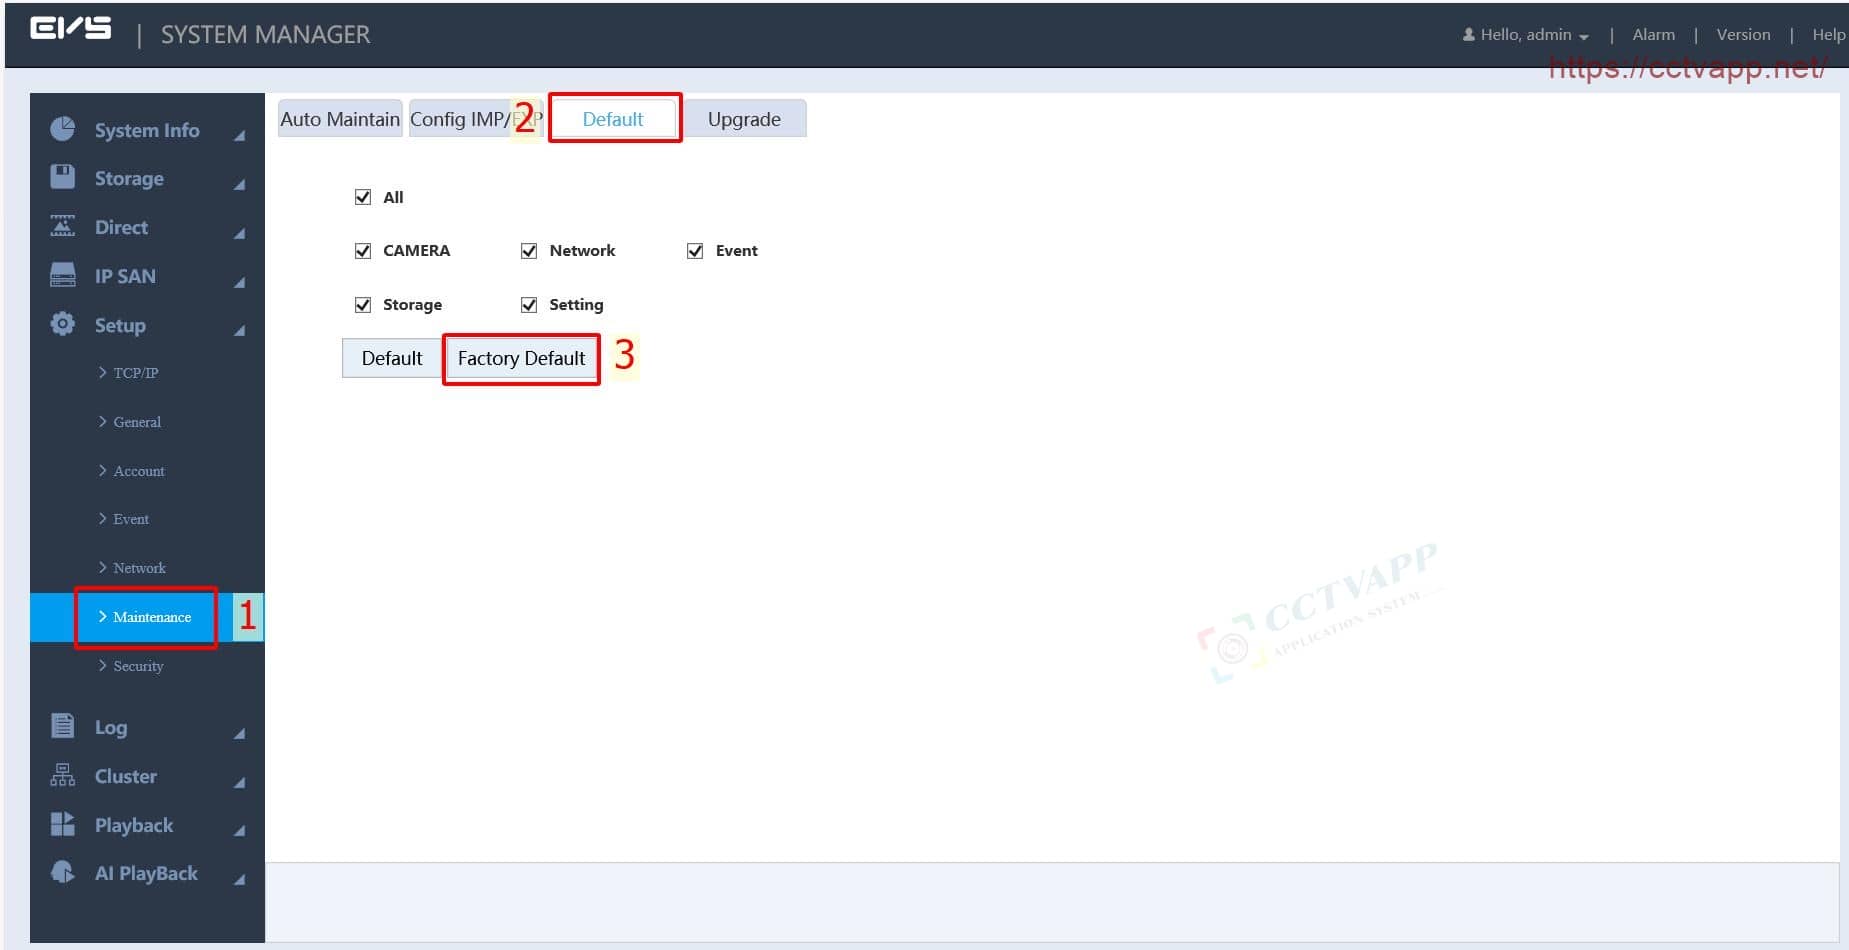
To restore default settings (restore factory settings) for EVS, proceed as follows:
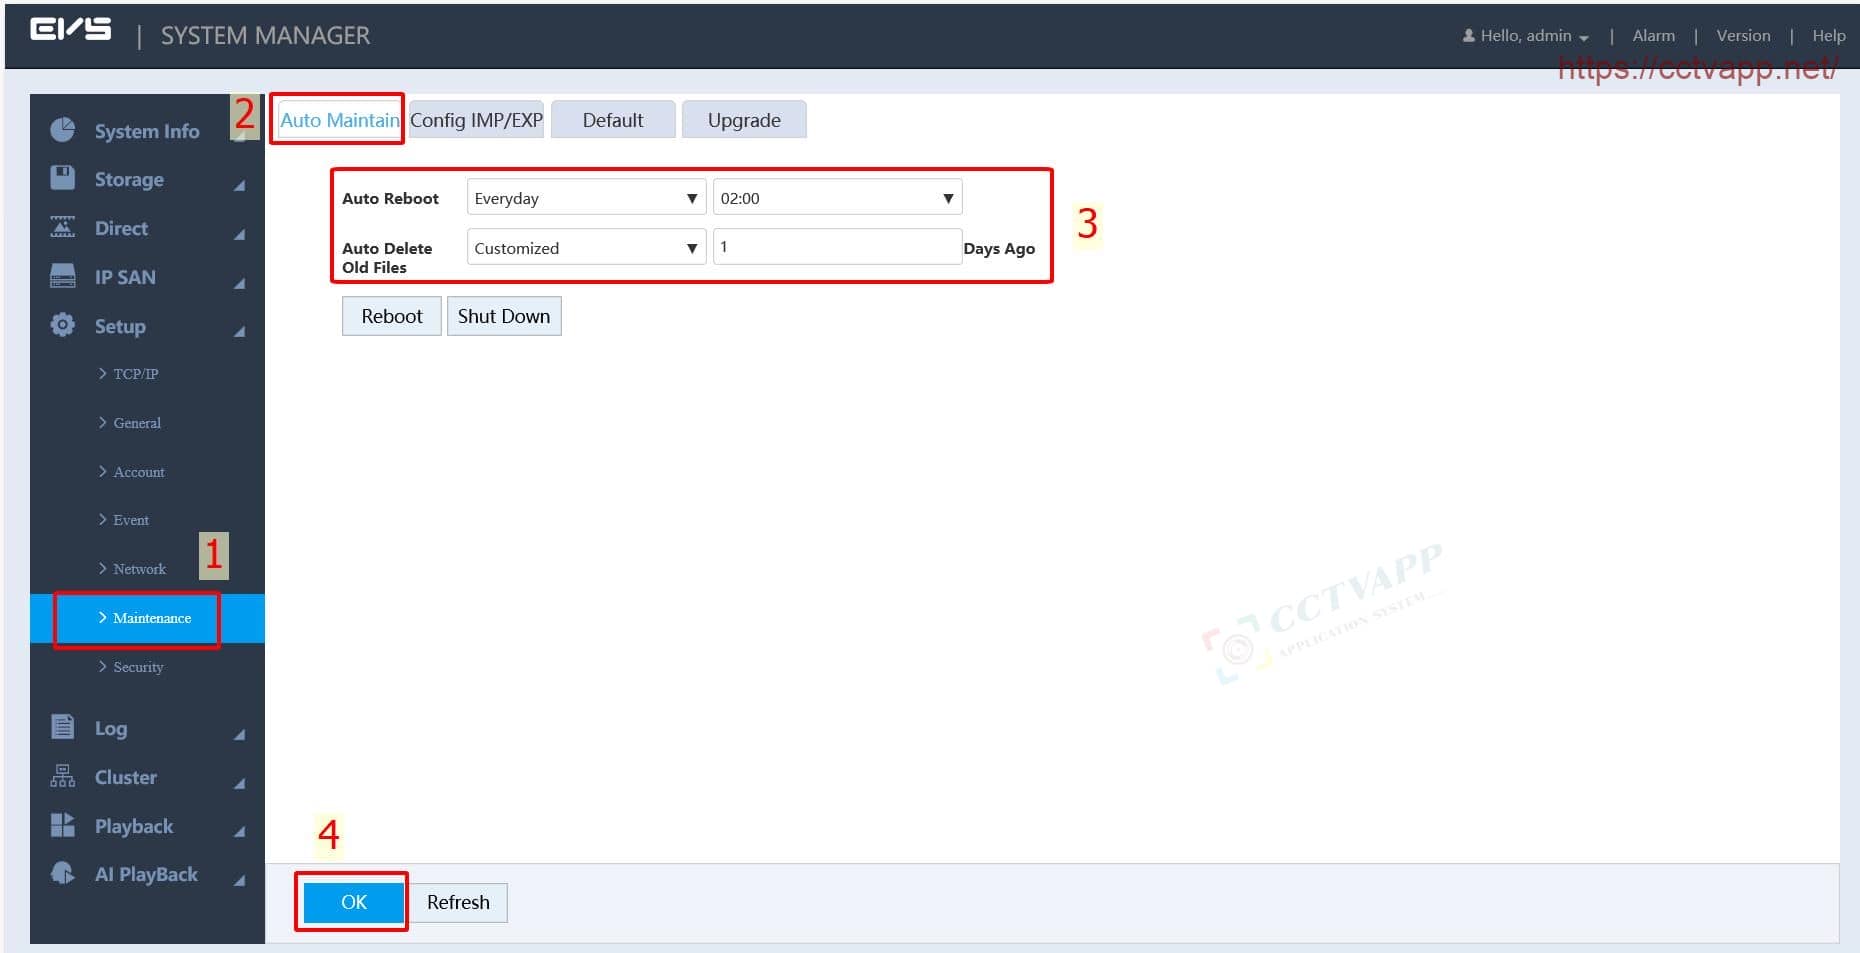
3. Schedule startup, delete data automatically
Manipulate as follows:
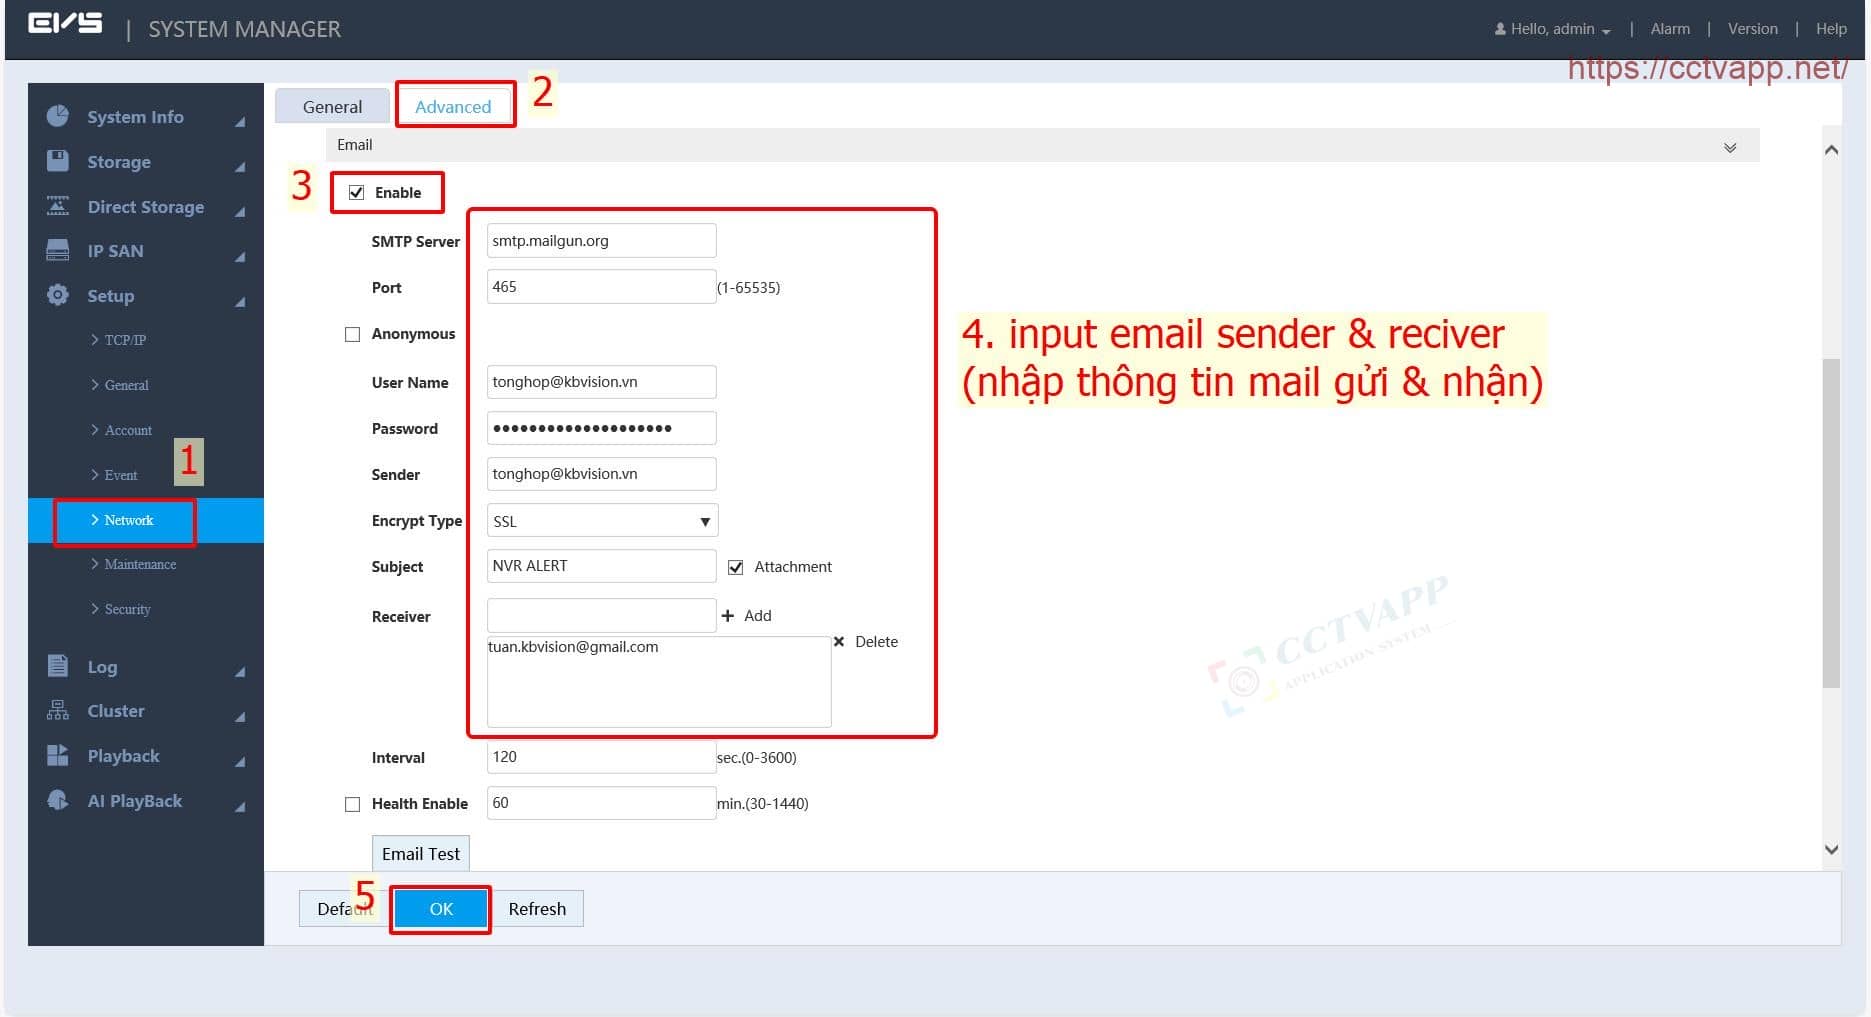
4. Configure Email alarm when an event occurs
First, enter Email Sender configuration information (Email account used to send messages).
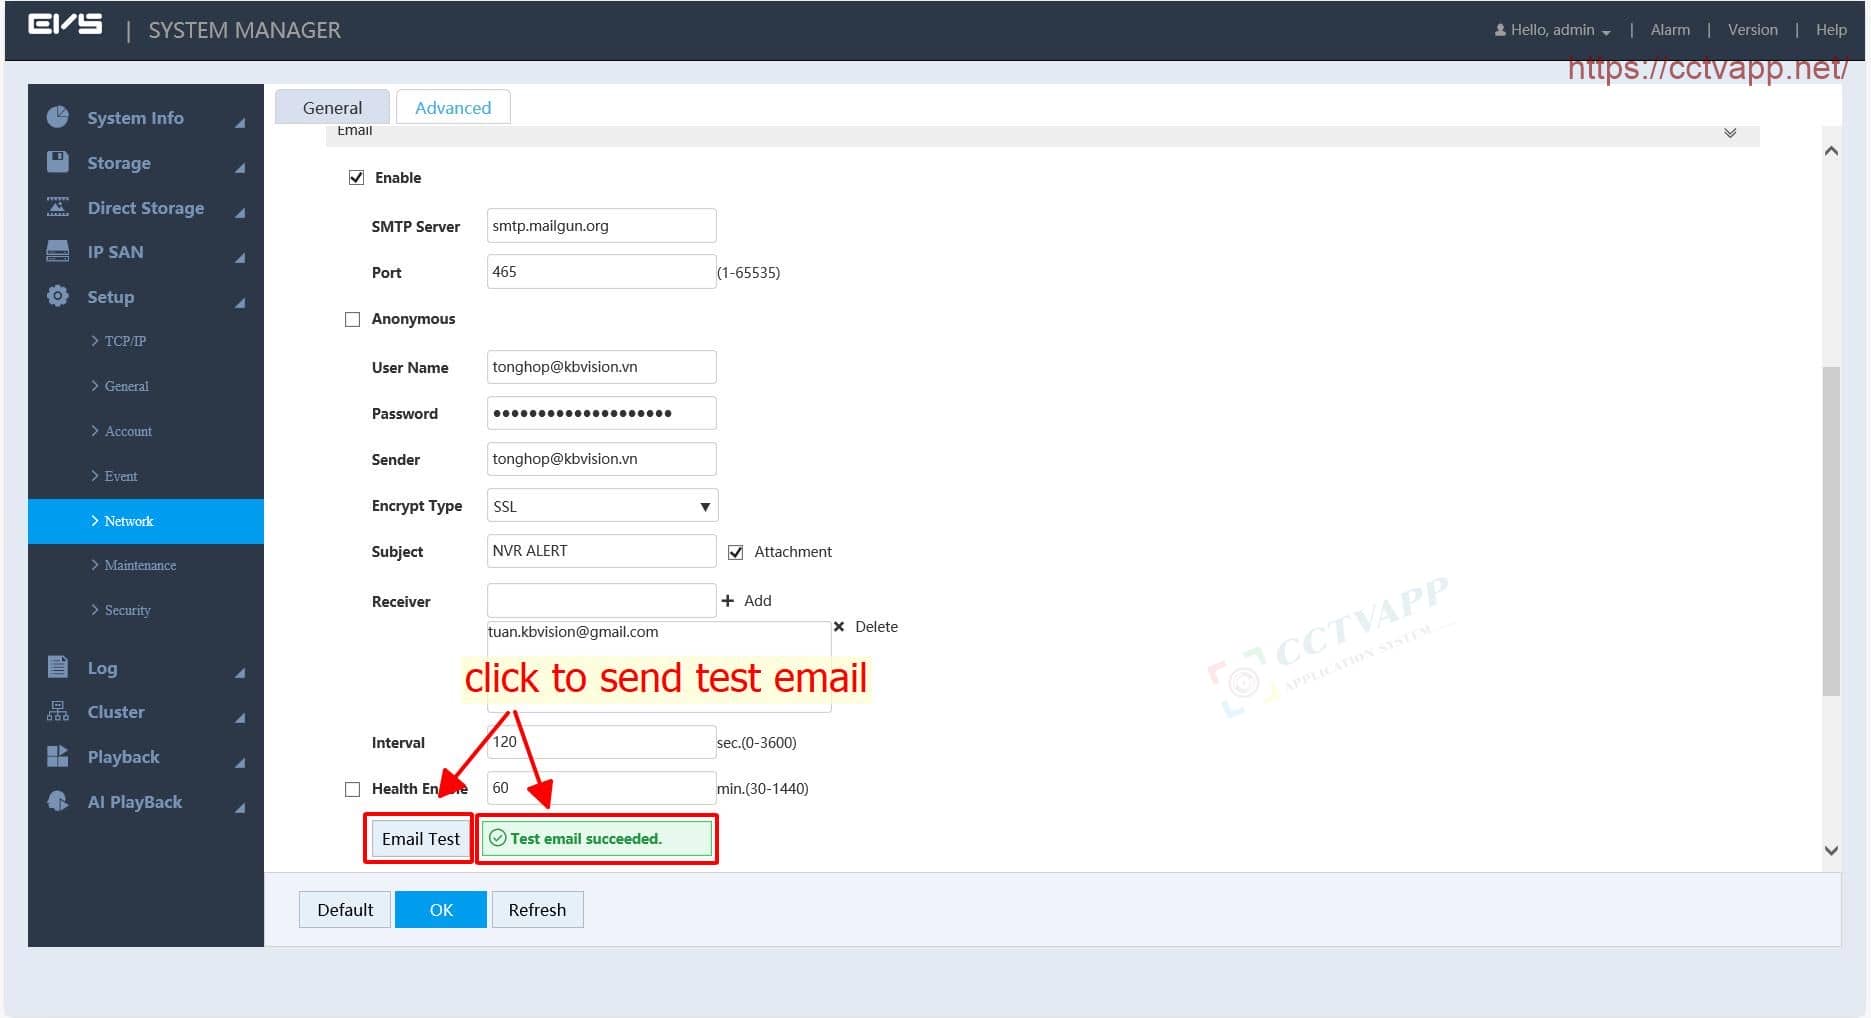

After successfully testing the mail, select the alarm event, then select the Send Email function.
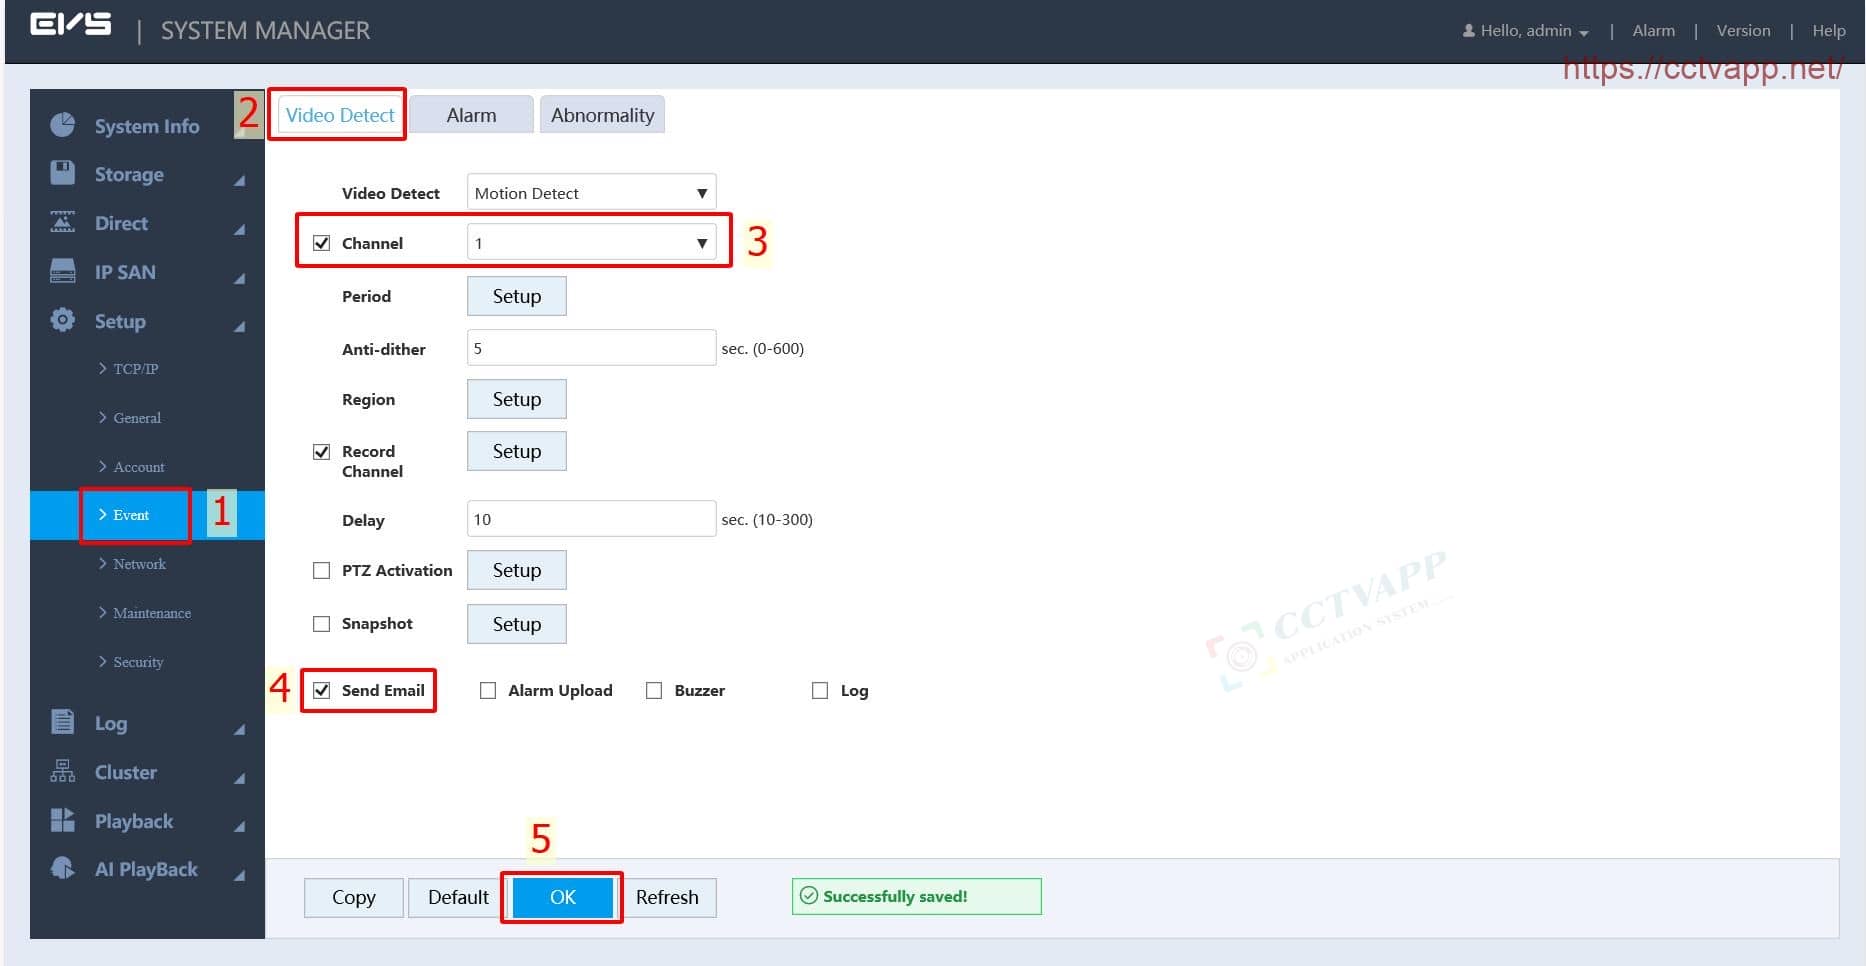
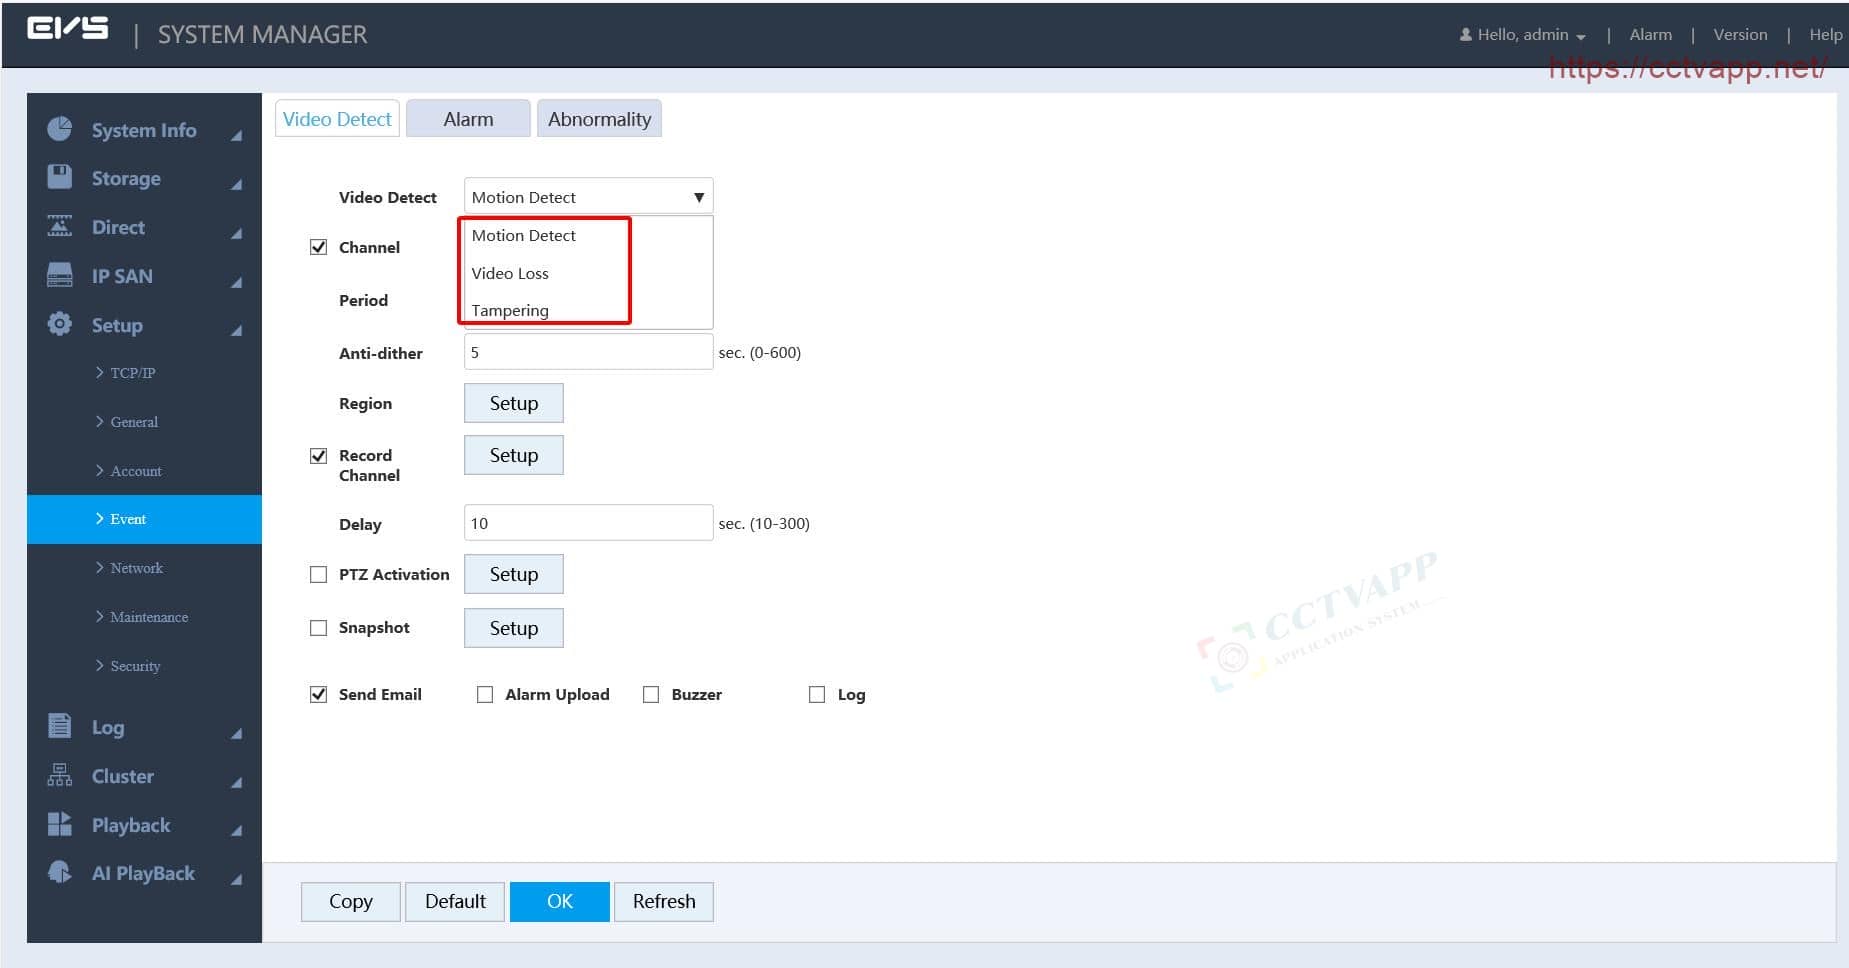
When an alarm event is detected, EVS will send you a warning Email similar to the form below:

Thank you for following the article!!!





 Tiếng Việt